Sony CDX-C910 Operating Instructions - Page 24
Maintenance, Dismounting the unit
 |
View all Sony CDX-C910 manuals
Add to My Manuals
Save this manual to your list of manuals |
Page 24 highlights
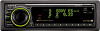
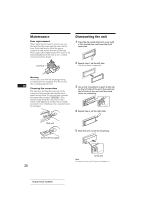
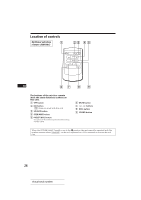
Maintenance Fuse replacement When replacing the fuse, be sure to use one that matches the amperage described on the fuse. If the fuse blows, check the power connection and replace the fuse. If the fuse blows again after replacement, there may be an internal malfunction. In such a case, consult your nearest Sony dealer. Fuse (3 A) Dismounting the unit 1 Press the clip inside the front cover with a thin screwdriver, and lever the front cover free. 2 Repeat step 1 on the left side. The front cover is removed. Warning Never use a fuse with an amperage rating exceeding the one supplied with the unit as this could damage the unit. EN Cleaning the connectors The unit may not function properly if the connectors between the unit and the front panel are not clean. To prevent this, open the front panel by pressing (RELEASE), then detach it and clean the connectors with a cotton swab dipped in alcohol. Do not apply too much force. Otherwise, the connectors may be damaged. 3 Use a thin screwdriver to push in the clip on the left side of the unit, then pull out the left side of the unit until the catch clears the mounting. 4 Repeat step 3 on the right side. Main unit Back of the front panel 5 Slide the unit out of the mounting. 24 Actual total number: Spring lock Note Do not pull out spring lock to prevent damage to it. Sony CDX-C910 (E,S,C) 3-856-715-11 (2)
-
 1
1 -
2
-
3
-
4
-
5
-
6
-
7
-
8
-
9
-
10
-
11
-
12
-
13
-
14
-
15
-
16
-
17
-
18
-
 19
19 -
 20
20 -
 21
21 -
 22
22 -
 23
23 -
 24
24 -
 25
25 -
 26
26 -
 27
27 -
 28
28 -
 29
29 -
30
-
31
-
32
-
33
-
34
-
35
-
36
-
37
-
38
-
39
-
40
-
41
-
42
-
43
-
44
-
45
-
46
-
47
-
48
-
49
-
50
-
51
-
52
-
53
-
54
-
55
-
56
-
57
-
58
-
59
-
60
-
61
-
62
 |
 |
