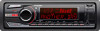
Sony CDX-GT660UP Operating Instructions
Sony CDX-GT660UP Manual
 |
View all Sony CDX-GT660UP manuals
Add to My Manuals
Save this manual to your list of manuals |
Sony CDX-GT660UP manual content summary:
- Sony CDX-GT660UP | Operating Instructions - Page 1
Operating Instructions US Mode d'emploi FR Owner's Record The model and serial numbers are located on the bottom of the unit. Record the serial number in the space provided below. Refer to these numbers whenever you call upon your Sony dealer regarding this product. Model No. CDX-GT660UP Serial - Sony CDX-GT660UP | Operating Instructions - Page 2
. www.siriusxm.com. Sirius, XM and all related marks and logos are trademarks of Sirius XM Radio Inc. and its subsidiaries. All other marks and logos are the property of their respective owners. All rights reserved. ZAPPIN and Quick-BrowZer are trademarks of Sony Corporation. 12 TONE ANALYSIS - Sony CDX-GT660UP | Operating Instructions - Page 3
trademarks of Pandora Media, Inc., used with permission. Note on the lithium battery Do not expose the battery to excessive heat such as direct sunlight, fire or the like. Warning if your car's ignition has no ACC position Be sure to set the Auto Off function (page 24). The unit will shut off - Sony CDX-GT660UP | Operating Instructions - Page 4
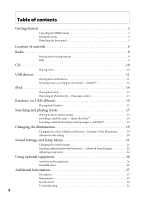
the DEMO mode 5 Setting the clock 5 Detaching the front panel 5 Location of controls 6 Radio 9 Storing and receiving stations 9 RDS 9 CD 10 Playing a disc 10 USB devices 11 Playing back a USB device 11 Enjoying music according to your mood - SensMe 12 iPod 14 Playing back iPod 14 - Sony CDX-GT660UP | Operating Instructions - Page 5
and hold the select button. The setup display appears. 2 Rotate the control dial until "DEMO" appears, then press it. 3 Rotate the control dial to select "DEMO-OFF," then press it. The setting is complete. 4 Press (BACK). The display returns to normal reception/ play mode. Setting the clock The - Sony CDX-GT660UP | Operating Instructions - Page 6
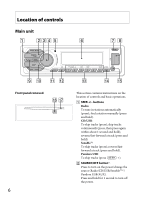
Main unit Front panel removed 6 This section contains instructions on the location of controls and basic operations. SEEK +/- buttons Radio: To tune in stations automatically (press); find a station manually (press and hold). CD/USB: To skip tracks (press); skip tracks continuously (press - Sony CDX-GT660UP | Operating Instructions - Page 7
control/enter the bookmark mode (Pandora USB). ZAP button page 19 To enter ZAPPIN™ mode. COLOR button page 19 To select the preset colors (press); register custom color settings (press and hold). PTY/CAT*3 button page 9, 26 To select PTY in RDS. Number buttons Radio: To receive stored - Sony CDX-GT660UP | Operating Instructions - Page 8
control Radio/CD/USB/SensMe™/ Pandora USB, the same as on the unit. Setup, sound setting, etc., can be operated by . (BACK) button ENTER button To apply a setting. PTY button VOL (volume) +*3/- button ATT (attenuate) button To attenuate the sound. To cancel, press again. MODE button - Sony CDX-GT660UP | Operating Instructions - Page 9
, FM3, AM1 or AM2. 2 Press and hold the select button. The setup display appears. 3 Rotate the control dial until "BTM" appears, then press it. The unit stores stations in order of frequency on the number buttons. Storing manually 1 While receiving the station that you want to store, press and hold - Sony CDX-GT660UP | Operating Instructions - Page 10
a different radio program from the one you select. Setting CT (Clock Time) The CT data from the RDS transmission sets the clock. 1 Set "CT-ON" in setup (page 24). Note The CT function may not work properly even though an RDS station is being received. CD Playing a disc This unit can play CD-DA - Sony CDX-GT660UP | Operating Instructions - Page 11
a USB device 1 Slide the USB cover, then connect the USB device to the USB connector with its USB cable. Notes • Do not use USB devices USB device, recording format and settings. Press Notes • The maximum number of displayable data is as follows. - folders (albums): 128 - files (tracks) per folder - Sony CDX-GT660UP | Operating Instructions - Page 12
Setup" and "Content Transfer" software from the support site. 2 Install the software in your computer. For more details on the installation, visit http://esupport.sony.com or http://www.sony.com/mobileAV Registering a USB device using "SensMe™ Setup" USB device registration is required to enable the - Sony CDX-GT660UP | Operating Instructions - Page 13
until the desired track appears, then press the control dial. Note If the connected USB device contains many tracks, it may take time MIDNIGHT (12:00 AM - 4:59 AM) Tracks recommended for each time of day. Set the clock (page 5) for the channel to be displayed accurately. SHUFFLE ALL: Plays all - Sony CDX-GT660UP | Operating Instructions - Page 14
or visit the support site on the back cover. Playing back iPod Before connecting the iPod, turn down the volume of the unit. 1 Slide the USB cover, then connect the iPod to the USB connector with the USB connection cable for iPod (not supplied)*. * Using the RC-100IP USB connection cable for iPod is - Sony CDX-GT660UP | Operating Instructions - Page 15
you will be able to operate the iPod directly. To exit the passenger control, press and hold Then "MODE AUDIO" will appear and the play mode will change to iPod mode. Note The volume can be adjusted only by the unit. Pandora® via USB (iPhone) Pandora Radio is available to stream music through your - Sony CDX-GT660UP | Operating Instructions - Page 16
connection. Bookmarking The song or artist currently being played can be bookmarked and stored in your Pandora account. 1 During playback, press and hold until "BOOKMARK" appears. 2 Rotate the control dial to select "TRK" (Track) or "ART" (Artist), then press it. Station list The station list - Sony CDX-GT660UP | Operating Instructions - Page 17
, press (REP) or (SHUF) repeatedly until the desired play mode appears. Playback in selected play mode may take time to start. Repeat play Select TRACK ALBUM PODCAST*1 ARTIST*1 random order. SHUF OFF track in normal order (Normal play). *1 iPod only *2 CD only *3 USB and iPod only 17 - Sony CDX-GT660UP | Operating Instructions - Page 18
list (USB only). 2 Rotate the control dial to select the desired search category, then press it to confirm. 3 Repeat step 2 until the desired track is selected. Playback starts. To exit the Quick-BrowZer mode, press (BROWSE). Note When entering the Quick-BrowZer mode, the repeat/shuffle setting is - Sony CDX-GT660UP | Operating Instructions - Page 19
: RAINBOW, OCEAN, SUNSET, FOREST, RANDOM. 1 Press 2 Rotate the control dial to select the desired preset color, then press it. The display returns to normal reception/ play mode. Note If the control dial is rotated rapidly, the color of the display and the buttons may change too quickly. 19 - Sony CDX-GT660UP | Operating Instructions - Page 20
4 Rotate the control dial to adjust the color range, then press it. Adjustable color range: "0" - "32." You cannot set "0" for all color ranges. 5 Press (BACK). Changing DAY/NIGHT color mode You can set a different color for DAY/ NIGHT depending on the DIMMER setting. Color mode DAY NIGHT DIMMER - Sony CDX-GT660UP | Operating Instructions - Page 21
Menu You can display the menu more clearly (White) without concern for color setting. 1 Press and hold the select button. The setup display appears. 2 Rotate the control dial until "WHITE MENU" appears, then press it. 3 Rotate the control dial to select "WHITE-ON," then press it. 4 Press (BACK). To - Sony CDX-GT660UP | Operating Instructions - Page 22
"CUSTOM" of EQ7 allows you to make your own equalizer settings. 1 Select a source, then press the select button. 2 Rotate the control dial until "EQ7 SETTING" appears, then press it. 3 Rotate the control dial until "BASE" appears, then press it. You can select an equalizer curve as a basis for - Sony CDX-GT660UP | Operating Instructions - Page 23
simulate a natural sound field by delaying the sound output from each speaker to suit your position. The options for "POSITION" are indicated below setting. 1 During reception/playback, press the select button. 2 Rotate the control dial until "ADJUST POS" appears, then press it. 3 Rotate the control - Sony CDX-GT660UP | Operating Instructions - Page 24
the bass sound by applying the low pass filter setting (page 25) to the rear speakers. This function allows the rear speakers to work as a subwoofer if one is not connected. 1 During reception/playback, press the select button. 2 Rotate the control dial until "REARBAS ENH" appears, then press it - Sony CDX-GT660UP | Operating Instructions - Page 25
function. - "ZAP.TIME-1 (about 6 seconds)," "ZAP.TIME-2 (about 15 seconds)," "ZAP.TIME-3 (about 30 seconds)." ZAPPIN BEEP Has the beep sound between track passages: "ON," "OFF." LPF FREQ (Low Pass Filter Frequency) Selects the subwoofer cut-off frequency: "50Hz," "60Hz," "80Hz," "100Hz," "120Hz - Sony CDX-GT660UP | Operating Instructions - Page 26
listen on your car speakers. Connecting the portable audio radio (Sirius and XM subscriptions sold separately). For more details on the services, visit the following web site: http://www.siriusxm.com/ Selecting channels 1 During playback, press (BROWSE) to enter the browse mode. 2 Rotate the control - Sony CDX-GT660UP | Operating Instructions - Page 27
then press the control dial. Displaying the SiriusXM Radio ID 1 During playback, press (BROWSE) to enter the browse mode. 2 Rotate the control dial to select designed to play back discs that conform to the Compact Disc (CD) standard. DualDiscs and some of the music discs encoded with copyright protection - Sony CDX-GT660UP | Operating Instructions - Page 28
of this device or its compliance with safety and regulatory standards. Please note that the use of this accessory with iPod or iPhone may affect wireless performance. If you have any questions or problems concerning your unit that are not covered in this manual, consult your nearest Sony dealer. 28 - Sony CDX-GT660UP | Operating Instructions - Page 29
When the battery becomes weak, the range of the remote commander becomes shorter. Replace the battery with a new dry cloth to assure a good contact. • Be sure to observe the correct polarity when installing the battery. • Do not hold the battery with metallic tweezers, otherwise a short-circuit may - Sony CDX-GT660UP | Operating Instructions - Page 30
AU CANADA, Y Remote commander: RM-X211 Parts for installation and connections (1 set) Optional accessories/equipment: USB connection cable for iPod: RC-100IP USB port OS Windows XP, Windows Vista, Windows 7 For details on compatible editions or Service Pack, visit the support site on the - Sony CDX-GT660UP | Operating Instructions - Page 31
Troubleshooting The following checklist will help you remedy problems the installation/connections manual supplied with this unit. If the problem is not solved, visit the support position of the fader control "FADER" is not set for a 2-speaker system. No beep sound. The beep sound is canceled - Sony CDX-GT660UP | Operating Instructions - Page 32
Off function activates after turning off the unit. - Turn off the unit. Radio reception The stations cannot be received. The sound is hampered by noises. The connection is not correct. - Connect a power antenna (aerial) control lead (blue) or accessory power supply lead (red) to the power supply - Sony CDX-GT660UP | Operating Instructions - Page 33
the disc. FAILURE The connection of speakers/amplifiers is incorrect. - See the installation/connections manual of this model to check the connection. HUBS NO SUPRT (Hubs Not Supported) USB hub is not supported on this unit. INVALID The connected USB device does not contain a music file for - Sony CDX-GT660UP | Operating Instructions - Page 34
of your USB device, visit the support site. " " or " " During reverse or fast-forward, you have reached the beginning or the end of the disc and you cannot go any further. "" The character cannot be displayed with the unit. For Pandora Radio: OPEN APP Pandora does not start - Sony CDX-GT660UP | Operating Instructions - Page 35
channel is locked by the parental control function. CH UNAVAIL (Channel Unavailable button. If these solutions do not help improve the situation, consult your nearest Sony dealer. If you take the unit to be repaired because of CD playback trouble, bring the disc that was used at the time the problem - Sony CDX-GT660UP | Operating Instructions - Page 36
Sirius XM Radio Inc. et de ses filiales. Les autres marques et logos sont la propriété de leurs détenteurs respectifs. Tous droits réservés. ZAPPIN et Quick-BrowZer sont des marques de commerce de Sony . Les données sur CD, DVD ou/et Blu ce service sont iPod, iPod classic, iPod nano et iPod touch - Sony CDX-GT660UP | Operating Instructions - Page 37
technologie de codage audio MPEG Layer-3 et des brevets obtenue de Fraunhofer IIS et Thomson. PANDORA, le logo PANDORA et la présentation Pandora sont des marques commerciales ou des marques déposées de Pandora Media, Inc., utilisées avec permission. Remarque sur la pile au lithium N'exposez pas la - Sony CDX-GT660UP | Operating Instructions - Page 38
Préparation 5 Annulation du mode DEMO 5 Réglage de l'horloge 5 Retrait de la façade 5 Emplacement des commandes 6 Radio 9 Mémorisation et réception des stations 9 RDS 9 CD 11 Lecture d'un disque 11 Périphériques USB 11 Lecture d'un périphérique USB 11 Pour écouter une musique - Sony CDX-GT660UP | Operating Instructions - Page 39
pour sélectionner « DEMO-OFF », puis appuyez dessus. Le réglage est terminé. 4 Appuyez sur (BACK). La fenêtre d'affichage retourne au mode de réception/ dans un véhicule stationné ou sur le tableau de bord ou la plage arrière. Installation de la façade Placez l'orifice de la façade sur la tige de - Sony CDX-GT660UP | Operating Instructions - Page 40
: Permettent de sauter des plages (appuyez sur Touche SOURCE/OFF*1 Appuyez pour mettre l'appareil en marche/changer la source (Radio/CD/ USB/SensMe™*2/Pandora USB/AUX). Appuyez sur la touche et maintenez-la enfoncée pendant 1 seconde pour éteindre l'appareil. Appuyez sur la touche et maintenez - Sony CDX-GT660UP | Operating Instructions - Page 41
à l'affichage précédent/sélectionner la bande radio (FM/AM). Appuyez sur la touche et maintenez-la enfoncée pour activer/annuler la commande passager/activer le mode signet (Pandora USB). Touche ZAP page 20 Permet de passer en mode ZAPPIN™. Touche COLOR page 20 Permet de sélectionner les - Sony CDX-GT660UP | Operating Instructions - Page 42
d'arrêter la source. Touche SOURCE*1 Permet de mettre l'appareil en marche ; changer la source (Radio/CD/USB/ SensMe™*2/Pandora USB/AUX). Touches Permettent de commander la source Radio/CD/USB/SensMe™/Pandora USB de la même façon que les touches de l'appareil. La configuration, le réglage du - Sony CDX-GT660UP | Operating Instructions - Page 43
, puis appuyez plusieurs fois sur pour régler la fréquence souhaitée avec précision (syntonisation manuelle). RDS Les stations de radio FM dotées des services RDS (Système de radiocommunication de données) transmettent des données numériques inaudibles en plus du signal d'émission de - Sony CDX-GT660UP | Operating Instructions - Page 44
MUSC (musique religieuse), REL TALK (infovariétés religieuses), PERSNLTY (personnalités), PUBLIC (publique), COLLEGE (collège), WEATHER (météo) Remarque Il se peut que l'émission de radio captée diffère de celle que vous avez sélectionnée. Réglage de CT (Heure) Les données CT de la transmission RDS - Sony CDX-GT660UP | Operating Instructions - Page 45
d'un disque Cet appareil peut lire des CD-DA (y compris ceux qui contiennent des informations CD TEXT) et des CD-R/ CD-RW (fichiers MP3/WMA/AAC (page 30 de l'éjection ou l'insertion d'un disque, laissez les périphériques USB débranchés pour ne pas endommager le disque. Pour changer les éléments - Sony CDX-GT660UP | Operating Instructions - Page 46
logiciel sur votre ordinateur. Pour plus de détails sur l'installation, visitez http://esupport.sony.com ou http://www.sony.com/mobileAV Enregistrement d'un périphérique USB à l'aide de « SensMe™ Setup » L'enregistrement du périphérique USB est requis pour activer la fonction SensMe™ sur l'appareil - Sony CDX-GT660UP | Operating Instructions - Page 47
é à l'aide de « Content Transfer ». 1 Raccordez le périphérique USB enregistré à votre ordinateur. Pour les périphériques USB, effectuez le raccordement en mode MSC. « Content Transfer » démarre automatiquement. Suivez les instructions à l'écran si elles apparaissent. 2 Glissez-déposez les plages de - Sony CDX-GT660UP | Operating Instructions - Page 48
avant de raccorder le iPod. 1 Faites coulisser le capuchon USB, puis raccordez le iPod au connecteur USB à l'aide du câble de raccordement USB pour iPod (non fourni)*. * Il est recommandé d'utiliser le câble de raccordement USB RC-100IP pour iPod. Les plages du iPod sont lues automatiquement - Sony CDX-GT660UP | Operating Instructions - Page 49
maintenez-la enfoncée pendant 1 seconde pour arrêter la lecture. Pour retirer le iPod, arrêtez la lecture du iPod, puis retirez le iPod. Précaution relative au iPhone Lorsque vous raccordez un iPhone au moyen d'un câble USB, le volume du téléphone est contrôlé par le iPhone lui-même. Afin d'éviter - Sony CDX-GT660UP | Operating Instructions - Page 50
service Pandora peuvent ne pas être disponibles. • Le service Pandora est présentement disponible uniquement aux États-Unis. Lecture de Pandora Lecture au moyen du connecteur USB USB RC-100IP pour iPhone. 2 Appuyez plusieurs fois sur jusqu'à ce que « PANDORA USB » apparaisse. 3 Démarrez Pandora - Sony CDX-GT660UP | Operating Instructions - Page 51
vous permet d'écouter des chansons lues sur une ou plusieurs stations Pandora de façon aléatoire dans votre liste de stations. Éditez puis appuyez dessus. Recherche et lecture des plages Lecture des plages dans divers modes Vous pouvez écouter les plages en boucle (lecture répétée) ou dans un ordre - Sony CDX-GT660UP | Operating Instructions - Page 52
normal (Lecture normale). *1 iPod uniquement *2 CD uniquement *3 USB et iPod uniquement Recherche d'une plage par nom - QuickBrowZer™ Vous pouvez facilement rechercher une plage par catégorie sur un CD ou périphérique USB. 1 Appuyez sur (BROWSE)*. L'appareil passe en mode QuickBrowZer et la liste - Sony CDX-GT660UP | Operating Instructions - Page 53
- Mode Saut Lorsqu'une catégorie contient de nombreux éléments, vous pouvez rechercher rapidement l'élément de votre choix. 1 Appuyez sur en mode Quick- . Pour annuler le mode Saut, appuyez sur (BACK) ou Recherche par ordre alphabétique - Recherche alphabétique Lorsqu'un iPod est raccordé à - Sony CDX-GT660UP | Operating Instructions - Page 54
courts passages des plages d'un CD ou périphérique USB. Le mode ZAPPIN est approprié pour rechercher une plage en mode de lecture aléatoire ou une plage que vous souhaitez écouter. La plage que vous sélectionnez revient au mode de lecture normal à partir du début. Lorsque vous appuyez sur (BACK), la - Sony CDX-GT660UP | Operating Instructions - Page 55
. 2 Tournez la molette de réglage jusqu'à ce que « BASE COLOR » s'affiche, puis appuyez dessus. Vous pouvez sélectionner une couleur pr Changement du mode de couleur DAY/ NIGHT Vous pouvez sélectionner une couleur différente pour le mode DAY/NIGHT en fonction du réglage DIMMER. Mode de couleur - Sony CDX-GT660UP | Operating Instructions - Page 56
4 Appuyez sur (BACK). Pour annuler la couleur des canaux SensMe™, sélectionnez « OFF » à l'étape 3. Remarque Lorsque la couleur des canaux SensMe™ est réglée à « ON » pour la source SensMe™, la couleur des canaux SensMe™ prend priorité sur les réglages de couleur/motif préréglé. Changement de la - Sony CDX-GT660UP | Operating Instructions - Page 57
sélectionner le réglage, puis appuyez dessus. 4 Appuyez sur (BACK). Les paramètres suivants peuvent être réglés : EQ7 PRESET (page 24) EQ7 SETTING (page 24) POSITION POSITION (réglage de position d'écoute) (page 25) ADJUST POS*1 (ajustement de position d'écoute) (page 25) SW POSITION*1 (position - Sony CDX-GT660UP | Operating Instructions - Page 58
glages d'égaliseur. 1 Sélectionnez une source, puis appuyez sur la touche de sélection. 2 Tournez la molette de réglage jusqu'à ce que « EQ7 SETTING » s'affiche, puis appuyez dessus. 3 Tournez la molette de réglage jusqu'à ce que « BASE » s'affiche, puis appuyez dessus. Vous pouvez sélectionner une - Sony CDX-GT660UP | Operating Instructions - Page 59
Optimisation du son par alignement temporel - Position d'écoute L'appareil peut simuler un champ acoustique naturel en retardant les sons émis par chaque haut-parleur en fonction de votre position. Les options pour « POSITION » sont indiquées ci-dessous. FRONT L () : Avant gauche FRONT R () : - Sony CDX-GT660UP | Operating Instructions - Page 60
(BACK). * Des étapes supplémentaires sont nécessaires pour le réglage Custom Color (page 21). L'étape 4 n'est pas nécessaire pour les réglages CLOCK-ADJ d'activer ou de désactiver la fonction CT : « ON », « OFF » (page 10). BEEP Permet d'activer ou de désactiver le bip : « ON », « OFF ». CAUT ALM*1 - Sony CDX-GT660UP | Operating Instructions - Page 61
DEMO (Démonstration) Permet d'activer ou de désactiver le mode de de contraste peut être réglé à 7 positions. COLOR (Couleur préréglée) Permet de sélectionner la couleur pr 30 secondes). ZAPPIN BEEP Permet de faire retentir le bip entre les passages de plage : « ON », « OFF ». LPF FREQ (Fréquence de - Sony CDX-GT660UP | Operating Instructions - Page 62
LOUDNESS (Intensité sonore) Permet de renforcer les graves et les aigus pour vous permettre d'entendre les sons clairement à des volumes faibles : « ON », « OFF ». ALO (Optimiseur de niveau automatique) Permet de régler le niveau du volume de lecture de toutes les sources au niveau optimal : « ON », - Sony CDX-GT660UP | Operating Instructions - Page 63
et fonctions de la radio satellite SiriusXM (abonnements Sirius et XM vendus séparément). Pour plus de détails sur les services, visitez le site Web des catégories 1 En cours de lecture, appuyez sur pour accéder au mode de navigation. 2 Tournez la molette de réglage pour sélectionner la catégorie - Sony CDX-GT660UP | Operating Instructions - Page 64
çu pour la lecture des disques conformes à la norme Compact Disc (CD). Les DualDiscs et certains disques de musique encodés avec des technologies Les disques de 8 cm (3 1/4 po). Remarques sur les disques CD-R/CD-RW • Nombre maximal de : (CD-R/CD-RW uniquement) - dossiers (albums) : 150 (y compris le - Sony CDX-GT660UP | Operating Instructions - Page 65
l'utilisation de cet accessoire avec un iPod ou un iPhone peut affecter les performances sont pas abordés dans ce mode d'emploi, contactez votre détaillant Sony. Entretien Remplacement de la pile contact. • Veillez à respecter la polarité lors de l'installation de la pile. • Ne tenez pas la pile avec - Sony CDX-GT660UP | Operating Instructions - Page 66
un objet métallique. Caractéristiques techniques Radio FM Plage de syntonisation : 87,5 9 125 kHz/5 kHz Sensibilité : 26 μV Lecteur CD Rapport signal/bruit : 120 dB Réponse en fré installation et aux raccordements (1 jeu) Accessoires/appareils en option : Câble de raccordement USB pour iPod : RC-100IP - Sony CDX-GT660UP | Operating Instructions - Page 67
rieure) • Port USB Système d'exploitation Windows XP, Windows Vista, Windows 7 Pour plus de détails sur les éditions ou Service Pack compatibles, retrait de l'appareil du tableau de bord, reportez-vous au manuel d'installation/ raccordement fourni avec cet appareil. Si vous ne parvenez pas à - Sony CDX-GT660UP | Operating Instructions - Page 68
« DEMO-ON » est sélectionné, l'écran du mode de démonstration apparaît. - Sélectionnez le réglage « DEMO-OFF véhicule est équipé d'une antenne de radio intégrée dans la fenêtre arrière commence pas. Le disque est défectueux ou sale. Les CD-R/CD-RW ne sont pas destinés à un usage audio (page 30). - Sony CDX-GT660UP | Operating Instructions - Page 69
et maintenez-la enfoncée. Le son est saccadé. L'installation est incorrecte. - Installez l'appareil suivant un angle de Pandora. Fermez Pandora sur le périphérique mobile, puis redémarrez-le. Affichage des erreurs et messages CHECKING L'appareil confirme le raccordement d'un périphérique USB - Sony CDX-GT660UP | Operating Instructions - Page 70
riphérique USB, visitez notre site d'assistance. « » ou « » En mode de retour ou d'avance rapide, vous avez atteint le début ou la fin du disque et vous ne pouvez pas aller plus loin. « » Le caractère ne peut pas être affiché sur l'appareil. Pour la radio Pandora : OPEN APP Pandora ne - Sony CDX-GT660UP | Operating Instructions - Page 71
raccordée et utilisée correctement. NO SIGNAL (Aucun signal) Le service est interrompu en raison d'une interruption du signal. SUBS UPDATE (Abonnement mis permettent pas d'améliorer la situation, contactez votre détaillant Sony le plus proche. Si vous devez faire réparer l'appareil en raison d'un - Sony CDX-GT660UP | Operating Instructions - Page 72
ce produit, rendez-vous sur le site Web suivant : http://esupport.sony.com http://www.sony.com/mobileAV If you have any questions/problems regarding this product, try the following: 1 Read Troubleshooting in these Operating Instructions. 2 Please contact (U.S.A. only); Call 1-800-222-7669 URL http
-
 1
1 -
 2
2 -
 3
3 -
 4
4 -
 5
5 -
 6
6 -
 7
7 -
8
-
9
-
10
-
11
-
12
-
13
-
14
-
15
-
16
-
17
-
18
-
19
-
20
-
21
-
22
-
23
-
24
-
25
-
26
-
27
-
28
-
29
-
30
-
31
-
32
-
33
-
34
-
35
-
36
-
37
-
38
-
39
-
40
-
41
-
42
-
43
-
44
-
45
-
46
-
47
-
48
-
49
-
50
-
51
-
52
-
53
-
54
-
55
-
56
-
57
-
58
-
59
-
60
-
61
-
62
-
63
-
64
-
65
-
66
-
67
-
68
-
69
-
70
-
71
-
72
 |
 |

4-286-236-
13
(1)
CDX-GT660UP
FM/AM
Compact Disc
Player
Owner’s Record
The model and serial numbers are located on the bottom of the unit.
Record the serial number in the space provided below.
Refer to these numbers whenever you call upon your Sony dealer
regarding this product.
Model No. CDX-GT660UP
Serial No.
To cancel the demonstration (DEMO) display, see page 5.
Pour annuler l’affichage de démonstration (DEMO), reportez-
vous à la page 5.
Operating Instructions
US
Mode d’emploi
FR