Sony CDX-GT660UP Operating Instructions - Page 20
Advanced color setting - how to set color
 |
View all Sony CDX-GT660UP manuals
Add to My Manuals
Save this manual to your list of manuals |
Page 20 highlights
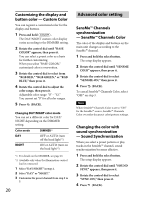
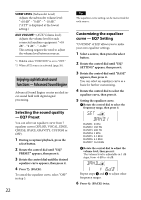
Customizing the display and button color - Custom Color You can register a customized color for the display and buttons. 1 Press and hold The DAY/NIGHT custom color display varies according to the DIMMER setting. 2 Rotate the control dial until "BASE COLOR" appears, then press it. You can select a preset color as a basis for further customizing. When you select "BASE COLOR," customized color is overwritten. 3 Rotate the control dial to select from "RGB RED," "RGB GREEN," or "RGB BLUE," then press it. 4 Rotate the control dial to adjust the color range, then press it. Adjustable color range: "0" - "32." You cannot set "0" for all color ranges. 5 Press (BACK). Changing DAY/NIGHT color mode You can set a different color for DAY/ NIGHT depending on the DIMMER setting. Color mode DAY NIGHT DIMMER*1 OFF or AUTO (turn off the head light*2) ON or AUTO (turn on the head light*2) *1 For details on the DIMMER, see page 25. *2 Available only when the illumination control lead is connected. 1 Select "DAY/NIGHT" in step 2. 2 Select "DAY" or "NIGHT." 3 Customize the preset channel from step 2 to 5. 20 Advanced color setting SensMe™ Channels synchronization - SensMe™ Channels Color The color of the display and buttons on the main unit changes according to the SensMe™ channel. 1 Press and hold the select button. The setup display appears. 2 Rotate the control dial until "SENSME COLR" appears, then press it. 3 Rotate the control dial to select "SENSME-ON," then press it. 4 Press (BACK). To cancel SensMe™ Channels Color, select "OFF" on step 3. Note When SensMe™ Channels Color is set to "ON" for the SensMe™ source, SensMe™ Channels Color overrides the preset color/pattern settings. Changing the color with sound synchronization - Sound Synchronization When you select a preset pattern or play tracks in the SensMe™ channel, sound synchronization becomes effective. 1 Press and hold the select button. The setup display appears. 2 Rotate the control dial until "SOUND SYNC" appears, then press it. 3 Rotate the control dial to select "SYNC-ON," then press it. 4 Press (BACK).
-
 1
1 -
2
-
3
-
4
-
5
-
6
-
7
-
8
-
9
-
10
-
11
-
12
-
13
-
14
-
 15
15 -
 16
16 -
 17
17 -
 18
18 -
 19
19 -
 20
20 -
 21
21 -
 22
22 -
 23
23 -
 24
24 -
 25
25 -
26
-
27
-
28
-
29
-
30
-
31
-
32
-
33
-
34
-
35
-
36
-
37
-
38
-
39
-
40
-
41
-
42
-
43
-
44
-
45
-
46
-
47
-
48
-
49
-
50
-
51
-
52
-
53
-
54
-
55
-
56
-
57
-
58
-
59
-
60
-
61
-
62
-
63
-
64
-
65
-
66
-
67
-
68
-
69
-
70
-
71
-
72
 |
 |