Sony CDX-GT660UP Operating Instructions - Page 21
Sound Settings and, Setup Menu
 |
View all Sony CDX-GT660UP manuals
Add to My Manuals
Save this manual to your list of manuals |
Page 21 highlights
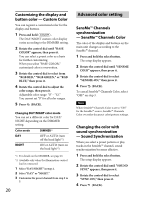
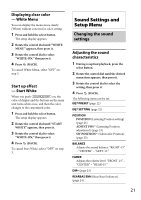
Displaying clear color - White Menu You can display the menu more clearly (White) without concern for color setting. 1 Press and hold the select button. The setup display appears. 2 Rotate the control dial until "WHITE MENU" appears, then press it. 3 Rotate the control dial to select "WHITE-ON," then press it. 4 Press (BACK). To cancel White Menu, select "OFF" on step 3. Start up effect - Start White When you push on, the color of display and the buttons on the main unit turns white once, and then the color changes to the customized color. 1 Press and hold the select button. The setup display appears. 2 Rotate the control dial until "START WHITE" appears, then press it. 3 Rotate the control dial to select "WHITE-ON," then press it. 4 Press (BACK). To cancel Start White, select "OFF" on step 3. Sound Settings and Setup Menu Changing the sound settings Adjusting the sound characteristics 1 During reception/playback, press the select button. 2 Rotate the control dial until the desired menu item appears, then press it. 3 Rotate the control dial to select the setting, then press it. 4 Press (BACK). The following items can be set: EQ7 PRESET (page 22) EQ7 SETTING (page 22) POSITION POSITION (Listening Position setting) (page 23) ADJUST POS*1 (Listening Position adjustment) (page 23) SW POSITION*1 (Subwoofer Position) (page 23) BALANCE Adjusts the sound balance: "RIGHT-15" - "CENTER" - "LEFT-15." FADER Adjusts the relative level: "FRONT-15" - "CENTER" - "REAR-15." DM+ (page 23) REARBAS ENH (Rear Bass Enhancer) (page 24) 21
-
 1
1 -
2
-
3
-
4
-
5
-
6
-
7
-
8
-
9
-
10
-
11
-
12
-
13
-
14
-
15
-
 16
16 -
 17
17 -
 18
18 -
 19
19 -
 20
20 -
 21
21 -
 22
22 -
 23
23 -
 24
24 -
 25
25 -
 26
26 -
27
-
28
-
29
-
30
-
31
-
32
-
33
-
34
-
35
-
36
-
37
-
38
-
39
-
40
-
41
-
42
-
43
-
44
-
45
-
46
-
47
-
48
-
49
-
50
-
51
-
52
-
53
-
54
-
55
-
56
-
57
-
58
-
59
-
60
-
61
-
62
-
63
-
64
-
65
-
66
-
67
-
68
-
69
-
70
-
71
-
72
 |
 |
