Sony CMT-DH7BT Operating Manual - Page 20
Performing QUICK SETUP
 |
View all Sony CMT-DH7BT manuals
Add to My Manuals
Save this manual to your list of manuals |
Page 20 highlights
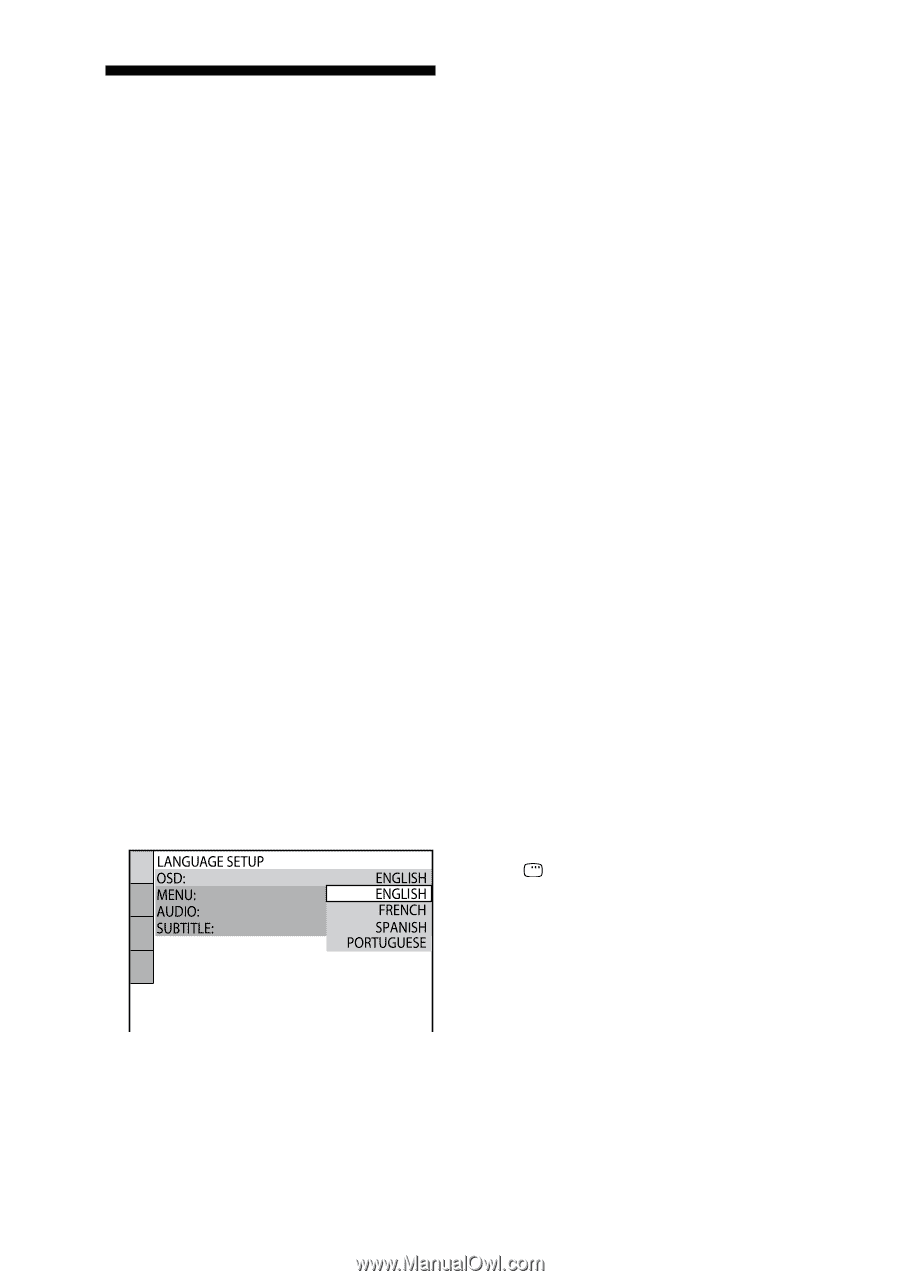
Performing QUICK SETUP Before using the system, you can make the minimum basic adjustments in QUICK SETUP. If you do not want to perform QUICK SETUP, press CLEAR in step 3. The guide message will disappear from the TV screen. 1 Turn on your TV and select the video input. 2 Press to turn on the system. Note Make sure there is no disc in the unit. Otherwise, the guide message does not appear. To perform QUICK SETUP, press on the unit to remove the disc. 3 Press FUNCTION +/ repeatedly to select "DVD" (or press DVD on the unit). The guide message appears at the bottom of the TV screen. 4 Press ENTER without inserting a disc. "LANGUAGE SETUP" appears on the TV screen. 5 Press or repeatedly to select a language, then press ENTER . The setting is selected and "SCREEN SETUP" appears on the TV screen. Tips The selected language is for "OSD," "MENU" and "SUBTITLE ." The selectable language is different depending on the area. 6 Press or repeatedly to select the setting that matches your TV type. If you have a 4:3 standard TV: Select "4:3 LETTER BOX" or "4:3 PAN SCAN" (page 45) If you have a wide-screen TV or a 4:3 standard TV with wide-screen mode: Select "16:9" (page 45) 7 Press ENTER . The setting is selected and "QUICK SETUP is complete." appears on the TV screen. The system is ready for playback. If you want to change each setting individually, see "Using the DVD setup menu" (page 43). To quit QUICK SETUP Press DISPLAY . 20GB
-
 1
1 -
2
-
3
-
4
-
5
-
6
-
7
-
8
-
9
-
10
-
11
-
12
-
13
-
14
-
 15
15 -
 16
16 -
 17
17 -
 18
18 -
 19
19 -
 20
20 -
 21
21 -
 22
22 -
 23
23 -
 24
24 -
 25
25 -
26
-
27
-
28
-
29
-
30
-
31
-
32
-
33
-
34
-
35
-
36
-
37
-
38
-
39
-
40
-
41
-
42
-
43
-
44
-
45
-
46
-
47
-
48
-
49
-
50
-
51
-
52
-
53
-
54
-
55
-
56
-
57
-
58
-
59
-
60
-
61
-
62
-
63
-
64
-
65
-
66
-
67
-
68
-
69
-
70
-
71
-
72
-
73
-
74
-
75
-
76
-
77
-
78
-
79
-
80
-
81
-
82
-
83
-
84
-
85
-
86
-
87
-
88
-
89
-
90
-
91
-
92
 |
 |