Sony DCR DVD205 Operating Guide - Page 17
Recording time, Disc use, Use of double-sided discs, Recording on the A side - handycam
 |
UPC - 027242691254
View all Sony DCR DVD205 manuals
Add to My Manuals
Save this manual to your list of manuals |
Page 17 highlights
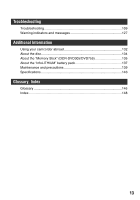
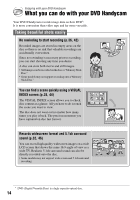
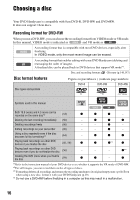
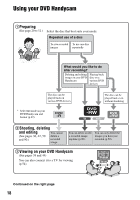
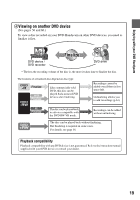
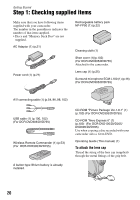
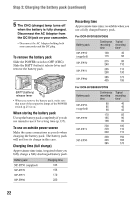
Enjoying with your DVD Handycam Recording time Recording time per disc side The minimum recording time is given in parentheses. unit: min. Recording mode Recording time HQ (High Quality) approx. 20 (18) SP (Standard Play) approx. 30 (18) LP (Long Play) approx. 60 (44) Your DVD Handycam uses the VBR (Variable Bit Rate) format to automatically adjust image quality to suit the recording scene. This technology causes fluctuations in the recording time of a disc. Movie containing quickly moving and complex images is recorded at a higher bit rate and this reduces the overall recording time. VBR Glossary (p.147) • The recording time for the movie drops when the disc also contains still images. Disc use For reliability durability of recording /playback, we recommend that you use Sony discs or discs with an * (for VIDEO CAMERA) mark for your DVD Handycam. • Using a disc other than above may cause the unsatisfactory recording/playback or you may not be able to remove the disc from your DVD Handycam. * Depending on the place you bought, the disc has a mark. Use of double-sided discs Double-sided discs allow you to record both sides of a disc. Recording on the A side Place the disc in your DVD Handycam with the side with the outwards until it clicks. symbol at the center facing symbol Place the symbol facing outwards. Recording is made on the rear side. • When using a double-sided disc, take care not to smudge the surface with fingerprints. • When a double-sided disc is used in your DVD Handycam, recording/playback are performed on that side only. You cannot switch to record on or play back the other side with the disc set to the DVD Handycam. When recording/playback of one side is complete, remove the disc and turn it over to access the other side. • The following operations are performed for each side of a double-sided disc. - Finalizing (p.56) - Unfinalizing (DVD-RW: VIDEO mode) (p.63) - Formatting (p.64) 17
-
 1
1 -
2
-
3
-
4
-
5
-
6
-
7
-
8
-
9
-
10
-
11
-
 12
12 -
 13
13 -
 14
14 -
 15
15 -
 16
16 -
 17
17 -
 18
18 -
 19
19 -
 20
20 -
 21
21 -
 22
22 -
23
-
24
-
25
-
26
-
27
-
28
-
29
-
30
-
31
-
32
-
33
-
34
-
35
-
36
-
37
-
38
-
39
-
40
-
41
-
42
-
43
-
44
-
45
-
46
-
47
-
48
-
49
-
50
-
51
-
52
-
53
-
54
-
55
-
56
-
57
-
58
-
59
-
60
-
61
-
62
-
63
-
64
-
65
-
66
-
67
-
68
-
69
-
70
-
71
-
72
-
73
-
74
-
75
-
76
-
77
-
78
-
79
-
80
-
81
-
82
-
83
-
84
-
85
-
86
-
87
-
88
-
89
-
90
-
91
-
92
-
93
-
94
-
95
-
96
-
97
-
98
-
99
-
100
-
101
-
102
-
103
-
104
-
105
-
106
-
107
-
108
-
109
-
110
-
111
-
112
-
113
-
114
-
115
-
116
-
117
-
118
-
119
-
120
-
121
-
122
-
123
-
124
-
125
-
126
-
127
-
128
-
129
-
130
-
131
-
132
-
133
-
134
-
135
-
136
-
137
-
138
-
139
-
140
-
141
-
142
-
143
-
144
-
145
-
146
-
147
-
148
-
149
-
150
-
151
-
152
-
153
-
154
-
155
-
156
 |
 |