Sony DCR-DVD403 Operating Guide - Page 25
To remove the disc - dvd handycam camcorder
 |
UPC - 027242670075
View all Sony DCR-DVD403 manuals
Add to My Manuals
Save this manual to your list of manuals |
Page 25 highlights
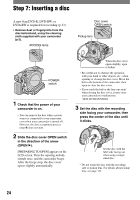
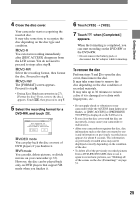
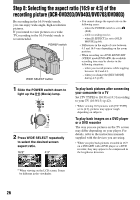
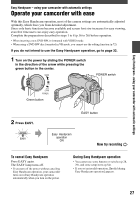
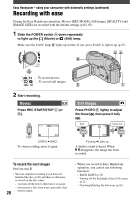
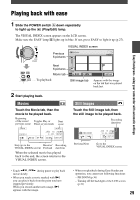
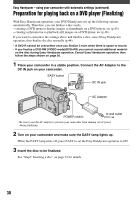
Getting Started 4 Close the disc cover. Your camcorder starts recognizing the inserted disc. It may take some time to recognize the disc depending on the disc type and condition. DVD-R You can start recording immediately after [DISC ACCESS] disappears from the LCD screen. You do not need to proceed to steps after step 5. DVD-RW Select the recording format, then format the disc. Proceed to step 5. DVD+RW The [FORMAT] screen appears. Proceed to step 6. • During Easy Handycam operation (p.27), [Format the disc? If not, remove the disc.] appears. Touch , then proceed to step 7. 5 Select the recording format for a DVD-RW, and touch . FORMAT : VIDEO Can playback on various DVD devices. Cannot edit in Camcorder VIDEO VR OK VIDEO mode You can play back the disc on most of DVD players if you finalize it. VR mode You can edit, delete pictures, or divide movies on your camcorder (p.72). However, the disc can be played back only on DVD players that support VR mode when you finalize it. 6 Touch [YES] [YES]. 7 Touch when [Completed.] appears. When the formatting is completed, you can start recording on the DVD-RW or the DVD+RW. • Do not remove the battery pack or disconnect the AC adaptor while formatting. To remove the disc Perform steps 1 and 2 to open the disc cover, then remove the disc. It may take some time to remove the disc depending on the disc condition or recorded materials. It may take up to 30 minutes to remove a disc if it is damaged or is dirty with fingerprints, etc. • Do not apply shock or vibration to your camcorder while the ACCESS lamp lights up or flashes, or [DISC ACCESS] or [PREPARING TO OPEN] is displayed on the LCD screen. • If you close the disc cover with the disc set incorrectly, it may cause your camcorder to malfunction. • After your camcorder recognizes the disc, disc information such as the date you started to use it and information on previously recorded areas appears for about 8 seconds. The information on previously recorded areas may not be displayed correctly depending on the condition of the disc. • To delete all of the previously recorded pictures from a DVD-RW/DVD+RW, then to use it again to record new pictures, see "Deleting all of the scenes on the disc (Formatting)" on page 51. 25
-
 1
1 -
2
-
3
-
4
-
5
-
6
-
7
-
8
-
9
-
10
-
11
-
12
-
13
-
14
-
15
-
16
-
17
-
18
-
19
-
 20
20 -
 21
21 -
 22
22 -
 23
23 -
 24
24 -
 25
25 -
 26
26 -
 27
27 -
 28
28 -
 29
29 -
 30
30 -
31
-
32
-
33
-
34
-
35
-
36
-
37
-
38
-
39
-
40
-
41
-
42
-
43
-
44
-
45
-
46
-
47
-
48
-
49
-
50
-
51
-
52
-
53
-
54
-
55
-
56
-
57
-
58
-
59
-
60
-
61
-
62
-
63
-
64
-
65
-
66
-
67
-
68
-
69
-
70
-
71
-
72
-
73
-
74
-
75
-
76
-
77
-
78
-
79
-
80
-
81
-
82
-
83
-
84
-
85
-
86
-
87
-
88
-
89
-
90
-
91
-
92
-
93
-
94
-
95
-
96
-
97
-
98
-
99
-
100
-
101
-
102
-
103
-
104
-
105
-
106
-
107
-
108
-
109
-
110
-
111
-
112
-
113
-
114
-
115
-
116
-
117
-
118
-
119
-
120
 |
 |