Sony DCR-PC115 Operating Instructions - Page 13
Charging the battery pack, Step 1, Preparing the power supply
 |
View all Sony DCR-PC115 manuals
Add to My Manuals
Save this manual to your list of manuals |
Page 13 highlights
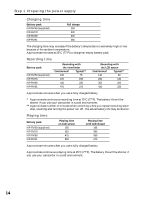
Getting started Step 1 Preparing the power supply Charging the battery pack Use the battery pack after charging it for your camcorder. Your camcorder operates only with the "InfoLITHIUM" battery pack (M series). See page 167 for details of "InfoLITHIUM" battery pack. (1) Open the jack cover and connect the AC power adaptor supplied with your camcorder to the DC IN jack with the plug's v mark facing up. (2) Connect the power cord to the AC power adaptor. (3) Connect the power cord to the wall outlet. (4) Set the POWER switch to OFF (CHG). The CHG lamp lights up when the charge begins. After the charge is completed, the CHG lamp goes out. (full charge) CHG lamp 2 1 4 POWER LOCK R VC OFF (CHG) M CAM EREAM O RY After charging the battery pack Disconnect the AC power adaptor from the DC IN jack on your camcorder. Note Prevent metallic objects from coming into contact with the metal parts of the DC plug of the AC power adaptor. This may cause a short-circuit, damaging the AC power adaptor. While charging the battery pack, the CHG lamp flashes in the following cases: - The battery pack is not installed correctly. - Something is wrong with the battery pack. When you use the AC power adaptor Place the AC power adaptor near a wall outlet. If any trouble occurs with this unit, disconnect the plug from a wall outlet as soon as possible to cut off the power. 13
-
 1
1 -
2
-
3
-
4
-
5
-
6
-
7
-
 8
8 -
 9
9 -
 10
10 -
 11
11 -
 12
12 -
 13
13 -
 14
14 -
 15
15 -
 16
16 -
 17
17 -
 18
18 -
19
-
20
-
21
-
22
-
23
-
24
-
25
-
26
-
27
-
28
-
29
-
30
-
31
-
32
-
33
-
34
-
35
-
36
-
37
-
38
-
39
-
40
-
41
-
42
-
43
-
44
-
45
-
46
-
47
-
48
-
49
-
50
-
51
-
52
-
53
-
54
-
55
-
56
-
57
-
58
-
59
-
60
-
61
-
62
-
63
-
64
-
65
-
66
-
67
-
68
-
69
-
70
-
71
-
72
-
73
-
74
-
75
-
76
-
77
-
78
-
79
-
80
-
81
-
82
-
83
-
84
-
85
-
86
-
87
-
88
-
89
-
90
-
91
-
92
-
93
-
94
-
95
-
96
-
97
-
98
-
99
-
100
-
101
-
102
-
103
-
104
-
105
-
106
-
107
-
108
-
109
-
110
-
111
-
112
-
113
-
114
-
115
-
116
-
117
-
118
-
119
-
120
-
121
-
122
-
123
-
124
-
125
-
126
-
127
-
128
-
129
-
130
-
131
-
132
-
133
-
134
-
135
-
136
-
137
-
138
-
139
-
140
-
141
-
142
-
143
-
144
-
145
-
146
-
147
-
148
-
149
-
150
-
151
-
152
-
153
-
154
-
155
-
156
-
157
-
158
-
159
-
160
-
161
-
162
-
163
-
164
-
165
-
166
-
167
-
168
-
169
-
170
-
171
-
172
-
173
-
174
-
175
-
176
-
177
-
178
-
179
-
180
-
181
-
182
-
183
-
184
-
185
-
186
-
187
-
188
 |
 |
