Sony DCR-PC115 Operating Instructions - Page 142
Example: For Windows 98/98SE/Me, Windows 2000 users - usb driver
 |
View all Sony DCR-PC115 manuals
Add to My Manuals
Save this manual to your list of manuals |
Page 142 highlights
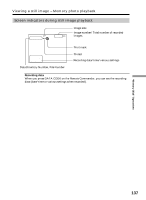
Viewing images using computer Installing the USB driver Before connecting your camcorder to your computer, install the USB driver to the computer. The USB driver is contained together with application software for viewing images on a CD-ROM which is supplied with your camcorder. Do not connect the USB cable to your computer before installation of the USB driver is completed. Example: For Windows 98/98SE/Me, Windows 2000 users (1) Turn on the power of your computer and allow Windows to load. (2) Insert the supplied CD-ROM in the CD-ROM drive of your computer. The application software screen appears. (3) Set the cursor on "USB Driver Installation for Windows 98/98SE/Me and Windows 2000" and click. USB driver installation starts. (4) Follow the on-screen messages to install the USB driver. (5) Connect the (USB) jack on your camcorder with the USB connector on your computer using the supplied USB cable. (6) Insert a "Memory Stick" into your camcorder, connect the AC power adaptor and set the POWER switch to MEMORY. USB MODE appears on the LCD screen of your camcorder. Your computer recognizes the camcorder, and the Windows Add Hardware Wizard starts. (7) Follow the on-screen messages to have the Add Hardware Wizard recognize the hardware. The Add Hardware Wizard starts twice because two different USB drivers are installed. Be sure to allow the installation to complete without interrupting it. 142 USB connector (USB) jack USB cable Push into the end Notes • You cannot install the USB driver if a "Memory Stick" is not in your camcorder. Be sure to insert a "Memory Stick" into your camcorder before installing the USB driver. • The USB driver has been registered incorrectly as your computer was connected to your camcorder before installation of the USB driver was completed. Re-install the USB driver following the procedure on page 143.
-
 1
1 -
2
-
3
-
4
-
5
-
6
-
7
-
8
-
9
-
10
-
11
-
12
-
13
-
14
-
15
-
16
-
17
-
18
-
19
-
20
-
21
-
22
-
23
-
24
-
25
-
26
-
27
-
28
-
29
-
30
-
31
-
32
-
33
-
34
-
35
-
36
-
37
-
38
-
39
-
40
-
41
-
42
-
43
-
44
-
45
-
46
-
47
-
48
-
49
-
50
-
51
-
52
-
53
-
54
-
55
-
56
-
57
-
58
-
59
-
60
-
61
-
62
-
63
-
64
-
65
-
66
-
67
-
68
-
69
-
70
-
71
-
72
-
73
-
74
-
75
-
76
-
77
-
78
-
79
-
80
-
81
-
82
-
83
-
84
-
85
-
86
-
87
-
88
-
89
-
90
-
91
-
92
-
93
-
94
-
95
-
96
-
97
-
98
-
99
-
100
-
101
-
102
-
103
-
104
-
105
-
106
-
107
-
108
-
109
-
110
-
111
-
112
-
113
-
114
-
115
-
116
-
117
-
118
-
119
-
120
-
121
-
122
-
123
-
124
-
125
-
126
-
127
-
128
-
129
-
130
-
131
-
132
-
133
-
134
-
135
-
136
-
 137
137 -
 138
138 -
 139
139 -
 140
140 -
 141
141 -
 142
142 -
 143
143 -
 144
144 -
 145
145 -
 146
146 -
 147
147 -
148
-
149
-
150
-
151
-
152
-
153
-
154
-
155
-
156
-
157
-
158
-
159
-
160
-
161
-
162
-
163
-
164
-
165
-
166
-
167
-
168
-
169
-
170
-
171
-
172
-
173
-
174
-
175
-
176
-
177
-
178
-
179
-
180
-
181
-
182
-
183
-
184
-
185
-
186
-
187
-
188
 |
 |
