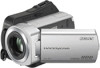
Sony DCR-SR46 Handycam® Handbook - Page 17
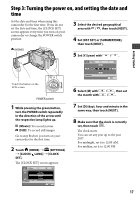
Step 3: Turning the power on, and setting the date and time
 |
View all Sony DCR-SR46 manuals
Add to My Manuals
Save this manual to your list of manuals |
Page 17 highlights
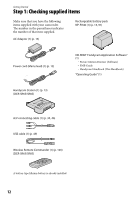
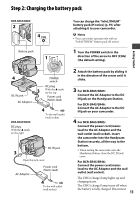
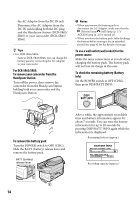
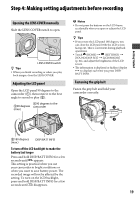
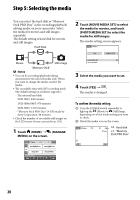
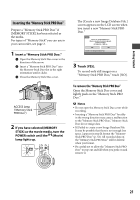
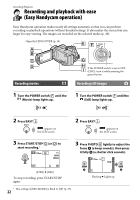
Step 3: Turning the power on, and setting the date and time Set the date and time when using this camcorder for the first time. If you do not set the date and time, the [CLOCK SET] screen appears every time you turn on your camcorder or change the POWER switch position. (HOME) 3 Select the desired geographical area with / , then touch [NEXT]. 4 Set [DST SET] or [SUMMERTIME], then touch [NEXT]. 5 Set [Y] (year) with / . Getting Started Touch the button on the LCD screen. POWER switch 1 While pressing the green button, turn the POWER switch repeatedly in the direction of the arrow until the respective lamp lights up. (Movie): To record movies (Still): To record still images Go to step 3 when you turn on your camcorder for the first time. 2 Touch (HOME) (SETTINGS) [CLOCK/ LANG] [CLOCK SET]. The [CLOCK SET] screen appears. 6 Select [M] with / , then set the month with / . 7 Set [D] (day), hour and minute in the same way, then touch [NEXT]. 8 Make sure that the clock is correctly set, then touch . The clock starts. You can set any year up to the year 2037. For midnight, set it to 12:00 AM. For midday, set it to 12:00 PM. 17
-
 1
1 -
2
-
3
-
4
-
5
-
6
-
7
-
8
-
9
-
10
-
11
-
 12
12 -
 13
13 -
 14
14 -
 15
15 -
 16
16 -
 17
17 -
 18
18 -
 19
19 -
 20
20 -
 21
21 -
 22
22 -
23
-
24
-
25
-
26
-
27
-
28
-
29
-
30
-
31
-
32
-
33
-
34
-
35
-
36
-
37
-
38
-
39
-
40
-
41
-
42
-
43
-
44
-
45
-
46
-
47
-
48
-
49
-
50
-
51
-
52
-
53
-
54
-
55
-
56
-
57
-
58
-
59
-
60
-
61
-
62
-
63
-
64
-
65
-
66
-
67
-
68
-
69
-
70
-
71
-
72
-
73
-
74
-
75
-
76
-
77
-
78
-
79
-
80
-
81
-
82
-
83
-
84
-
85
-
86
-
87
-
88
-
89
-
90
-
91
-
92
-
93
-
94
-
95
-
96
-
97
-
98
-
99
-
100
-
101
-
102
-
103
-
104
-
105
-
106
-
107
-
108
 |
 |
