Sony DCR-SR46 Handycam® Handbook - Page 50
To finish printing, Touch [EXEC] - video camera
 |
View all Sony DCR-SR46 manuals
Add to My Manuals
Save this manual to your list of manuals |
Page 50 highlights
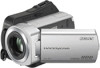
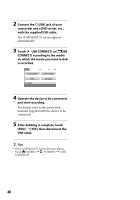
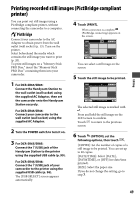
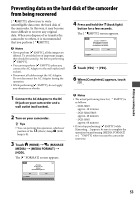
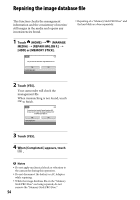
7 Touch [EXEC] [YES] . The still image selection screen appears again. To finish printing Touch on the screen in step 4. Notes We can guarantee the operation of only models that are PictBridge compatible. Refer also to the instruction manual of the printer to be used. Do not attempt the following operations when is on the screen. The operations may not be performed properly. Operate the POWER switch Press (VIEW IMAGES) Remove your camcorder from the Handycam Station (DCR-SR65/SR85) Remove the USB cable from your camcorder, the Handycam Station (DCR-SR65/SR85), or the printer Remove the "Memory Stick PRO Duo" from your camcorder while printing still images saved on it If the printer stops working, disconnect the USB cable, turn the printer off and on again, and restart the operation from the beginning. You can select only the paper sizes that the printer can print. On some printer models, the top, bottom, right, and left edges of images may be trimmed. If you print a still image recorded in a 16:9 (wide) ratio, the left and right ends of the image may be trimmed widely. Some printer models may not support the date printing function. Refer to your printer's instruction manual for details. The still images described below may not be printed out: The still image edited by a computer The still image recorded by another devices The still image file exceeding 4 MB The still image file larger than 3,680 × 2,760 pixels Tips PictBridge is an industry standard established by the Camera & Imaging Products Association (CIPA). You can print still images without using a computer by connecting a printer directly to a digital video camera or digital still camera, regardless of model or manufacturer. You can print a still image on the still image playback screen by touching (OPTION) tab [PRINT]. 50
-
 1
1 -
2
-
3
-
4
-
5
-
6
-
7
-
8
-
9
-
10
-
11
-
12
-
13
-
14
-
15
-
16
-
17
-
18
-
19
-
20
-
21
-
22
-
23
-
24
-
25
-
26
-
27
-
28
-
29
-
30
-
31
-
32
-
33
-
34
-
35
-
36
-
37
-
38
-
39
-
40
-
41
-
42
-
43
-
44
-
 45
45 -
 46
46 -
 47
47 -
 48
48 -
 49
49 -
 50
50 -
 51
51 -
 52
52 -
 53
53 -
 54
54 -
 55
55 -
56
-
57
-
58
-
59
-
60
-
61
-
62
-
63
-
64
-
65
-
66
-
67
-
68
-
69
-
70
-
71
-
72
-
73
-
74
-
75
-
76
-
77
-
78
-
79
-
80
-
81
-
82
-
83
-
84
-
85
-
86
-
87
-
88
-
89
-
90
-
91
-
92
-
93
-
94
-
95
-
96
-
97
-
98
-
99
-
100
-
101
-
102
-
103
-
104
-
105
-
106
-
107
-
108
 |
 |
