Sony DCR-SR60 Handycam Handbook - Page 97
Click [OK]., Click, Write] tab, the ImageMixer3 DVD Authoring, screen., Once the completion dialog
 |
View all Sony DCR-SR60 manuals
Add to My Manuals
Save this manual to your list of manuals |
Page 97 highlights
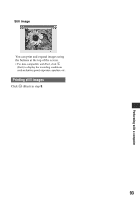
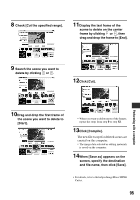
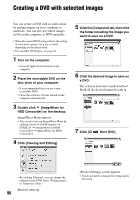
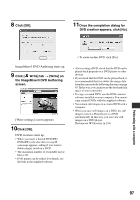
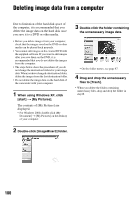
8 Click [OK]. 11Once the completion dialog for DVD creation appears, click [No]. ImageMixer3 DVD Authoring starts up. 9 Click [ Write] tab t [Write] on the ImageMixer3 DVD Authoring screen. [Write settings] screen appears. 10Click [OK]. DVD creation starts up. • When you insert a burned DVD-RW/ DVD+RW in the disc drive in step 2, a message appears, asking if you want to delete images saved on a DVD. • The maximum number of recordable movie files is 98. • DVD menus can be edited. For details, see the help in the supplied software. • To create another DVD, click [Yes]. • After creating a DVD, check that the DVD can be played back properly on a DVD player or other devices. • If you check that the DVD can be played back, it is recommended that you delete the image data from the camcorder by following the steps on page 45. In this way, you can increase the free hard disk space of your camcorder. • To copy a created DVD, use the DVD creation software installed on your computer. You cannot copy created DVDs with the supplied software. • You cannot edit images on a created DVD with a computer. • When you save still images on a DVD, the still images convert a Photomovie to a DVD automatically. In this way, you can view still images on a DVD player. Photomovie 1 Glossary (p.124) Performing with a computer 97
-
 1
1 -
2
-
3
-
4
-
5
-
6
-
7
-
8
-
9
-
10
-
11
-
12
-
13
-
14
-
15
-
16
-
17
-
18
-
19
-
20
-
21
-
22
-
23
-
24
-
25
-
26
-
27
-
28
-
29
-
30
-
31
-
32
-
33
-
34
-
35
-
36
-
37
-
38
-
39
-
40
-
41
-
42
-
43
-
44
-
45
-
46
-
47
-
48
-
49
-
50
-
51
-
52
-
53
-
54
-
55
-
56
-
57
-
58
-
59
-
60
-
61
-
62
-
63
-
64
-
65
-
66
-
67
-
68
-
69
-
70
-
71
-
72
-
73
-
74
-
75
-
76
-
77
-
78
-
79
-
80
-
81
-
82
-
83
-
84
-
85
-
86
-
87
-
88
-
89
-
90
-
91
-
 92
92 -
 93
93 -
 94
94 -
 95
95 -
 96
96 -
 97
97 -
 98
98 -
 99
99 -
 100
100 -
 101
101 -
 102
102 -
103
-
104
-
105
-
106
-
107
-
108
-
109
-
110
-
111
-
112
-
113
-
114
-
115
-
116
-
117
-
118
-
119
-
120
-
121
-
122
-
123
-
124
-
125
-
126
-
127
-
128
-
129
-
130
-
131
-
132
 |
 |
