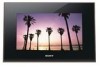
Sony DPF X1000 Operating Instructions - Page 55
Adding a frame, Making layout panels, image, then press
 |
UPC - 027242763333
View all Sony DPF X1000 manuals
Add to My Manuals
Save this manual to your list of manuals |
Page 55 highlights
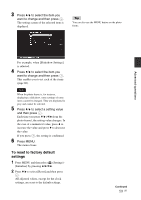
Advanced operations Adding a frame 1 From the CreativeEdit menu (page 48), press B/b/v/V to select (Frame) and then press . The Frame templates are displayed. Making layout panels You can select the layout of the photo displaying as follows. • 2 panels, 4 panels, 9 panels, 13 panels, 16 panels 1 From the CreativeEdit menu (page 48), press B/b/v/V to select (Layout Print) and then press . The Layout Print templates are displayed. 2 Press B/b/v/V to select the desired frame, then press . The index view is displayed. 3 Press B/b/v/V to select the desired image, then press . The image adjustment window is displayed. For how to adjust an image, see step 5 on page 49. 4 Press B/b to select . and press The selected image is displayed with the selected frame. 2 Press B/b/v/V to select the desired template, then press . A preview of the selected template is displayed 3 Select an image. When you select a template with multiple images, select an image for each area. For how to select an image, see step 4 on page 49. When you select image(s), the window used for adjusting the image is displayed. 4 Adjust the image. For how to adjust an image, see step 5 on page 49. When you adjust an image, the image is added to the image area. To add a stamp, see "Superimposing a stamp" on page 50. 55 GB
-
 1
1 -
2
-
3
-
4
-
5
-
6
-
7
-
8
-
9
-
10
-
11
-
12
-
13
-
14
-
15
-
16
-
17
-
18
-
19
-
20
-
21
-
22
-
23
-
24
-
25
-
26
-
27
-
28
-
29
-
30
-
31
-
32
-
33
-
34
-
35
-
36
-
37
-
38
-
39
-
40
-
41
-
42
-
43
-
44
-
45
-
46
-
47
-
48
-
49
-
 50
50 -
 51
51 -
 52
52 -
 53
53 -
 54
54 -
 55
55 -
 56
56 -
 57
57 -
 58
58 -
 59
59 -
 60
60 -
61
-
62
-
63
-
64
-
65
-
66
-
67
-
68
-
69
-
70
-
71
-
72
-
73
-
74
-
75
-
76
-
77
-
78
-
79
-
80
-
81
-
82
-
83
-
84
-
85
-
86
-
87
-
88
 |
 |
