Sony DPP-EX5 Operating Instructions - Page 32
Adding a special filter to an image, Press ENTER.
 |
UPC - 027242604902
View all Sony DPP-EX5 manuals
Add to My Manuals
Save this manual to your list of manuals |
Page 32 highlights
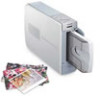
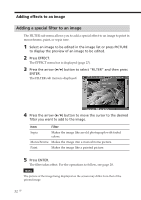
Adding effects to an image Adding a special filter to an image The FILTER sub menu allows you to add a special effect to an image to print in monochrome, paint, or sepia tone. 1 Select an image to be edited in the image list or press PICTURE to display the preview of an image to be edited. 2 Press EFFECT. The EFFECT menu bar is displayed (page 27). 3 Press the arrow (B/b) button to select "FILTER" and then press ENTER. The FILTER sub menu is displayed. 4 Press the arrow (V/v) button to move the cursor to the desired filter you want to add to the image. Item Filter Sepia Makes the image like an old photograph with faded colors. Monochrome Makes the image into a monochrome picture. Paint Makes the image like a painted picture. 5 Press ENTER. The filter takes effect. For the operations to follow, see page 28. Note The picture of the image being displayed on the screen may differ from that of the printed image. 32 GB
-
 1
1 -
2
-
3
-
4
-
5
-
6
-
7
-
8
-
9
-
10
-
11
-
12
-
13
-
14
-
15
-
16
-
17
-
18
-
19
-
20
-
21
-
22
-
23
-
24
-
25
-
26
-
 27
27 -
 28
28 -
 29
29 -
 30
30 -
 31
31 -
 32
32 -
 33
33 -
 34
34 -
 35
35 -
 36
36 -
 37
37 -
38
-
39
-
40
-
41
-
42
-
43
-
44
-
45
-
46
-
47
-
48
-
49
-
50
-
51
-
52
-
53
-
54
-
55
-
56
-
57
-
58
-
59
-
60
-
61
-
62
-
63
-
64
-
65
-
66
-
67
-
68
-
69
-
70
-
71
-
72
-
73
-
74
-
75
-
76
-
77
-
78
-
79
-
80
-
81
-
82
-
83
-
84
-
85
-
86
-
87
-
88
-
89
-
90
-
91
-
92
-
93
-
94
-
95
-
96
-
97
-
98
-
99
-
100
-
101
-
102
-
103
-
104
-
105
-
106
-
107
-
108
-
109
-
110
-
111
-
112
-
113
-
114
-
115
-
116
-
117
-
118
-
119
-
120
-
121
-
122
-
123
-
124
-
125
-
126
-
127
-
128
-
129
-
130
-
131
-
132
-
133
-
134
-
135
-
136
-
137
-
138
-
139
-
140
-
141
-
142
-
143
-
144
-
145
-
146
-
147
-
148
-
149
-
150
-
151
-
152
-
153
-
154
-
155
-
156
-
157
-
158
-
159
-
160
-
161
-
162
-
163
-
164
-
165
-
166
-
167
-
168
-
169
-
170
-
171
-
172
 |
 |