Sony DSC P200 Operating Instructions - Page 14
Identifying parts, For shooting: Zoom W/T button - lens
 |
UPC - 027242671331
View all Sony DSC P200 manuals
Add to My Manuals
Save this manual to your list of manuals |
Page 14 highlights
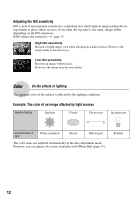
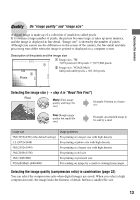
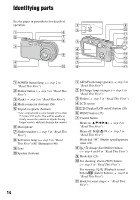
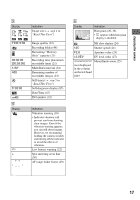
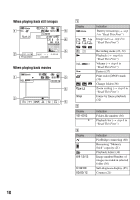
Identifying parts See the pages in parentheses for details of operation. 1 9 2 q; 1 6 qa 2 7 qs 8 3 qd 3 4 9 5 qf 6 qg 4 7 qh 5 q; 8 qj A POWER button/lamp (t step 2 in "Read This First") B Shutter button (t step 5 in "Read This First") C Flash (t step 5 in "Read This First") D Multi connector (bottom) (56) E Tripod receptacle (bottom) • Use a tripod with a screw length of less than 5.5 mm (7/32 inch). You will be unable to firmly secure the camera to tripods having longer screws, and may damage the camera. F Microphone G Finder window (t step 5 in "Read This First") H Self-timer lamp (t step 5 in "Read This First")/AF illuminator (46) I Lens J Speaker (bottom) 14 A AE/AF lock lamp (green) (t step 5 in "Read This First") B /Charge lamp (orange) (t step 1 in "Read This First") C Finder (t step 5 in "Read This First") D LCD screen E (Display/LCD on/off) button (20) F MENU button (25) G Control button Menu on: v/V/b/B/z (t step 2 in "Read This First") Menu off: / / / (t step 5 in "Read This First") Mode dial "M": Shutter speed/aperture value (24) H (Image Size/Delete) button (t step 4 and 6 in "Read This First") I Mode dial (23) J For shooting: Zoom (W/T) button (t step 5 in "Read This First") For viewing: / (Playback zoom) button/ (Index) button (t step 6 in "Read This First") K Hook for wrist strap (t "Read This First")
-
 1
1 -
2
-
3
-
4
-
5
-
6
-
7
-
8
-
 9
9 -
 10
10 -
 11
11 -
 12
12 -
 13
13 -
 14
14 -
 15
15 -
 16
16 -
 17
17 -
 18
18 -
 19
19 -
20
-
21
-
22
-
23
-
24
-
25
-
26
-
27
-
28
-
29
-
30
-
31
-
32
-
33
-
34
-
35
-
36
-
37
-
38
-
39
-
40
-
41
-
42
-
43
-
44
-
45
-
46
-
47
-
48
-
49
-
50
-
51
-
52
-
53
-
54
-
55
-
56
-
57
-
58
-
59
-
60
-
61
-
62
-
63
-
64
-
65
-
66
-
67
-
68
-
69
-
70
-
71
-
72
-
73
-
74
-
75
-
76
-
77
-
78
-
79
-
80
-
81
-
82
-
83
-
84
-
85
-
86
-
87
-
88
-
89
-
90
-
91
-
92
-
93
-
94
-
95
-
96
-
97
-
98
-
99
 |
 |
