Sony DSC W50 User Guide - Page 59
Copying images to your computer, Stage 1: Preparing the camera, and the computer
 |
UPC - 027242682238
View all Sony DSC W50 manuals
Add to My Manuals
Save this manual to your list of manuals |
Page 59 highlights
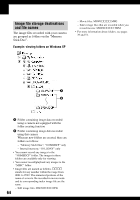
Copying images to your computer This section describes the process using a Windows computer as an example. You can copy images from the camera to your computer as follows. For a computer with a "Memory Stick" slot Remove the "Memory Stick Duo" from the camera and insert it in the Memory Stick Duo Adaptor. Insert the Memory Stick Duo Adaptor in the computer and copy the images. If the "Memory Stick PRO Duo" is not recognized, see page 88. For a computer without a "Memory Stick" slot Follow Stages 1 through 4 on pages 59 to 63 to copy images. • When using Windows 2000/Me, install the supplied software before proceeding. With Windows XP, the installation is unnecessary. • The screen displays shown in this section are the examples for copying images from "Memory Stick Duo". Stage 1: Preparing the camera and the computer 1 Insert a "Memory Stick Duo" with recorded images into the camera. • When copying images in the internal memory, this step is unnecessary. 2 Insert the sufficiently charged battery pack in the camera, or connect the camera to a wall outlet (wall socket) with the AC Adaptor (not supplied). • When you copy images to your computer using a battery pack with little remaining charge, copying may fail or image data may become corrupted if the battery pack shuts down too soon. 3 Press to turn on the camera and the computer. Using your computer 59
-
 1
1 -
2
-
3
-
4
-
5
-
6
-
7
-
8
-
9
-
10
-
11
-
12
-
13
-
14
-
15
-
16
-
17
-
18
-
19
-
20
-
21
-
22
-
23
-
24
-
25
-
26
-
27
-
28
-
29
-
30
-
31
-
32
-
33
-
34
-
35
-
36
-
37
-
38
-
39
-
40
-
41
-
42
-
43
-
44
-
45
-
46
-
47
-
48
-
49
-
50
-
51
-
52
-
53
-
 54
54 -
 55
55 -
 56
56 -
 57
57 -
 58
58 -
 59
59 -
 60
60 -
 61
61 -
 62
62 -
 63
63 -
 64
64 -
65
-
66
-
67
-
68
-
69
-
70
-
71
-
72
-
73
-
74
-
75
-
76
-
77
-
78
-
79
-
80
-
81
-
82
-
83
-
84
-
85
-
86
-
87
-
88
-
89
-
90
-
91
-
92
-
93
-
94
-
95
-
96
-
97
-
98
-
99
-
100
-
101
-
102
-
103
-
104
-
105
-
106
-
107
 |
 |
