Sony DVP-NS400D Operating Instructions - Page 14
Getting Started, Quick Overview, Step 1: Unpacking, Step 2: Inserting Batteries into the Remote - remote control
 |
UPC - 027242586543
View all Sony DVP-NS400D manuals
Add to My Manuals
Save this manual to your list of manuals |
Page 14 highlights
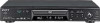
Getting Started Quick Overview A quick overview presented in this chapter will give you enough information to start using the player for your enjoyment. To use the surround sound features of this player, refer to "Hookups" on page 17. Note You cannot connect this player to a TV that does not have a video input jack. Be sure to turn off the power of each component before connecting. Step 1: Unpacking Check that you have the following items: • Audio/video cord (pinplug × 3 y pinplug × 3) (1) • Remote commander (remote) RMT-D128A (1) • Size AA (R6) batteries (2) Step 2: Inserting Batteries into the Remote You can control the player using the supplied remote. Insert two size AA (R6) batteries by matching the 3 and # ends on the batteries to the markings inside the compartment. When using the remote, point it at the remote sensor on the player. Notes • Do not leave the remote in an extremely hot or humid place. • Do not drop any foreign object into the remote casing, particularly when replacing the batteries. • Do not expose the remote sensor to direct light from the sun or lighting apparatus. Doing so may cause a malfunction. • If you do not use the remote for an extended period of time, remove the batteries to avoid possible damage from battery leakage and corrosion. 14
-
 1
1 -
2
-
3
-
4
-
5
-
6
-
7
-
8
-
 9
9 -
 10
10 -
 11
11 -
 12
12 -
 13
13 -
 14
14 -
 15
15 -
 16
16 -
 17
17 -
 18
18 -
 19
19 -
20
-
21
-
22
-
23
-
24
-
25
-
26
-
27
-
28
-
29
-
30
-
31
-
32
-
33
-
34
-
35
-
36
-
37
-
38
-
39
-
40
-
41
-
42
-
43
-
44
-
45
-
46
-
47
-
48
-
49
-
50
-
51
-
52
-
53
-
54
-
55
-
56
-
57
-
58
-
59
-
60
-
61
-
62
-
63
-
64
-
65
-
66
-
67
-
68
-
69
-
70
-
71
-
72
-
73
-
74
-
75
-
76
-
77
-
78
-
79
-
80
-
81
-
82
-
83
-
84
-
85
-
86
-
87
-
88
 |
 |
