Sony F35 Product Manual (CvpFileEditor V4.0) - Page 22
Camera Control Window, To connect a camera, To transmit the data to the connected camera, camera
 |
View all Sony F35 manuals
Add to My Manuals
Save this manual to your list of manuals |
Page 22 highlights
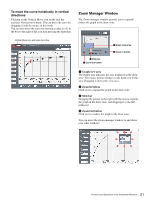
Camera Control Window The Camera Control window permits you to transmit a gamma to a camera connected via Ethernet or a group of gammas as a user gamma file. The names of the gammas loaded in a camera are displayed, permitting you to change the current gamma selection on the camera. a Connect button and indicator b Send button and radio buttons for selecting gamma number on camera c Auto Send check box d Select Camera Table area To connect a camera 1 Connect the CvpFileEditor-installed PC to the camera via Ethernet or using a cross cable. 2 Select "Camera IP Setting" from the User Gamma menu to open the Ethernet Setting window. 3 Enter the IP address of the camera then click on OK to close the Ethernet Setting window. Enter the IP address of the camera. a Connect button and indicator Click on the button to connect or disconnect communication with a camera. When connection is established, the indicator changes color from red to green. b Send button and radio buttons for selecting gamma number on camera To send the gamma selected in the User Gamma window (page 11) to a camera as the user gamma of the number specified with the corresponding radio button. Select ALL to send all the registered data (5 gammas at maximum) of the current user gamma file to a camera. c Auto Send check box Check this box to automatically send the data to a camera each time you edit the graph. This is convenient to immediately confirm the results of editing. Note Responses to graph operations may become slower, as data are transmitted each time you change the graph. d Select Camera Table area The names of the user gammas installed in the connected camera are displayed. You can switch the user gamma on the camera by using the radio buttons. 4 Click on the Connect button in the Camera Control window. The connection to the camera is established, and the indicator to the left of the button changes color to green. To transmit the data to the connected camera 1 Specify the target user gamma number with a radio button. (Select ALL to send all gammas of the current file.) 2 Click on the Send button. Send button To send the selected gamma to the connected camera, specify the target user gamma number on the camera with the corresponding radio button. To send the current user gamma file (group of 5 gammas at maximum), select ALL. The display is automatically updated when transmission is completed. 22 Functions and Operations of the Component Windows
-
 1
1 -
2
-
3
-
4
-
5
-
6
-
7
-
8
-
9
-
10
-
11
-
12
-
13
-
14
-
15
-
16
-
 17
17 -
 18
18 -
 19
19 -
 20
20 -
 21
21 -
 22
22 -
 23
23 -
 24
24 -
 25
25 -
 26
26
 |
 |
