Sony FD97 Operating Instructions (primary manual) - Page 19
For the number of images you can record on a floppy disk or a, Memory Stick, Recording
 |
UPC - 027242587618
View all Sony FD97 manuals
Add to My Manuals
Save this manual to your list of manuals |
Page 19 highlights
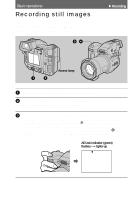
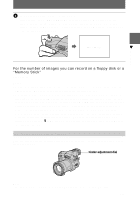
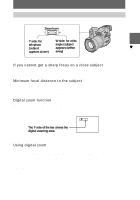
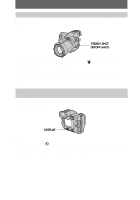
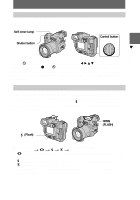
B Recording 4 Press the shutter button fully down. The shutter clicks. "RECORDING" appears on the LCD screen or on the finder, and the image will be recorded on the floppy disk or the "Memory Stick." When "RECORDING" disappears from the LCD screen or finder, you can start the next recording. RECORDING For the number of images you can record on a floppy disk or a "Memory Stick" See page 48. Notes • When recording bright subjects, the color of the LCD screen may change after the AE is locked. However, this will not affect the recorded image. • While the image is being recorded on a floppy disk or a "Memory Stick," the access lamp lights. When this lamp is lit, do not shake or strike the camera. Also, do not turn the power off, not change the position of the MS/FD selector, or not remove the battery pack/floppy disk/"Memory Stick." Otherwise, an image data breakdown may occur and the floppy disk or the "Memory Stick" may become unusable. • When you press the shutter button fully down at once, the camera starts recording after the automatic adjustment is complete. However, the recording cannot be carried out while the lamp (page 8) is flashing. (During this time, the camera is charging the flash.) Recording images with the finder Turn the finder adjustment dial until the image appears clearly within the finder, then record the image. Finder adjustment dial Note The finder display is automatically turned off when your face is not near the finder. 19
-
 1
1 -
2
-
3
-
4
-
5
-
6
-
7
-
8
-
9
-
10
-
11
-
12
-
13
-
 14
14 -
 15
15 -
 16
16 -
 17
17 -
 18
18 -
 19
19 -
 20
20 -
 21
21 -
 22
22 -
 23
23 -
 24
24 -
25
-
26
-
27
-
28
-
29
-
30
-
31
-
32
-
33
-
34
-
35
-
36
-
37
-
38
-
39
-
40
-
41
-
42
-
43
-
44
-
45
-
46
-
47
-
48
-
49
-
50
-
51
-
52
-
53
-
54
-
55
-
56
-
57
-
58
-
59
-
60
-
61
-
62
-
63
-
64
-
65
-
66
-
67
-
68
-
69
-
70
-
71
-
72
-
73
-
74
-
75
-
76
-
77
-
78
-
79
-
80
-
81
-
82
-
83
-
84
-
85
-
86
-
87
-
88
-
89
-
90
-
91
-
92
 |
 |
