Sony GTK-XB7 Operating Instructions - Page 27
Enjoying music with the Speaker Lights turned on, Using an optional equipment
 |
View all Sony GTK-XB7 manuals
Add to My Manuals
Save this manual to your list of manuals |
Page 27 highlights
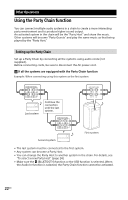
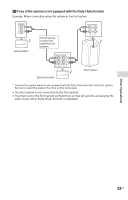
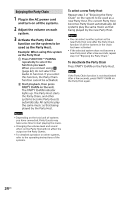
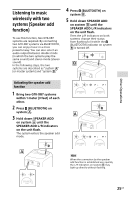
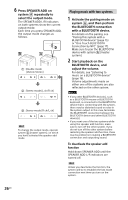
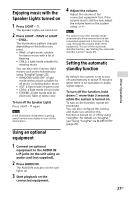
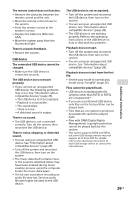
Enjoying music with the Speaker Lights turned on 1 Press LIGHT - . The Speaker Lights are turned on. 2 Press LIGHT - RAVE or LIGHT - CHILL. The illumination pattern changes depending on the button you press. •• RAVE: a light mode suitable for dance music with a lot of flashing •• CHILL: a light mode suitable for relaxing music You can also select various light modes such as the following by using "SongPal" (page 20). •• RANDOM FLASH OFF: a light mode without flash suitable for all music, including dance music •• HOT: a light mode of warm color •• COOL: a light mode of cool color •• STROBE: a light mode with an electronic flash of white color To turn off the Speaker Lights Press LIGHT - again. Note If the illumination brightness is glaring, switch on the room lights or turn off the illumination. 4 Adjust the volume. Adjust the volume of the connected equipment first. If the volume level is still too low, adjust the volume level on the system using +/-. Note The system may enter standby mode automatically if the volume level of the connected equipment is too low. In this case, increase the volume level of the equipment. To turn off the automatic standby function, see "Setting the automatic standby function" (page 27). Setting the automatic standby function By default, this system is set to turn off automatically in about 15 minutes when there is no operation or audio signal output. To turn off the function, hold down more than 3 seconds while the system is turned on. To turn on the function, repeat the procedure. You can also configure this setting and make sure whether this function is turned on or off by using "SongPal." For details on "SongPal," see "Using "SongPal" via BLUETOOTH" (page 20). Other Operations Using an optional equipment 1 Connect an optional equipment to the AUDIO IN L/R jacks on the unit using an audio cord (not supplied). 2 Press AUDIO IN. The AUDIO IN indicator on the unit lights up. 3 Start playback on the connected equipment. 27GB
-
 1
1 -
2
-
3
-
4
-
5
-
6
-
7
-
8
-
9
-
10
-
11
-
12
-
13
-
14
-
15
-
16
-
17
-
18
-
19
-
20
-
21
-
 22
22 -
 23
23 -
 24
24 -
 25
25 -
 26
26 -
 27
27 -
 28
28 -
 29
29 -
 30
30 -
 31
31 -
 32
32 -
33
-
34
-
35
-
36
-
37
-
38
-
39
-
40
-
41
-
42
-
43
-
44
-
45
-
46
-
47
-
48
-
49
-
50
-
51
-
52
-
53
-
54
-
55
-
56
-
57
-
58
-
59
-
60
-
61
-
62
-
63
-
64
-
65
-
66
-
67
-
68
-
69
-
70
-
71
-
72
-
73
-
74
-
75
-
76
-
77
-
78
-
79
-
80
-
81
-
82
-
83
-
84
-
85
-
86
-
87
-
88
-
89
-
90
-
91
-
92
-
93
-
94
-
95
-
96
-
97
-
98
-
99
-
100
-
101
-
102
-
103
-
104
-
105
-
106
-
107
 |
 |
