Sony HCD-HPX7 Service Manual - Page 6
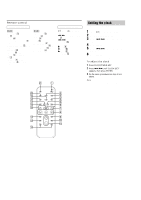
Setting the clock
 |
View all Sony HCD-HPX7 manuals
Add to My Manuals
Save this manual to your list of manuals |
Page 6 highlights
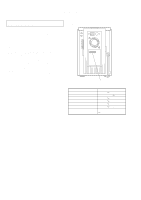
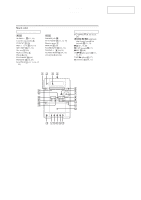
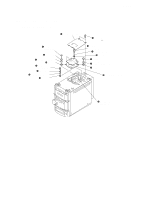
HCD-HPX7 Remote control ALPHABETICAL ORDER A - O ALBUM +/- qs (11, 13) CD qj (11, 13, 15) CLEAR qf (13) CLOCK/TIMER SELECT 2 (20, 21, 26) CLOCK/TIMER SET 3 (9, 20, 21) DISC SKIP 0 (11, 13) DISPLAY w; (16, 22) ENTER 9 (9, 13, 20, 21) EQ qd (19) FM MODE 4 (16, 27) FUNCTION 6 (11, 13, 15, 17, 23) BUTTON DESCRIPTIONS P - Z PLAY MODE ql (11, 13, 18) REPEAT 4 (12) SLEEP wa (19) TAPE qh (17) TUNER/BAND 5 (14, 15) TUNER MEMORY qk (14) TUNING MODE ql (14, 15) VOLUME +/- qa (20, 26) ?/1 (power) 1 (8, 15, 20, 21, 28) m/M (rewind/fast forward) 7 (11, 17) ./> (skip back/skip forward) qg (9, 11, 13, 19, 20, 21) x (stop) 8 (11, 15, 17, 18, 28) X (pause) 8 (11, 17) N (play) 8 (11, 13, 17, 27) +/- (tuning) qg (14, 15) wa 1 Setting the clock Use buttons on the remote for the operation. 1 Press ?/1 to turn on the system. 2 Press CLOCK/TIMER SET. 3 Press ./> repeatedly to set the hour. 4 Press ENTER. 5 Press ./> repeatedly to set the minute. 6 Press ENTER. The clock starts working. To adjust the clock 1 Press CLOCK/TIMER SET. 2 Press ./> until "CLOCK SET" appears, then press ENTER. 3 Do the same procedures as step 3 to 6 above. Note The clock is not displayed in Power Saving Mode w; 2 ql 3 qk 4 qj 5 qh 6 qg 7 8 qf 9 qd 0 qa qs 6
-
 1
1 -
 2
2 -
 3
3 -
 4
4 -
 5
5 -
 6
6 -
 7
7 -
 8
8 -
 9
9 -
 10
10 -
 11
11 -
 12
12 -
13
-
14
-
15
-
16
-
17
-
18
-
19
-
20
-
21
-
22
-
23
-
24
-
25
-
26
-
27
-
28
-
29
-
30
-
31
-
32
-
33
-
34
-
35
-
36
-
37
-
38
-
39
-
40
-
41
-
42
-
43
-
44
-
45
-
46
-
47
-
48
-
49
-
50
-
51
-
52
-
53
-
54
-
55
-
56
-
57
-
58
-
59
-
60
-
61
-
62
-
63
-
64
-
65
-
66
-
67
-
68
-
69
-
70
-
71
-
72
-
73
-
74
-
75
-
76
-
77
-
78
-
79
-
80
-
81
-
82
-
83
-
84
-
85
-
86
-
87
-
88
-
89
-
90
-
91
-
92
-
93
-
94
-
95
-
96
-
97
-
98
-
99
-
100
-
101
-
102
-
103
-
104
-
105
-
106
-
107
-
108
-
109
-
110
 |
 |
