Sony HCD-LF10 Operating Instructions - Page 41
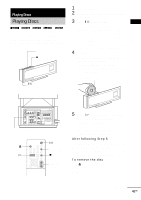
Playing Discs, After following Step 5, To remove the disc
 |
View all Sony HCD-LF10 manuals
Add to My Manuals
Save this manual to your list of manuals |
Page 41 highlights
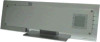
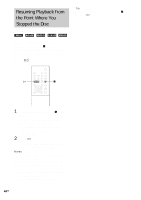
Playing Discs Playing Discs Playing Discs Depending on the DVD or VIDEO CD, some operations may be different or restricted. Refer to the operation details supplied with your disc. Disc slot Z "/1 Standby indicator 1 Turn on your TV. 2 Switch the input selector on the TV to this system. 3 Press "/1 on the system. The system turns on. Unless the mode of the system is set to "DVD," press FUNCTION on the remote or touch the Touch Panel Sensor (page 43) to select "DVD." "No Disc" appears in the front panel display and the system is ready for loading the disc. 4 Load a disc. Push the disc into the disc slot until the disc is pulled in automatically. The disc is drawn into the system automatically and "Reading" appears in the front panel display. Labeled side facing to the front VIDEO COMPONENT VIDEO OUT ANTENNA Y PB/CB PR/CR SCAN SELECT SELECTABLE INTERLACE S VIDEO (DVD ONLY) MONITOR OUTPUT VIDEO IN VIDEO IN DIR-T1 PHONES DIR-R4 AUDIO IN L AUDIO IN OPTICAL L DIGITAL IN R VIDEO R SAT AM FM 75 COAXIAL FRONT R CENTER FRONT L (FOR SS-TSL10 , SS-CTL10) SPEAKER SYSTEM CONNECTOR FOR HCD-LF10 Connect headphones "/1 Z FUNCTION H x Adjust the volume 5 Press H on the remote or touch the Touch Panel Sensor (page 43). The system starts playback (continuous play). Adjust the volume on the remote or the Touch Panel Sensor (page 43). After following Step 5 Depending on the disc, a menu may appear on the TV screen. You can play the disc interactively by following the instructions on the menu. (DVD: page 45), (VIDEO CD: page 46). To remove the disc Press Z. Remove the disc after it is ejected from the system. "No Disc" appears in the front panel display. continued 41GB
-
 1
1 -
2
-
3
-
4
-
5
-
6
-
7
-
8
-
9
-
10
-
11
-
12
-
13
-
14
-
15
-
16
-
17
-
18
-
19
-
20
-
21
-
22
-
23
-
24
-
25
-
26
-
27
-
28
-
29
-
30
-
31
-
32
-
33
-
34
-
35
-
 36
36 -
 37
37 -
 38
38 -
 39
39 -
 40
40 -
 41
41 -
 42
42 -
 43
43 -
 44
44 -
 45
45 -
 46
46 -
47
-
48
-
49
-
50
-
51
-
52
-
53
-
54
-
55
-
56
-
57
-
58
-
59
-
60
-
61
-
62
-
63
-
64
-
65
-
66
-
67
-
68
-
69
-
70
-
71
-
72
-
73
-
74
-
75
-
76
-
77
-
78
-
79
-
80
-
81
-
82
-
83
-
84
-
85
-
86
-
87
-
88
-
89
-
90
-
91
-
92
-
93
-
94
-
95
-
96
-
97
-
98
-
99
-
100
-
101
-
102
-
103
-
104
-
105
-
106
-
107
-
108
-
109
-
110
-
111
-
112
-
113
-
114
-
115
-
116
-
117
-
118
-
119
-
120
 |
 |
