Sony HDR-AX2000 Operating Guide (Large File - 11.29 MB) - Page 30
Adjusting the focus manually, To restore automatic adjustment, Using automatic focus temporarily - tripod
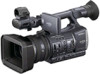 |
UPC - 027242781733
View all Sony HDR-AX2000 manuals
Add to My Manuals
Save this manual to your list of manuals |
Page 30 highlights
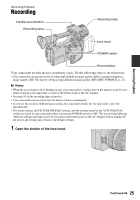
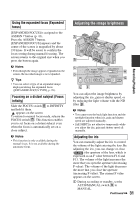
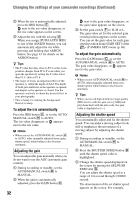
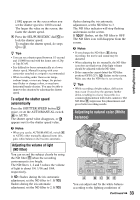
Changing the settings of your camcorder recordings (Continued) Adjusting the focus manually 9 changes to when the focus cannot be adjusted any farther. 9 changes to when the focus cannot be adjusted any closer. z Tips For focusing manually • It is easier to focus on the subject when you use the zoom function. Move the power zoom lever towards T (telephoto) to adjust the focus, and then, towards W (wide angle) to adjust the zoom for recording. • When you want to record a close-up image of a subject, move the power zoom lever towards W (wide angle) to fully magnify the image, then adjust the focus. You can adjust the focus manually for different recording conditions. Use this function in the following cases. - To record a subject behind a window covered with raindrops. - To record horizontal stripes. - To record a subject with little contrast between the subject and its background. - When you want to focus on a subject in the background. - To record a stationary subject using a tripod. 1 During recording or standby, set the FOCUS switch B to MAN. 9 appears. 2 Rotate the focus ring A and adjust the focus. 30 To restore automatic adjustment Set the FOCUS switch B to AUTO. 9 disappears and the automatic focus adjustment is restored. Using automatic focus temporarily (Push auto focus) Record the subject while pressing and holding the PUSH AUTO button C. If you release the button, the setting returns to manual focusing. Use this function to shift the focus on one subject to another. The scenes will shift smoothly. z Tips • The focal distance information (for when it is dark and hard to adjust the focus) appears for about 3 seconds in the following cases. (It will not be displayed correctly if you are using a conversion lens (sold separately)). - When you set the FOCUS switch B to MAN and 9 appears on the screen - When you rotate the focus ring while 9 is displayed on the screen.
-
 1
1 -
2
-
3
-
4
-
5
-
6
-
7
-
8
-
9
-
10
-
11
-
12
-
13
-
14
-
15
-
16
-
17
-
18
-
19
-
20
-
21
-
22
-
23
-
24
-
 25
25 -
 26
26 -
 27
27 -
 28
28 -
 29
29 -
 30
30 -
 31
31 -
 32
32 -
 33
33 -
 34
34 -
 35
35 -
36
-
37
-
38
-
39
-
40
-
41
-
42
-
43
-
44
-
45
-
46
-
47
-
48
-
49
-
50
-
51
-
52
-
53
-
54
-
55
-
56
-
57
-
58
-
59
-
60
-
61
-
62
-
63
-
64
-
65
-
66
-
67
-
68
-
69
-
70
-
71
-
72
-
73
-
74
-
75
-
76
-
77
-
78
-
79
-
80
-
81
-
82
-
83
-
84
-
85
-
86
-
87
-
88
-
89
-
90
-
91
-
92
-
93
-
94
-
95
-
96
-
97
-
98
-
99
-
100
-
101
-
102
-
103
-
104
-
105
-
106
-
107
-
108
-
109
-
110
-
111
-
112
-
113
-
114
-
115
-
116
-
117
-
118
-
119
-
120
-
121
-
122
-
123
-
124
-
125
-
126
-
127
-
128
-
129
-
130
-
131
-
132
 |
 |
