Sony HDR-CX300 Operating Guide - Page 32
Play back movies and photos on, your camcorder p. 28., connected TV 16:9/4:3
 |
UPC - 027242788817
View all Sony HDR-CX300 manuals
Add to My Manuals
Save this manual to your list of manuals |
Page 32 highlights
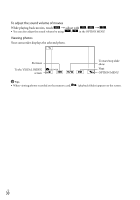
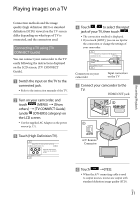
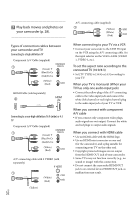
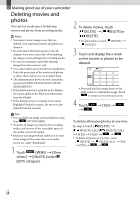
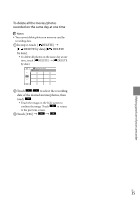
Play back movies and photos on your camcorder (p. 28). Types of connection cables between your camcorder and TV Connecting to a high definition TV Component A/V Cable (supplied) (Green) Y (Blue)PB/CB (Red)PR/CR (White) (Red) HDMI Cable (sold separately) Connecting to a non-high-definition 16:9 (wide) or 4:3 TV Component A/V Cable (supplied) (Green) Y (Blue)PB/CB (Red)PR/CR (White) (Red) A/V connecting cable with S VIDEO (sold separately) (White) (Red) (Yellow) US 32 A/V connecting cable (supplied) (Yellow) (White) (Red) When connecting to your TV via a VCR Connect your camcorder to the LINE IN input on the VCR using the A/V connecting cable. Set the input selector on the VCR to LINE (VIDEO 1, VIDEO 2, etc.). To set the aspect ratio according to the connected TV (16:9/4:3) Set [TV TYPE] to [16:9] or [4:3] according to your TV. When your TV is monaural (When your TV has only one audio input jack) Connect the yellow plug of the A/V connecting cable to the video input jack and connect the white (left channel) or red (right channel) plug to the audio input jack of your TV or VCR. When you connect with component A/V cable If you connect only component video plugs, audio signals are not output. Connect the white and red plugs to output audio signals. When you connect with HDMI cable Use an HDMI cable with the HDMI logo. Use an HDMI mini connector on one end (for the camcorder), and a plug suitable for connecting your TV on the other end. Copyright-protected images are not output from the HDMI OUT jack of your camcorder. Some TVs may not function correctly (e.g., no sound or image) with this connection. Do not connect the camcorder HDMI OUT jack to an external device HDMI OUT jack, as malfunction may result.
-
 1
1 -
2
-
3
-
4
-
5
-
6
-
7
-
8
-
9
-
10
-
11
-
12
-
13
-
14
-
15
-
16
-
17
-
18
-
19
-
20
-
21
-
22
-
23
-
24
-
25
-
26
-
 27
27 -
 28
28 -
 29
29 -
 30
30 -
 31
31 -
 32
32 -
 33
33 -
 34
34 -
 35
35 -
 36
36 -
 37
37 -
38
-
39
-
40
-
41
-
42
-
43
-
44
-
45
-
46
-
47
-
48
-
49
-
50
-
51
-
52
-
53
-
54
-
55
-
56
-
57
-
58
-
59
-
60
-
61
-
62
-
63
-
64
-
65
-
66
-
67
-
68
-
69
-
70
-
71
-
72
-
73
-
74
-
75
-
76
-
77
-
78
-
79
-
80
-
81
-
82
-
83
-
84
-
85
-
86
-
87
-
88
-
89
-
90
-
91
-
92
-
93
-
94
-
95
-
96
-
97
-
98
-
99
-
100
-
101
-
102
-
103
-
104
-
105
-
106
-
107
-
108
-
109
-
110
-
111
-
112
-
113
-
114
-
115
-
116
-
117
-
118
-
119
-
120
-
121
-
122
-
123
-
124
-
125
-
126
-
127
-
128
-
129
-
130
-
131
-
132
-
133
-
134
-
135
-
136
-
137
-
138
-
139
-
140
-
141
-
142
-
143
-
144
-
145
-
146
-
147
-
148
-
149
-
150
-
151
-
152
-
153
-
154
-
155
 |
 |
