Sony HDR-CX300 Operating Guide - Page 46
Copying a disc, Editing movies, Capturing photos from a movie, At the top of the window, click
 |
UPC - 027242788817
View all Sony HDR-CX300 manuals
Add to My Manuals
Save this manual to your list of manuals |
Page 46 highlights
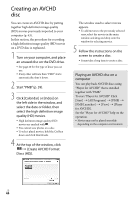
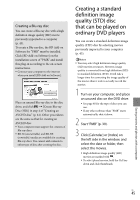
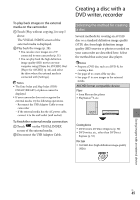
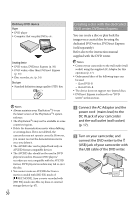
4 At the top of the window, click [Create DVD-Video Format Discs (STD)]. The window used to select movies appears. To add movies to the previously selected ones, select the movies in the main window and drag and drop onto the window for selecting movies. 5 Follow the instructions on the screen to create a disc. It may take a long time to create a disc. Editing movies You can cut out only necessary parts from a movie and save it as another file. Double-click the movie to be edited on "PMB," then click [Show Edit Palette] on the right side of the screen [Trim Video], or select the [Manipulate] menu [Edit] [Trim Video]. See "PMB Help" (p. 39) for details. Capturing photos from a movie You can save a frame of a movie as a photo file. Double-click the movie to be edited on "PMB," then click [Show Edit Palette] on the right side of the screen [Save Frame]. See "PMB Help" (p. 39) for details. Copying a disc You can copy a recorded disc to another disc using "Video Disc Copier." Click [Start] [All Programs] [PMB] [PMB Launcher] [Disc Creation] [Video Disc Copier] to start the software. See "Video Disc Copier" help on the operation. You cannot copy high definition image quality (HD) movies by converting them to standard definition image quality (STD). You cannot copy to a Blu-ray disc. US 46
-
 1
1 -
2
-
3
-
4
-
5
-
6
-
7
-
8
-
9
-
10
-
11
-
12
-
13
-
14
-
15
-
16
-
17
-
18
-
19
-
20
-
21
-
22
-
23
-
24
-
25
-
26
-
27
-
28
-
29
-
30
-
31
-
32
-
33
-
34
-
35
-
36
-
37
-
38
-
39
-
40
-
 41
41 -
 42
42 -
 43
43 -
 44
44 -
 45
45 -
 46
46 -
 47
47 -
 48
48 -
 49
49 -
 50
50 -
 51
51 -
52
-
53
-
54
-
55
-
56
-
57
-
58
-
59
-
60
-
61
-
62
-
63
-
64
-
65
-
66
-
67
-
68
-
69
-
70
-
71
-
72
-
73
-
74
-
75
-
76
-
77
-
78
-
79
-
80
-
81
-
82
-
83
-
84
-
85
-
86
-
87
-
88
-
89
-
90
-
91
-
92
-
93
-
94
-
95
-
96
-
97
-
98
-
99
-
100
-
101
-
102
-
103
-
104
-
105
-
106
-
107
-
108
-
109
-
110
-
111
-
112
-
113
-
114
-
115
-
116
-
117
-
118
-
119
-
120
-
121
-
122
-
123
-
124
-
125
-
126
-
127
-
128
-
129
-
130
-
131
-
132
-
133
-
134
-
135
-
136
-
137
-
138
-
139
-
140
-
141
-
142
-
143
-
144
-
145
-
146
-
147
-
148
-
149
-
150
-
151
-
152
-
153
-
154
-
155
 |
 |
