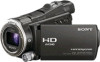
Sony HDR-CX700V Handycam® Handbook - Page 124
Wireless Remote Commander, MIC PLUG IN POWER jack - release date
 |
UPC - 027242820135
View all Sony HDR-CX700V manuals
Add to My Manuals
Save this manual to your list of manuals |
Page 124 highlights
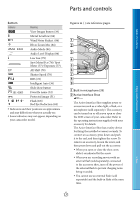
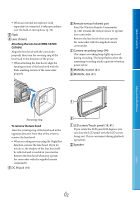
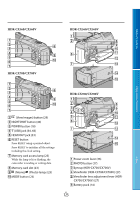
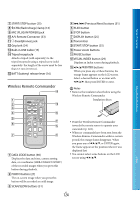
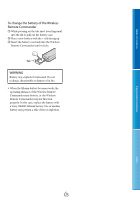
Table of Contents START/STOP button (25) /CHG (flash/charge) lamp (14) MIC (PLUG IN POWER) jack A/V Remote Connector (33) (headphones) jack Grip belt (24) Built-in USB Cable (15) Tripod receptacle Attach a tripod (sold separately) to the tripod receptacle using a tripod screw (sold separately: the length of the screw must be less than 5.5 mm (7/32 in.)). BATT (battery) release lever (16) Wireless Remote Commander Previous/Next) buttons (31) PLAY button STOP button DISPLAY button (25) Transmitter START/STOP button (25) Power zoom buttons PAUSE button VISUAL INDEX button (29) Displays an Index screen during playback. ENTER buttons When you press any of these buttons, the orange frame appears on the LCD screen. Select a desired button or an item with then press ENTER to enter. Notes Remove the insulation sheet before using the Wireless Remote Commander. Insulation sheet Enjoy Useful Functions Index DATA CODE button (90) Displays the date and time, camera setting data, or coordinates (HDR-CX560V/CX700V) of the recorded images when you press this button during playback. PHOTO button (27) The on-screen image when you press this button will be recorded as a still image. SCAN/SLOW buttons (31) Point the Wireless Remote Commander towards the remote sensor to operate your camcorder (p. 122). When no commands have been sent from the Wireless Remote Commander within a certain period, the orange frame disappears. When you press any of or ENTER again, the frame appears at the position where it was displayed last. You cannot select some buttons on the LCD screen using US 124
-
 1
1 -
2
-
3
-
4
-
5
-
6
-
7
-
8
-
9
-
10
-
11
-
12
-
13
-
14
-
15
-
16
-
17
-
18
-
19
-
20
-
21
-
22
-
23
-
24
-
25
-
26
-
27
-
28
-
29
-
30
-
31
-
32
-
33
-
34
-
35
-
36
-
37
-
38
-
39
-
40
-
41
-
42
-
43
-
44
-
45
-
46
-
47
-
48
-
49
-
50
-
51
-
52
-
53
-
54
-
55
-
56
-
57
-
58
-
59
-
60
-
61
-
62
-
63
-
64
-
65
-
66
-
67
-
68
-
69
-
70
-
71
-
72
-
73
-
74
-
75
-
76
-
77
-
78
-
79
-
80
-
81
-
82
-
83
-
84
-
85
-
86
-
87
-
88
-
89
-
90
-
91
-
92
-
93
-
94
-
95
-
96
-
97
-
98
-
99
-
100
-
101
-
102
-
103
-
104
-
105
-
106
-
107
-
108
-
109
-
110
-
111
-
112
-
113
-
114
-
115
-
116
-
117
-
118
-
 119
119 -
 120
120 -
 121
121 -
 122
122 -
 123
123 -
 124
124 -
 125
125 -
 126
126 -
 127
127 -
 128
128
 |
 |
