Sony HDR-TD30V Operating Guide - Page 52
Saving images on an external media device
 |
View all Sony HDR-TD30V manuals
Add to My Manuals
Save this manual to your list of manuals |
Page 52 highlights
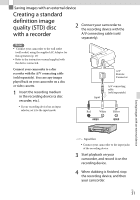
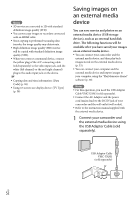
Notes 3D movies are converted to 2D with standard definition image quality (STD). You cannot copy images to recorders connected with an HDMI cable. Since copying is performed via analog data transfer, the image quality may deteriorate. High definition image quality (HD) movies will be copied with standard definition image quality (STD). When you connect a monaural device, connect the yellow plug of the A/V connecting cable (sold separately) to the video input jack, and the white (left channel) or the red (right channel) plug to the audio input jack on the device. Copying date and time information: [Data Code] (p. 58) Using 4:3 screen size display device: [TV Type] (p. 58) Saving images on an external media device You can save movies and photos on an external media device (USB storage devices), such as an external hard disk drive. The following functions will be available after you have saved your images on an external media device. You can connect your camcorder and the external media device, and then play back images stored on the external media device (p. 53). You can connect your computer and the external media device and import images to your computer using the "PlayMemories Home" software (p. 50). Notes For this operation, you need the USB Adaptor Cable VMC-UAM1 (sold separately). Connect the AC Adaptor and the power cord (mains lead) to the DC IN jack of your camcorder and the wall outlet (wall socket). Refer to the instruction manual supplied with the external media device. 1 Connect your camcorder and the external media device using the USB Adaptor Cable (sold separately). USB Adaptor Cable VMC-UAM1 (sold separately) US 52
-
 1
1 -
2
-
3
-
4
-
5
-
6
-
7
-
8
-
9
-
10
-
11
-
12
-
13
-
14
-
15
-
16
-
17
-
18
-
19
-
20
-
21
-
22
-
23
-
24
-
25
-
26
-
27
-
28
-
29
-
30
-
31
-
32
-
33
-
34
-
35
-
36
-
37
-
38
-
39
-
40
-
41
-
42
-
43
-
44
-
45
-
46
-
 47
47 -
 48
48 -
 49
49 -
 50
50 -
 51
51 -
 52
52 -
 53
53 -
 54
54 -
 55
55 -
 56
56 -
 57
57 -
58
-
59
-
60
-
61
-
62
-
63
-
64
-
65
-
66
-
67
-
68
-
69
-
70
-
71
-
72
-
73
-
74
-
75
-
76
-
77
-
78
-
79
-
80
-
81
-
82
-
83
-
84
 |
 |
