Sony HMD-A100 Operating Instructions - Page 10
picture's sides PIN/PIN BALANCE
 |
View all Sony HMD-A100 manuals
Add to My Manuals
Save this manual to your list of manuals |
Page 10 highlights
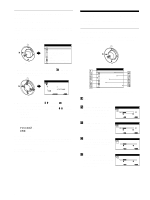
Adjusting the brightness and contrast (BRIGHTNESS/CONTRAST) Brightness and contrast adjustments are made using a separate BRIGHTNESS/CONTRAST menu. These settings are stored in memory for all input signals. 1 Move the control button in any direction. The BRIGHTNESS/CONTRAST menu appears on the screen. BR I GHTNESS / CONTRAST 26 26 68 . 7 kHz / 85 . 0Hz 1024 768 2 Move the control button m/M to adjust the brightness ( ), and
-
 1
1 -
2
-
3
-
4
-
 5
5 -
 6
6 -
 7
7 -
 8
8 -
 9
9 -
 10
10 -
 11
11 -
 12
12 -
 13
13 -
 14
14 -
 15
15 -
16
-
17
-
18
-
19
-
20
-
21
-
22
-
23
-
24
-
25
-
26
-
27
-
28
-
29
-
30
-
31
-
32
-
33
-
34
-
35
-
36
-
37
-
38
-
39
-
40
-
41
-
42
-
43
-
44
-
45
-
46
-
47
-
48
 |
 |

10
Adjusting the brightness and
contrast
(BRIGHTNESS/CONTRAST)
Brightness and contrast adjustments are made using a separate
BRIGHTNESS/CONTRAST menu.
These settings are stored in memory for all input signals.
1
Move the control button in any direction.
The BRIGHTNESS/CONTRAST menu appears on the
screen.
2
Move the control button
m
/
M
to adjust the
brightness (
), and
<
/
,
to adjust the contrast
(
6
).
The menu automatically disappears after about 3 seconds.
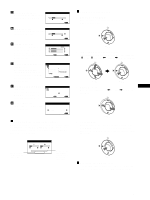
Adjusting the horizontal size or
centering of the picture
(H-SIZE/CENTER)
These settings are stored in memory for the current input signal.
1
Press the center of the control button.
The main MENU appears on the screen.
2
Move the control button to highlight
H-SIZE/
CENTER, and press the center of the control button
again.
The H-SIZE/CENTER menu appears on the screen.
3
First move the control button
m
/
M
to select the
desired adjustment item. Then move the control
button
<
/
,
to make the adjustment.
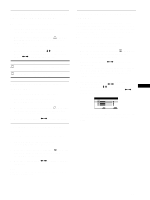
Adjusting the vertical size or
centering of the picture
(V-SIZE/CENTER)
These settings are stored in memory for the current input signal.
1
Press the center of the control button.
The main MENU appears on the screen.
2
Move the control button to highlight
V-SIZE/
CENTER, and press the center of the control button
again.
The V-SIZE/CENTER menu appears on the screen.
3
First move the control button
m
/
M
to select the
desired adjustment item. Then move the control
button
<
/
,
to make the adjustment.
Adjusting the curvature of the
picture’s sides (PIN/PIN BALANCE)
These settings are stored in memory for the current input signal.
1
Press the center of the control button.
The main MENU appears on the screen.
2
Move the control button to highlight
PIN/PIN
BALANCE, and press the center of the control
button again.
The PIN/PIN BALANCE menu appears on the screen.
3
First move the control button
m
/
M
to select the
desired adjustment item. Then move the control
button
<
/
,
to make the adjustment.
Select
To
H-SIZE
adjust the horizontal size
H-CENTER
adjust the horizontal centering
26
26
68 . 7kHz / 85 . 0Hz
1024
768
BR I GHTNESS / CONTRAST
Select
To
V-SIZE
adjust the vertical size
V-CENTER
adjust the vertical centering
Select
To
PIN
expand or contract the picture sides
PIN BALANCE
shift the picture sides to the left or right