Sony HT-7100DH Operating Instructions - Page 17
L1 - 3a: Connecting the audio components, To connect the speakers, correctly
 |
View all Sony HT-7100DH manuals
Add to My Manuals
Save this manual to your list of manuals |
Page 17 highlights
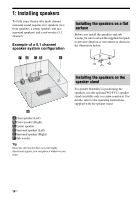
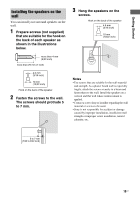
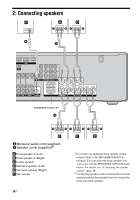
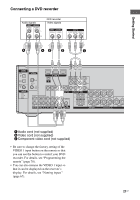
Getting Started To connect the speakers correctly Check the speaker type by referring to the speaker label* on the rear panel of the speakers. Character on speaker label L R SL SR Speaker type Front left Front right Surround left Surround right * The center speaker and sub woofer do not have any character on the speaker label. For details on the speaker type, see page 3. Tip Use the supplied speakers to optimize the system's performance. 3a: Connecting the audio components Connecting a Super Audio CD/CD player/CD recorder The following illustration shows how to connect a Super Audio CD player, CD player or CD recorder. After connecting your audio component, proceed to "3b: Connecting the video components" (page 18) or "4: Connecting the antennas" (page 26). Super Audio CD player/ CD player/ CD recorder A DIGITAL (ASSIGNABLE) OPTICAL SAT IN VIDEO 2/ BD IN COAXIAL DVD IN DMPORT ANTENNA AM DVD IN VIDEO 2/BD IN OUT HDMI XM VIDEO IN VIDEO IN VIDEO OUT VIDEO IN L L L L R R OUT IN IN SA-CD/CD/CD-R TV R AUDIO IN AUDIO IN SAT DVD R AUDIO OUT AUDIO IN VIDEO 1 A Audio cord (not supplied) 17US
-
 1
1 -
2
-
3
-
4
-
5
-
6
-
7
-
8
-
9
-
10
-
11
-
 12
12 -
 13
13 -
 14
14 -
 15
15 -
 16
16 -
 17
17 -
 18
18 -
 19
19 -
 20
20 -
 21
21 -
 22
22 -
23
-
24
-
25
-
26
-
27
-
28
-
29
-
30
-
31
-
32
-
33
-
34
-
35
-
36
-
37
-
38
-
39
-
40
-
41
-
42
-
43
-
44
-
45
-
46
-
47
-
48
-
49
-
50
-
51
-
52
-
53
-
54
-
55
-
56
-
57
-
58
-
59
-
60
-
61
-
62
-
63
-
64
-
65
-
66
-
67
-
68
-
69
-
70
-
71
-
72
-
73
-
74
-
75
-
76
-
77
-
78
-
79
-
80
-
81
-
82
-
83
-
84
 |
 |
