Sony HT-7100DH Operating Instructions - Page 67
L1 - Naming inputs, Assignable inputs for digital, audio input
 |
View all Sony HT-7100DH manuals
Add to My Manuals
Save this manual to your list of manuals |
Page 67 highlights
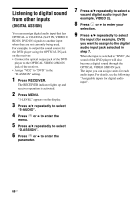
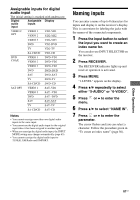
Assignable inputs for digital audio input The initial setting is marked with underscore. Digital audio Assignable Display inputs input VIDEO 2 OPT VIDEO 1 VIDEO 2 VD2-VD1 VD2-VD2 VIDEO 3 VD2-VD3 DVD VD2-DVD TV VD2-TV SA-CD/CD VD2-CD DVD COAX VIDEO 1 VIDEO 2 DVD-VD1 DVD-VD2 VIDEO 3 DVD-VD3 DVD DVD-DVD SAT DVD-SAT TV DVD-TV SA-CD/CD DVD-CD SAT OPT VIDEO 1 SAT-VD1 VIDEO 3 SAT -VD3 DVD SAT -DVD SAT SAT-SAT TV SAT-TV SA-CD/CD SAT-CD Notes • You cannot reassign more than one digital audio inputs to the same input. • You cannot use the digital audio input for the original input when it has been assigned to another input. • When you reassign the digital audio input, the INPUT MODE setting may change automatically (page 63). • You cannot reassign the digital audio input to TUNER, XM Radio and DMPORT. Naming inputs You can enter a name of up to 8 characters for inputs and display it on the receiver's display. This is convenient for labeling the jacks with the names of the connected components. 1 Press the input button to select the input you want to create an index name for. You can also use INPUT SELECTOR on the receiver. 2 Press RECEIVER. The RECEIVER indicator lights up and receiver operation is activated. 3 Press MENU. "1-LEVEL" appears on the display. 4 Press V/v repeatedly to select either "5-AUDIO" or "6-VIDEO". 5 Press or b to enter the menu. 6 Press V/v to select "NAME IN". 7 Press or b to enter the parameter. The cursor flashes and you can select a character. Follow the procedure given in "To create an index name" (page 56). Other Operations 67US
-
 1
1 -
2
-
3
-
4
-
5
-
6
-
7
-
8
-
9
-
10
-
11
-
12
-
13
-
14
-
15
-
16
-
17
-
18
-
19
-
20
-
21
-
22
-
23
-
24
-
25
-
26
-
27
-
28
-
29
-
30
-
31
-
32
-
33
-
34
-
35
-
36
-
37
-
38
-
39
-
40
-
41
-
42
-
43
-
44
-
45
-
46
-
47
-
48
-
49
-
50
-
51
-
52
-
53
-
54
-
55
-
56
-
57
-
58
-
59
-
60
-
61
-
 62
62 -
 63
63 -
 64
64 -
 65
65 -
 66
66 -
 67
67 -
 68
68 -
 69
69 -
 70
70 -
 71
71 -
 72
72 -
73
-
74
-
75
-
76
-
77
-
78
-
79
-
80
-
81
-
82
-
83
-
84
 |
 |
