Sony HTCT500 Operating Instructions - Page 53
DMPORT function, Features of DIGITAL MEDIA PORT (DMPORT), Selecting the operation screen
 |
UPC - 027242757561
View all Sony HTCT500 manuals
Add to My Manuals
Save this manual to your list of manuals |
Page 53 highlights
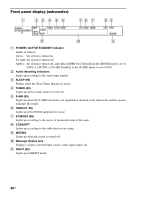
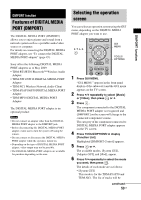
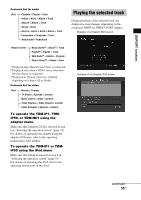
DMPORT function Features of DIGITAL MEDIA PORT (DMPORT) The DIGITAL MEDIA PORT (DMPORT) allows you to enjoy picture and sound from a network system such as a portable audio/video source or computer. For details on connecting the DIGITAL MEDIA PORT adapter, see "To connect the DIGITAL MEDIA PORT adapter" (page 45). Sony offers the following DIGITAL MEDIA PORT adapters as of May 2009: • TDM-BT1/BT10 Bluetooth™ Wireless Audio Adapter • TDM-NW1/NW10 DIGITAL MEDIA PORT Adapter • TDM-NC1 Wireless Network Audio Client • TDM-iP1/iP10/iP50 DIGITAL MEDIA PORT Adapter • TDM-MP10 DIGITAL MEDIA PORT Adapter The DIGITAL MEDIA PORT adapter is an optional product. Notes • Do not connect an adapter other than the DIGITAL MEDIA PORT adapter to the DMPORT jack. • Before disconnecting the DIGITAL MEDIA PORT adapter, make sure to turn the system off using the remote. • Do not connect or disconnect the DIGITAL MEDIA PORT adapter while the system is turned on. • Depending on the type of DIGITAL MEDIA PORT adapter, video output may not be possible. • The DIGITAL MEDIA PORT adapters are available for purchase depending on the area. Selecting the operation screen You can select an operation screen using the GUI menu, depending on the DIGITAL MEDIA PORT adapter you want to use. YELLOW BLUE RED GREEN C, X, x, c, DISPLAY GUI MENU GUI MENU RETURN/ EXIT HOME MENU TOOLS/ OPTIONS PRESET REPLAY ADVANCE PRESET TUNING TUNING TOOLS/ OPTIONS 1 Press GUI MENU. "GUI MENU" appears in the front panel display of the subwoofer and the GUI menu appears on the TV screen. 2 Press X/x repeatedly to select [Music] or [Video], then press or c. 3 Press . The component connected to the DIGITAL MEDIA PORT adapter is recognized and [DMPORT] on the screen will change to the connected component's name. The category of the component connected to DIGITAL MEDIA PORT adapter appears on the TV screen. 4 Press TOOLS/OPTIONS to display [Function List]. Highlighted [DMPORT Control] appears. 5 Press or c. The available modes, [System GUI], [Adapter GUI], and [iPod], appear. 6 Press X/x repeatedly to select the mode you want, then press . The details of each mode are as follows: • [System GUI] This mode is for the TDM-iP1/iP50 and TDM-NC1. The list of tracks will be continued 53US DMPORT function
-
 1
1 -
2
-
3
-
4
-
5
-
6
-
7
-
8
-
9
-
10
-
11
-
12
-
13
-
14
-
15
-
16
-
17
-
18
-
19
-
20
-
21
-
22
-
23
-
24
-
25
-
26
-
27
-
28
-
29
-
30
-
31
-
32
-
33
-
34
-
35
-
36
-
37
-
38
-
39
-
40
-
41
-
42
-
43
-
44
-
45
-
46
-
47
-
 48
48 -
 49
49 -
 50
50 -
 51
51 -
 52
52 -
 53
53 -
 54
54 -
 55
55 -
 56
56 -
 57
57 -
 58
58 -
59
-
60
-
61
-
62
-
63
-
64
-
65
-
66
-
67
-
68
-
69
-
70
-
71
-
72
-
73
-
74
-
75
-
76
-
77
-
78
-
79
-
80
-
81
-
82
-
83
-
84
-
85
-
86
-
87
-
88
-
89
-
90
-
91
-
92
-
93
-
94
-
95
-
96
-
97
-
98
-
99
-
100
-
101
-
102
-
103
-
104
-
105
-
106
-
107
-
108
-
109
-
110
-
111
-
112
-
113
-
114
-
115
-
116
-
117
-
118
-
119
-
120
-
121
-
122
-
123
-
124
-
125
-
126
-
127
-
128
-
129
-
130
-
131
-
132
-
133
-
134
-
135
-
136
-
137
-
138
-
139
-
140
-
141
-
142
-
143
-
144
-
145
-
146
-
147
-
148
-
149
-
150
-
151
-
152
-
153
-
154
-
155
-
156
-
157
-
158
-
159
-
160
-
161
-
162
-
163
-
164
-
165
-
166
-
167
-
168
-
169
-
170
-
171
-
172
-
173
-
174
-
175
-
176
-
177
-
178
-
179
-
180
-
181
-
182
-
183
-
184
-
185
-
186
-
187
-
188
-
189
-
190
-
191
-
192
-
193
-
194
-
195
-
196
-
197
-
198
-
199
-
200
-
201
-
202
-
203
-
204
-
205
-
206
-
207
-
208
-
209
-
210
-
211
-
212
-
213
-
214
-
215
-
216
-
217
-
218
-
219
-
220
-
221
-
222
-
223
-
224
-
225
-
226
-
227
-
228
-
229
-
230
-
231
-
232
-
233
-
234
-
235
-
236
-
237
-
238
-
239
-
240
-
241
-
242
-
243
-
244
-
245
-
246
-
247
-
248
-
249
-
250
-
251
-
252
-
253
-
254
-
255
-
256
-
257
-
258
-
259
-
260
-
261
-
262
-
263
-
264
-
265
-
266
-
267
-
268
-
269
-
270
-
271
-
272
-
273
-
274
-
275
-
276
-
277
-
278
-
279
-
280
-
281
-
282
-
283
-
284
-
285
-
286
-
287
-
288
-
289
-
290
-
291
-
292
-
293
-
294
-
295
-
296
-
297
-
298
-
299
-
300
-
301
-
302
-
303
-
304
-
305
-
306
-
307
-
308
-
309
-
310
-
311
-
312
-
313
-
314
-
315
-
316
-
317
-
318
-
319
-
320
-
321
-
322
-
323
-
324
-
325
-
326
-
327
-
328
-
329
-
330
-
331
-
332
-
333
-
334
-
335
-
336
-
337
-
338
-
339
-
340
 |
 |
