Sony HTCT500 Operating Instructions - Page 6
Table of contents, Getting Started, Playback Options, DMPORT function, Surround Sound Functions - controller
 |
UPC - 027242757561
View all Sony HTCT500 manuals
Add to My Manuals
Save this manual to your list of manuals |
Page 6 highlights
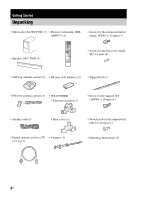
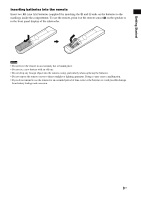
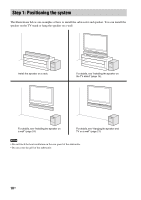
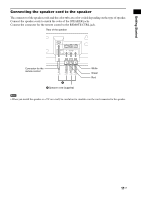
Table of contents Precautions 3 About the S-AIR function 5 Getting Started Unpacking 8 Step 1: Positioning the system 10 Warning about installing the system's speaker to the TV stand or a wall ....12 Step 2: Connecting the speaker 25 Step 3a: Connecting the components with HDMI jacks 27 Step 3b: Connecting the components without HDMI jacks 30 Setting up the sound output of the connected component 34 Function for conversion of video signals 35 Step 4: Connecting the antenna (aerial 37 Step 5: Connecting the AC power cord (mains lead 39 Step 6: Operating the system using the GUI 39 (Graphical User Interface) Connecting other components 45 Playback Options Index to parts and controls 47 Enjoying TV 50 Enjoying other components 51 DMPORT function Features of DIGITAL MEDIA PORT (DMPORT 53 Selecting the operation screen 53 Operating the component connected to the DIGITAL MEDIA PORT adapter ...54 Playing the selected track 55 Surround Sound Functions Enjoying the surround effects 57 Adjusting the bass and treble level ........58 Enjoying the sound at low volume.........59 (Night Mode) "BRAVIA" Sync features What is "BRAVIA" Sync 60 Preparing for the "BRAVIA" Sync....... 60 Enjoying a Blu-ray Disc/DVD 62 (One-Touch Play) Enjoying the TV sound from the speakers 62 (System Audio Control) Turning off the TV, system, and connected components 64 (System Power Off) Enjoying the components while the system is in standby mode 65 (HDMI Pass Through) Tuner Functions Listening to FM/AM radio using the GUI menu 66 Listening to FM/AM radio using the front panel display of the subwoofer ....... 68 Advanced Settings Controlling connected Sony components with the remote 72 Changing the input button assignments of the remote 75 Setting the speaker level 78 Adjusting the delay between the sound and the image 79 (A/V Sync) Enjoying multiplex broadcast sound ..... 80 (Dual Mono) Reassigning the audio input 81 (Audio Assign) Converting the resolution of analog video input signals 82 (Resolution) Enjoying higher quality HDMI images 83 (Video Direct) Changing the brightness of the front panel display 84 (Dimmer) 6US
-
 1
1 -
 2
2 -
 3
3 -
 4
4 -
 5
5 -
 6
6 -
 7
7 -
 8
8 -
 9
9 -
 10
10 -
 11
11 -
 12
12 -
13
-
14
-
15
-
16
-
17
-
18
-
19
-
20
-
21
-
22
-
23
-
24
-
25
-
26
-
27
-
28
-
29
-
30
-
31
-
32
-
33
-
34
-
35
-
36
-
37
-
38
-
39
-
40
-
41
-
42
-
43
-
44
-
45
-
46
-
47
-
48
-
49
-
50
-
51
-
52
-
53
-
54
-
55
-
56
-
57
-
58
-
59
-
60
-
61
-
62
-
63
-
64
-
65
-
66
-
67
-
68
-
69
-
70
-
71
-
72
-
73
-
74
-
75
-
76
-
77
-
78
-
79
-
80
-
81
-
82
-
83
-
84
-
85
-
86
-
87
-
88
-
89
-
90
-
91
-
92
-
93
-
94
-
95
-
96
-
97
-
98
-
99
-
100
-
101
-
102
-
103
-
104
-
105
-
106
-
107
-
108
-
109
-
110
-
111
-
112
-
113
-
114
-
115
-
116
-
117
-
118
-
119
-
120
-
121
-
122
-
123
-
124
-
125
-
126
-
127
-
128
-
129
-
130
-
131
-
132
-
133
-
134
-
135
-
136
-
137
-
138
-
139
-
140
-
141
-
142
-
143
-
144
-
145
-
146
-
147
-
148
-
149
-
150
-
151
-
152
-
153
-
154
-
155
-
156
-
157
-
158
-
159
-
160
-
161
-
162
-
163
-
164
-
165
-
166
-
167
-
168
-
169
-
170
-
171
-
172
-
173
-
174
-
175
-
176
-
177
-
178
-
179
-
180
-
181
-
182
-
183
-
184
-
185
-
186
-
187
-
188
-
189
-
190
-
191
-
192
-
193
-
194
-
195
-
196
-
197
-
198
-
199
-
200
-
201
-
202
-
203
-
204
-
205
-
206
-
207
-
208
-
209
-
210
-
211
-
212
-
213
-
214
-
215
-
216
-
217
-
218
-
219
-
220
-
221
-
222
-
223
-
224
-
225
-
226
-
227
-
228
-
229
-
230
-
231
-
232
-
233
-
234
-
235
-
236
-
237
-
238
-
239
-
240
-
241
-
242
-
243
-
244
-
245
-
246
-
247
-
248
-
249
-
250
-
251
-
252
-
253
-
254
-
255
-
256
-
257
-
258
-
259
-
260
-
261
-
262
-
263
-
264
-
265
-
266
-
267
-
268
-
269
-
270
-
271
-
272
-
273
-
274
-
275
-
276
-
277
-
278
-
279
-
280
-
281
-
282
-
283
-
284
-
285
-
286
-
287
-
288
-
289
-
290
-
291
-
292
-
293
-
294
-
295
-
296
-
297
-
298
-
299
-
300
-
301
-
302
-
303
-
304
-
305
-
306
-
307
-
308
-
309
-
310
-
311
-
312
-
313
-
314
-
315
-
316
-
317
-
318
-
319
-
320
-
321
-
322
-
323
-
324
-
325
-
326
-
327
-
328
-
329
-
330
-
331
-
332
-
333
-
334
-
335
-
336
-
337
-
338
-
339
-
340
 |
 |