Sony HTCT500 Operating Instructions - Page 75
Changing the input button assignments of the remote, press TV yellow at the same time.
 |
UPC - 027242757561
View all Sony HTCT500 manuals
Add to My Manuals
Save this manual to your list of manuals |
Page 75 highlights
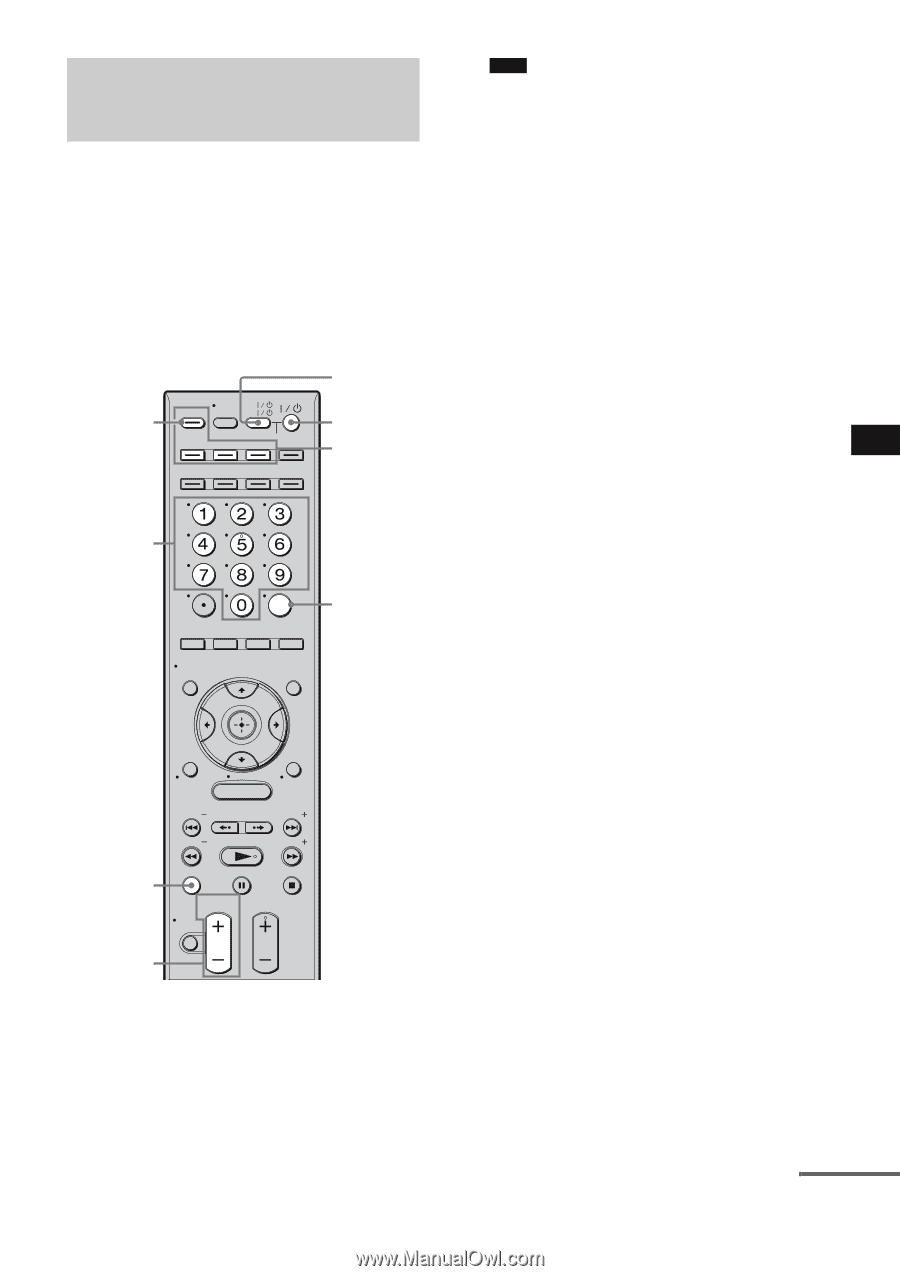
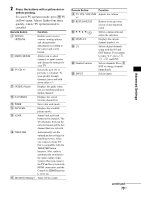
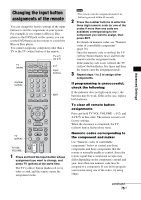
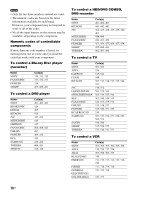
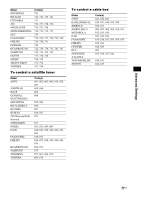
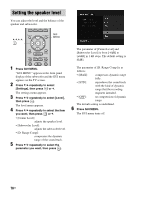
Advanced Settings Changing the input button assignments of the remote You can change the factory settings of the input buttons to suit the components in your system. For example, if you connect a Blu-ray Disc player to the DVD jack on the system, you can set the DVD button on this remote to control the Blu-ray Disc player. You cannot assign any component other than a TV to the TV (white) button of the remote. TV ?/1 AV ?/1 TV (white) TV TV INPUT AV SYSTEM STANDBY BD DVD SAT/CATV DMPORT TUNER/ VIDEO1 VIDEO2 VIDEO3 BAND ?/1 Input buttons Number buttons /CLEAR YELLOW BLUE ENT RED GREEN ENT DISPLAY GUI MENU RETURN/ EXIT HOME MENU TOOLS/ OPTIONS PRESET REPLAY ADVANCE PRESET TV (yellow) TV VOL VOLUME - TUNING TUNING TV TV VOL TV CH VOLUME CHANNEL MUTING 1 Press and hold the input button whose assignment you want to change, and press TV (yellow) at the same time. The TV (yellow) button flashes red every other second, and the remote enters the assignment mode. Note • The remote exits the assignment mode if no button is pressed within 60 seconds. 2 Press the number buttons to enter the three digit numeric code (or one of the codes if more than one code are available) corresponding to the component you want to assign, then press ENT. For details on numeric codes, see "Numeric codes of controllable components" (page 76). Once the numeric code is verified, the TV (yellow) button flashes twice and then the remote exits the assignment mode. If the numeric code is not verified, the TV (yellow) button flashes five times and then the remote exits the assignment mode. 3 Repeat steps 1 to 2 to assign other components. If programming is unsuccessful, check the following: If the indicator does not light up in step 1, the batteries may be weak. If this is the case, replace both batteries. To clear all remote button assignments Press and hold TV VOL VOLUME -, ?/1, and AV ?/1 in this order. The remote is reset to its factory settings. When the clearance is completed, the TV (yellow) button flashes three times. Numeric codes corresponding to the component and maker Use "Numeric codes of controllable components" below to control non-Sony components and Sony components that the remote is normally unable to control. Since the remote signal that a component accepts may differ depending on the component's model and year, more than one numeric code may be assigned to a component. If you fail to program your remote using one of the codes, try using others. continued 75US
-
 1
1 -
2
-
3
-
4
-
5
-
6
-
7
-
8
-
9
-
10
-
11
-
12
-
13
-
14
-
15
-
16
-
17
-
18
-
19
-
20
-
21
-
22
-
23
-
24
-
25
-
26
-
27
-
28
-
29
-
30
-
31
-
32
-
33
-
34
-
35
-
36
-
37
-
38
-
39
-
40
-
41
-
42
-
43
-
44
-
45
-
46
-
47
-
48
-
49
-
50
-
51
-
52
-
53
-
54
-
55
-
56
-
57
-
58
-
59
-
60
-
61
-
62
-
63
-
64
-
65
-
66
-
67
-
68
-
69
-
 70
70 -
 71
71 -
 72
72 -
 73
73 -
 74
74 -
 75
75 -
 76
76 -
 77
77 -
 78
78 -
 79
79 -
 80
80 -
81
-
82
-
83
-
84
-
85
-
86
-
87
-
88
-
89
-
90
-
91
-
92
-
93
-
94
-
95
-
96
-
97
-
98
-
99
-
100
-
101
-
102
-
103
-
104
-
105
-
106
-
107
-
108
-
109
-
110
-
111
-
112
-
113
-
114
-
115
-
116
-
117
-
118
-
119
-
120
-
121
-
122
-
123
-
124
-
125
-
126
-
127
-
128
-
129
-
130
-
131
-
132
-
133
-
134
-
135
-
136
-
137
-
138
-
139
-
140
-
141
-
142
-
143
-
144
-
145
-
146
-
147
-
148
-
149
-
150
-
151
-
152
-
153
-
154
-
155
-
156
-
157
-
158
-
159
-
160
-
161
-
162
-
163
-
164
-
165
-
166
-
167
-
168
-
169
-
170
-
171
-
172
-
173
-
174
-
175
-
176
-
177
-
178
-
179
-
180
-
181
-
182
-
183
-
184
-
185
-
186
-
187
-
188
-
189
-
190
-
191
-
192
-
193
-
194
-
195
-
196
-
197
-
198
-
199
-
200
-
201
-
202
-
203
-
204
-
205
-
206
-
207
-
208
-
209
-
210
-
211
-
212
-
213
-
214
-
215
-
216
-
217
-
218
-
219
-
220
-
221
-
222
-
223
-
224
-
225
-
226
-
227
-
228
-
229
-
230
-
231
-
232
-
233
-
234
-
235
-
236
-
237
-
238
-
239
-
240
-
241
-
242
-
243
-
244
-
245
-
246
-
247
-
248
-
249
-
250
-
251
-
252
-
253
-
254
-
255
-
256
-
257
-
258
-
259
-
260
-
261
-
262
-
263
-
264
-
265
-
266
-
267
-
268
-
269
-
270
-
271
-
272
-
273
-
274
-
275
-
276
-
277
-
278
-
279
-
280
-
281
-
282
-
283
-
284
-
285
-
286
-
287
-
288
-
289
-
290
-
291
-
292
-
293
-
294
-
295
-
296
-
297
-
298
-
299
-
300
-
301
-
302
-
303
-
304
-
305
-
306
-
307
-
308
-
309
-
310
-
311
-
312
-
313
-
314
-
315
-
316
-
317
-
318
-
319
-
320
-
321
-
322
-
323
-
324
-
325
-
326
-
327
-
328
-
329
-
330
-
331
-
332
-
333
-
334
-
335
-
336
-
337
-
338
-
339
-
340
 |
 |