Sony KDF 50WE655 Operating Instructions - Page 42
Two VCRs for Tape Editing
 |
UPC - 027242648500
View all Sony KDF 50WE655 manuals
Add to My Manuals
Save this manual to your list of manuals |
Page 42 highlights
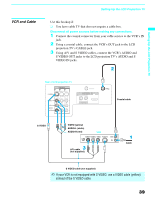
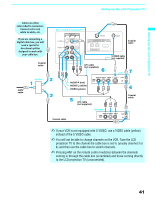
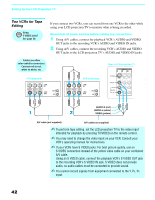
Setting Up the LCD Projection TV Two VCRs for Tape Editing Using S VIDEO jacks? See page 38. If you connect two VCRs, you can record from one VCR to the other while using your LCD projection TV to monitor what is being recorded. Disconnect all power sources before making any connections. 1 Using A/V cables, connect the playback VCR's AUDIO and VIDEO OUT jacks to the recording VCR's AUDIO and VIDEO IN jacks. 2 Using A/V cables, connect the recording VCR's AUDIO and VIDEO OUT jacks to the LCD projection TV's AUDIO and VIDEO IN jacks. Cables are often color-coded to connectors. Connect red to red, white to white, etc. VCR (playback) VCR (recording) Rear of LCD projection TV VIDEO IN 1 3 4 S VIDEO 7 VIDEO L (MONO) AUDIO R AUDIO-R (red) AUDIO-L (white) VIDEO (yellow) A/V cable (not supplied) A/V cable (not supplied) ✍ To perform tape editing, set the LCD projection TV to the video input intended for playback by pressing TV/VIDEO on the remote control. ✍ You may need to change the video input on your VCR. Consult your VCR's operating manual for instructions. ✍ If your VCRs have S VIDEO jacks: For best picture quality, use an S VIDEO connection instead of the yellow video cable on your combined A/V cable. Using an S VIDEO cable, connect the playback VCR's S VIDEO OUT jack to the recording VCR's S VIDEO IN jack. S VIDEO does not provide audio, so audio cables must be connected to provide sound. ✍ You cannot record signals from equipment connected to the Y, PB, PR input. 42
-
 1
1 -
2
-
3
-
4
-
5
-
6
-
7
-
8
-
9
-
10
-
11
-
12
-
13
-
14
-
15
-
16
-
17
-
18
-
19
-
20
-
21
-
22
-
23
-
24
-
25
-
26
-
27
-
28
-
29
-
30
-
31
-
32
-
33
-
34
-
35
-
36
-
 37
37 -
 38
38 -
 39
39 -
 40
40 -
 41
41 -
 42
42 -
 43
43 -
 44
44 -
 45
45 -
 46
46 -
 47
47 -
48
-
49
-
50
-
51
-
52
-
53
-
54
-
55
-
56
-
57
-
58
-
59
-
60
-
61
-
62
-
63
-
64
-
65
-
66
-
67
-
68
-
69
-
70
-
71
-
72
-
73
-
74
-
75
-
76
-
77
-
78
-
79
-
80
-
81
-
82
-
83
-
84
-
85
-
86
-
87
-
88
-
89
-
90
-
91
-
92
-
93
-
94
-
95
-
96
-
97
-
98
-
99
-
100
-
101
-
102
-
103
-
104
-
105
-
106
-
107
-
108
-
109
-
110
-
111
-
112
-
113
-
114
-
115
-
116
-
117
-
118
-
119
-
120
-
121
-
122
-
123
-
124
-
125
-
126
-
127
-
128
-
129
-
130
-
131
-
132
 |
 |
