Sony KDL-40SL150 Online Reference Book (.pdf version) - Page 34
Clock/Timers
 |
View all Sony KDL-40SL150 manuals
Add to My Manuals
Save this manual to your list of manuals |
Page 34 highlights
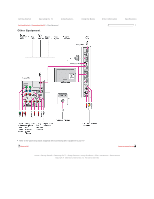
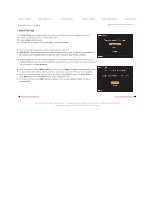
Getting Started Operating the TV Using Features Using the Menus Getting Started > Initial Setup Initial Setup The Initial Setup screen appears when you turn on the TV for the first time (shown to the right). 1) Select the language for the on-screen display text. 2) Select HOME or Retail mode. 3) Connect cable or antenna, then select OK to run Auto Program. Other Information If you have cable and antenna available, please connect cable first. IMPORTANT: Auto Program process is only effective when cable or antenna is connected. If you cancel Auto Program before completion some channels may not be available. 4) Auto Program will scan for available channels from the signal source directly connected to the TV's CABLE/ANTENNA input and may take sometime to complete the process. Follow the help text provided on the screen to run Auto Program. When prompted to select HOME or Retail, be sure to select HOME for ENERGY STAR compliant mode. If you use both cable without a box and antenna connections, use an A-B RF switch (not supplied). Select your preferred aspect ratio for the screen display. Press WIDE to select the Wide Mode or press MENU and set the Auto Wide to On under the Screen menu. To change the clock, press MENU and go to Setup menu then select Clock/Timers and adjust Current Time. Specifications Back to Other Equipment Next to Operating the TV Home | Getting Started | Operating the TV | Using Features | Using the Menus | Other Information | Specifications Copyright © 2009 Sony Electronics Inc. All rights reserved.
-
 1
1 -
2
-
3
-
4
-
5
-
6
-
7
-
8
-
9
-
10
-
11
-
12
-
13
-
14
-
15
-
16
-
17
-
18
-
19
-
20
-
21
-
22
-
23
-
24
-
25
-
26
-
27
-
28
-
 29
29 -
 30
30 -
 31
31 -
 32
32 -
 33
33 -
 34
34 -
 35
35 -
 36
36 -
 37
37 -
 38
38 -
 39
39 -
40
-
41
-
42
-
43
-
44
-
45
-
46
-
47
-
48
-
49
-
50
-
51
-
52
-
53
-
54
-
55
-
56
-
57
-
58
-
59
-
60
-
61
-
62
-
63
-
64
-
65
-
66
-
67
-
68
-
69
-
70
-
71
-
72
-
73
-
74
-
75
-
76
-
77
-
78
-
79
-
80
-
81
-
82
-
83
-
84
-
85
-
86
-
87
-
88
-
89
-
90
-
91
-
92
-
93
-
94
-
95
-
96
-
97
-
98
-
99
-
100
-
101
-
102
-
103
-
104
-
105
-
106
-
107
-
108
-
109
-
110
-
111
-
112
-
113
-
114
-
115
-
116
-
117
-
118
-
119
-
120
-
121
-
122
-
123
-
124
-
125
-
126
-
127
-
128
-
129
-
130
-
131
-
132
-
133
-
134
-
135
-
136
-
137
-
138
-
139
-
140
-
141
-
142
-
143
-
144
-
145
-
146
-
147
-
148
-
149
-
150
-
151
-
152
-
153
-
154
-
155
-
156
-
157
-
158
-
159
-
160
-
161
-
162
-
163
-
164
-
165
-
166
-
167
-
168
-
169
-
170
-
171
-
172
-
173
-
174
-
175
-
176
-
177
-
178
-
179
-
180
-
181
-
182
-
183
-
184
-
185
-
186
-
187
-
188
-
189
-
190
-
191
-
192
-
193
 |
 |
