Sony KV-27SXR10 Operating Instructions - Page 16
Timer/Block, Program, Start, Timer
 |
View all Sony KV-27SXR10 manuals
Add to My Manuals
Save this manual to your list of manuals |
Page 16 highlights
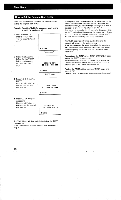
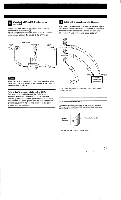
Timer/Block How to Set the Program Start Timer Make sure that the clock has been set correctly before setting the program start TIMER. Example: To set the TIMER for a program which begins at 10:30 PM on channel 12, 1 Press TIMER/BLOCK once to change from "normal page" to "clock page." 2 Press TIMER/BLOCK before the "AM"/"PM" Indication disappears and summon "TIMER page." 3 Press 1, 0, 3, 0, AM/PM, ENTER. Numbers will "wink" to indicate that the time' • has been set. 8:05PM "clock page" (TIMER SET) CH. ■II 8:05PM "TIMER page" (TIMER SET) 10:30PM CH. III 8,05Pm 4 Press 1, 2, ENTER (0 not necessary). Numbers will "wink" to indicate that the channel has been set. (TIMER SET) 10:30PM CH. 12 8:05PM At the preset time, the selected channel will appear on the screen and the TIMER lamp will go out. The TIMER will operate whether you are watching a TV program or a VCR playback, or even if you have turned off the TV. If no button is pressed within 2 hours after the preset time, an "OFF" indication will appear on the screen for 1 minute. If a button is still not touched during the 1 minute, the TV will turn off automatically as a safety precaution. The TIMER operates only once, but the time and the channel will remain in the unit's memory. If you want to preset the same channel at the same time for a future date, press TIMER OFF/REPEAT. The TIMER lamp will light up to indicate that the TIMER has been reactivated. To deactivate the TIMER, press TIMER OFF/REPEAT again so that the TIMER lamp goes out. It is not necessary to summon "TIMER page" to use the TIMER OFF/REPEAT button. Furthermore, this button is effective even if the TV has been turned off. To clear the TIMER setting, summon "TIMER page" and press CLEAR. To reset, clear the setting and follow the steps from step 3. The TIMER lamp will light up to indicate that the TIMER has been set. If you have made a mistake, press CLEAR and return to step 3. 16
-
 1
1 -
2
-
3
-
4
-
5
-
6
-
7
-
8
-
9
-
10
-
 11
11 -
 12
12 -
 13
13 -
 14
14 -
 15
15 -
 16
16 -
 17
17 -
 18
18 -
 19
19 -
 20
20 -
 21
21
 |
 |
