Sony MHC-GX450 MHCGX450 Instructions (tuner portion of Stereo System) - Page 32
Listening to audio using, wireless system, When the sound is distorted, To finish using WIRELESS
 |
View all Sony MHC-GX450 manuals
Add to My Manuals
Save this manual to your list of manuals |
Page 32 highlights
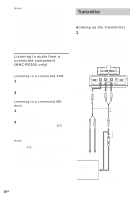
Listening to audio using wireless system 1 Start playing the connected component. 2 Press WIRELESS on the unit to switch the function to WIRELESS. When the sound is distorted 1 Move CHANNEL 1-3 on the transmitter to select a radio frequency. CHANNEL 1: 913.4 MHz CHANNEL 2: 914.0 MHz CHANNEL 3: 914.6 MHz 2 Press WIRELESS on the unit. "AUTO SCAN" appears. If you do not hear clear audio, press WIRELESS on the unit several times. If this does not work, select another channel using CHANNEL 1-3 on the transmitter, then press WIRELESS on the unit again. To finish using WIRELESS function Press any function button to select different function and quit WIRELESS. Notes • You may not hear the beginning of the sound from the main unit until the transmitter starts sending the RF signals after detecting an audio signal. • If the transmitter is connected to the headphones jack of the source component, set the volume of that component as high as possible without distorting the audio signal. • If you hold the antenna of the transmitter with your hand, noise may occur. However this is not a malfunction. • When the transmitter is not to be used for a long period of time, disconnect the AC power adaptor from the wall outlet holding the plug. Do not pull on the cord. 32GB
-
 1
1 -
2
-
3
-
4
-
5
-
6
-
7
-
8
-
9
-
10
-
11
-
12
-
13
-
14
-
15
-
16
-
17
-
18
-
19
-
20
-
21
-
22
-
23
-
24
-
25
-
26
-
 27
27 -
 28
28 -
 29
29 -
 30
30 -
 31
31 -
 32
32 -
 33
33 -
 34
34 -
 35
35 -
 36
36 -
 37
37 -
38
-
39
-
40
-
41
-
42
-
43
-
44
-
45
-
46
-
47
-
48
 |
 |