Sony MHC-NX3AV Operating Instructions (primary manual) - Page 13
Recording a CD
 |
View all Sony MHC-NX3AV manuals
Add to My Manuals
Save this manual to your list of manuals |
Page 13 highlights
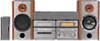
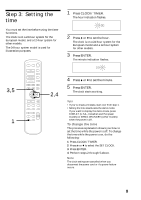
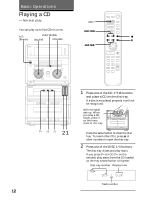
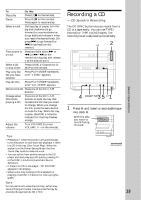
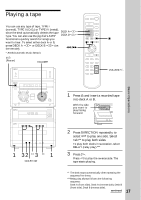
To Do this Stop play Press π (p on the remote). Pause Press ∏ (P on the remote). Press again to resume play. Select a track During play or pause, turn the jog dial clockwise (to go forward) or counterclockwise (to go back) and release it when you reach the desired track. (Or press + (to go forward) or = (to go back) on the remote.) Find a point in a track Press and hold down ) or 0 (or )/0 on the remote) during play and release it at the desired point. Select a CD Press a DISC 1~5 button (or D. in stop mode SKIP on the remote). Play only the CD you have selected Press PLAY MODE repeatedly until "1 DISC" appears. Play all CDs Press PLAY MODE repeatedly until "ALL DISCS" appears. Remove the CD Press one of the CD 1~5 § buttons. Change other CDs while playing a CD Press one of the CD 1~5 § buttons to open the tray that contains the CD that you want to change. When you change the CD, press the same button to close the tray. While the tray is open, the DISC 1~5 button indicator for that tray flashes orange. Adjust the volume Turn VOLUME (or press VOLUME +/- on the remote). Tips • Pressing · when the power is off automatically turns the power on and starts CD playback if there is a CD in the tray (One Touch Play). When the system is in the Power Saving Mode, the One Touch Play function does not work. • You can switch from another source to the CD player and start playing a CD just by pressing · or the DISC 1~5 buttons (Automatic Source Selection). • If there is no CD in the player, "CD NO DISC" appears in the display. • When a disc tray holding a CD is selected (or playing), the DISC 1~5 button for that tray lights green. Note Do not use force to close the disc tray, as this may cause CD player trouble. Always close the tray by pressing the appropriate CD 1~5 §. Recording a CD - CD Synchro Recording The CD SYNC button lets you record from a CD to a tape easily. You can use TYPE I (normal) or TYPE II (CrO2) tapes. The recording level is adjusted automatically. ª 2 · ∏ π § 1 2 3 4 5 ª· π ª· π § § 4 3 5 1 DOLBY NR π 1 Press § and insert a recordable tape into deck B. With the side you want to record facing forward § continued Basic Operations 13
-
 1
1 -
2
-
3
-
4
-
5
-
6
-
7
-
 8
8 -
 9
9 -
 10
10 -
 11
11 -
 12
12 -
 13
13 -
 14
14 -
 15
15 -
 16
16 -
 17
17 -
 18
18 -
19
-
20
-
21
-
22
-
23
-
24
-
25
-
26
-
27
-
28
-
29
-
30
-
31
-
32
-
33
-
34
-
35
-
36
-
37
-
38
-
39
-
40
-
41
-
42
-
43
-
44
-
45
-
46
-
47
-
48
-
49
-
50
-
51
-
52
 |
 |