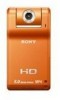
Sony MHS PM1 Instruction Manual - Page 24
Note on playback of movie files, MPEG-4 AVC/H.264, Installing PMB, Display, Others - video
 |
UPC - 027242765276
View all Sony MHS PM1 manuals
Add to My Manuals
Save this manual to your list of manuals |
Page 24 highlights
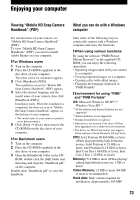
Display: DirectX 7 or later-compatible video card, Minimum 1,024 × 768 dots Others: USB port (this must be provided as standard, Hi-Speed USB (USB 2.0 compatible)) * For "PMB Portable", the disk volume required on using the program temporarily is approximately 1 GB. [ Note on playback of movie files (MPEG-4 AVC/H.264) To play back and editing movie files (MPEG-4 AVC/H.264) recorded by the camera, you need to install the software compatible with MPEG-4 AVC/H.264 or "PMB" on your computer. • Even under a PC environment where operations are guaranteed, sometimes images cannot be played back smoothly due to dropped frames. Note that the transferred image itself is not affected. • If you are using a notebook PC, be sure to use the PC with the AC adaptor plugged in. Sometimes normal operations are not possible due to the power savings function of the PC. b Note • Operations are not guaranteed, even on computers fulfilling the above system requirements. For example, other open or background applications currently running may limit product performance. [ Installing "PMB" You can install "PMB" using the following procedure. • Log on as Administrator. 1 Turn on your computer, and insert the CD-ROM (supplied) into the CD-ROM drive. The installation menu screen appears. • If it does not appear, double-click [Computer] (in Windows XP, [My Computer]) t (SONYPICTUTIL). • The AutoPlay screen may appear. Select "Run Install.exe." and follow the instructions that appear on the screen to proceed with the installation. 2 Click [Install]. The "Choose Setup Language" screen appears. 3 Select the desired language, then click [Next]. The "License Agreement" screen appears. 4 Read the agreement carefully. If you accept the terms of the agreement, click the radio button next to [I accept the terms of the license agreement] and then click [Next]. 5 Follow the instructions on the screen to complete the installation. • When the restarting confirmation message appears, restart the computer following the instructions on the screen. • DirectX may be installed depending on the system environment of your computer. 6 Remove the CD-ROM after the installation is complete. 24
-
 1
1 -
2
-
3
-
4
-
5
-
6
-
7
-
8
-
9
-
10
-
11
-
12
-
13
-
14
-
15
-
16
-
17
-
18
-
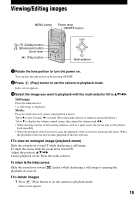 19
19 -
 20
20 -
 21
21 -
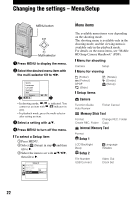 22
22 -
 23
23 -
 24
24 -
 25
25 -
 26
26 -
 27
27 -
 28
28 -
 29
29 -
30
-
31
-
32
-
33
-
34
-
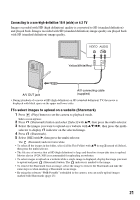
35
-
36
-
37
-
38
-
39
-
40
 |
 |