Sony MVC-CD200 Operating Instructions - Page 53
Setting the image size (IMAGE SIZE), Control button
 |
UPC - 027242589247
View all Sony MVC-CD200 manuals
Add to My Manuals
Save this manual to your list of manuals |
Page 53 highlights
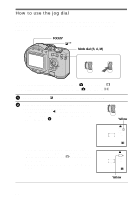
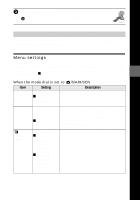
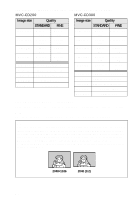
Before performing advanced operations Setting the image size (IMAGE SIZE) 1 3 Control button 2 1 Set the mode dial to , S, A, M, SCN, or . 2 Press MENU. The menu appears. 3 Select the desired image size with v/V on the control button from [ ] (IMAGE SIZE). Still image sizes: MVC-CD200: 1600×1200, 1600 (3:2)*, 1024×768, 640×480 MVC-CD300: 2048×1536, 2048 (3:2)*, 1600×1200, 1280×960, 640×480 ∗ The image is recorded in the ratio of three to two to fit the printing paper size. Using this image size, the margin of an image is not printed out. However, the slight amount of the upper and lower black portions are displayed on the LCD screen. Moving image (MPEG movie) sizes: 320 (HQ)*, 320×240, 160×112 ∗ High Quality mode Moving image (Clip Motion) sizes: MOBILE (80×72), NORMAL (160×120) 53
-
 1
1 -
2
-
3
-
4
-
5
-
6
-
7
-
8
-
9
-
10
-
11
-
12
-
13
-
14
-
15
-
16
-
17
-
18
-
19
-
20
-
21
-
22
-
23
-
24
-
25
-
26
-
27
-
28
-
29
-
30
-
31
-
32
-
33
-
34
-
35
-
36
-
37
-
38
-
39
-
40
-
41
-
42
-
43
-
44
-
45
-
46
-
47
-
 48
48 -
 49
49 -
 50
50 -
 51
51 -
 52
52 -
 53
53 -
 54
54 -
 55
55 -
 56
56 -
 57
57 -
 58
58 -
59
-
60
-
61
-
62
-
63
-
64
-
65
-
66
-
67
-
68
-
69
-
70
-
71
-
72
-
73
-
74
-
75
-
76
-
77
-
78
-
79
-
80
-
81
-
82
-
83
-
84
-
85
-
86
-
87
-
88
-
89
-
90
-
91
-
92
-
93
-
94
-
95
-
96
-
97
-
98
-
99
-
100
-
101
-
102
-
103
-
104
-
105
-
106
-
107
-
108
 |
 |
