Sony MZ-NH900 Operating Instructions - Page 70
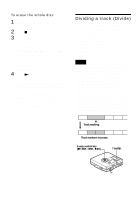
Dividing a track Divide
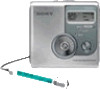 |
View all Sony MZ-NH900 manuals
Add to My Manuals
Save this manual to your list of manuals |
Page 70 highlights
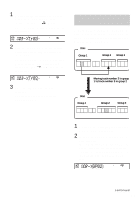
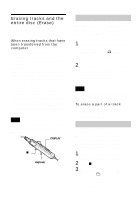
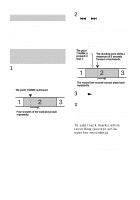
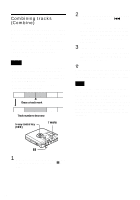
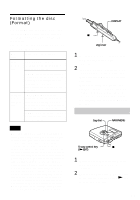
To erase the whole disc 1 Play the disc you want to erase to check the contents. 2 Press x. 3 Enter the menu and select "Edit" - "Erase" - "AllErase". "ALL TRACK Erase OK?" and "PUSH YES:ENTER NO:CANCEL" appear in the display. If the disc contains tracks that have been transferred from the computer, "TrkFromPC Erase OK?" appears in the display. 4 Press NENT to erase the whole disc. "SYSTEM FILE WRITING" appears in the display, and all the tracks will be erased. When erasing completes, "NO TRACK" appears in the display in Hi-MD mode and "BLANKDISC" and "00:00" appear in MD mode. Dividing a track (Divide) You can divide a track with a track mark, creating a new track from the part following the track mark. You can also make fine adjustments to the track mark position before making the actual division. The track numbers will increase as follows. This operation can be done on the recorder only. Notes • You cannot add a track mark on a track that has been transferred from your computer. • You cannot divide a track that has been recorded in Hi-MD mode using the MD Simple Burner software. • The Bookmark and Program settings will be erased if you carry out the Divide function. • You cannot divide a track at its beginning or end. • You cannot divide a track if after the division causes the total number of tracks on the disc to exceed the maximum allowed (2,047 tracks for a disc used in Hi-MD mode or 254 tracks for a standard disc). 1 2 Track marking 34 12345 Track numbers increase. 5-way control key (NENT, ., >) T MARK 70
-
 1
1 -
2
-
3
-
4
-
5
-
6
-
7
-
8
-
9
-
10
-
11
-
12
-
13
-
14
-
15
-
16
-
17
-
18
-
19
-
20
-
21
-
22
-
23
-
24
-
25
-
26
-
27
-
28
-
29
-
30
-
31
-
32
-
33
-
34
-
35
-
36
-
37
-
38
-
39
-
40
-
41
-
42
-
43
-
44
-
45
-
46
-
47
-
48
-
49
-
50
-
51
-
52
-
53
-
54
-
55
-
56
-
57
-
58
-
59
-
60
-
61
-
62
-
63
-
64
-
 65
65 -
 66
66 -
 67
67 -
 68
68 -
 69
69 -
 70
70 -
 71
71 -
 72
72 -
 73
73 -
 74
74 -
 75
75 -
76
-
77
-
78
-
79
-
80
-
81
-
82
-
83
-
84
-
85
-
86
-
87
-
88
-
89
-
90
-
91
-
92
-
93
-
94
-
95
-
96
-
97
-
98
-
99
-
100
-
101
-
102
-
103
-
104
-
105
-
106
-
107
-
108
-
109
-
110
-
111
-
112
-
113
-
114
-
115
-
116
-
117
-
118
-
119
-
120
-
121
-
122
-
123
-
124
-
125
-
126
-
127
-
128
-
129
-
130
-
131
-
132
-
133
-
134
-
135
-
136
 |
 |
