Sony MZ-RH10 User Manual - Page 36
Adding track marks while recording, Adding track marks manually, Adding track marks, while recording
 |
View all Sony MZ-RH10 manuals
Add to My Manuals
Save this manual to your list of manuals |
Page 36 highlights
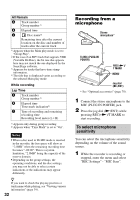
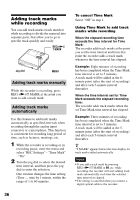
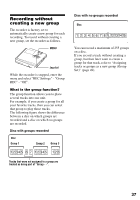
Adding track marks while recording You can add track marks (track number) while recording to divide the material into separate parts, that allow you to go to specific track quickly and easily. REC(+N)/ T MARK Jog dial MENU Adding track marks manually While the recorder is recording, press REC(+N)/T MARK at the point you want to add a track mark. Adding track marks automatically Use this feature to add track marks automatically at specified intervals when recording through the analog input connector or a microphone. This function is convenient for recording long period of time, such as lectures, meetings, etc. 1 While the recorder is recording or in recording pause, enter the menu and select "REC Settings" - "Time Mark" - "On". 2 Turn the jog dial to select the desired time interval, and then press the jog dial to enter the selection. One rotation changes the time setting (Time __ min) by 1 minute, within the range of 1 to 60 minutes. 36 To cancel Time Mark Select "Off" in step 1. Using Time Mark to add track marks while recording When the elapsed recording time exceeds the time interval for Time Mark: The recorder adds track marks at the point you set the time interval and from that point the recorder adds a track mark whenever the time interval has elapsed. Example: Eight minutes of recording has been completed when the Time Mark time interval is set to 5 minutes. A track mark will be added at the 8minute point (after the start of recording) and after each 5-minute interval thereafter. When the time interval set for Time Mark exceeds the elapsed recording time: The recorder adds track marks when the set Time Mark time interval has elapsed. Example: Three minutes of recording has been completed when the Time Mark time interval is set to 5 minutes. A track mark will be added at the 5minute point (after the start of recording) and after each 5-minute interval thereafter. z "T MARK" appears before the time display for track marks added automatically. Notes • If you add a track mark by pressing REC(+N)/T MARK or X, etc. while recording, the recorder will start adding track mark automatically each time the selected time interval as elapsed. • The setting is canceled when you connect a digital optical cable to the recorder.
-
 1
1 -
2
-
3
-
4
-
5
-
6
-
7
-
8
-
9
-
10
-
11
-
12
-
13
-
14
-
15
-
16
-
17
-
18
-
19
-
20
-
21
-
22
-
23
-
24
-
25
-
26
-
27
-
28
-
29
-
30
-
 31
31 -
 32
32 -
 33
33 -
 34
34 -
 35
35 -
 36
36 -
 37
37 -
 38
38 -
 39
39 -
 40
40 -
 41
41 -
42
-
43
-
44
-
45
-
46
-
47
-
48
-
49
-
50
-
51
-
52
-
53
-
54
-
55
-
56
-
57
-
58
-
59
-
60
-
61
-
62
-
63
-
64
-
65
-
66
-
67
-
68
-
69
-
70
-
71
-
72
-
73
-
74
-
75
-
76
-
77
-
78
-
79
-
80
-
81
-
82
-
83
-
84
-
85
-
86
-
87
-
88
-
89
-
90
-
91
-
92
-
93
-
94
-
95
-
96
-
97
-
98
-
99
-
100
-
101
-
102
-
103
-
104
-
105
-
106
-
107
-
108
-
109
-
110
-
111
-
112
-
113
-
114
-
115
-
116
-
117
-
118
-
119
 |
 |
