Sony PCV-R553DS Reference Manual - Page 49
Installing System Memory, Removing a Memory Module, Removing the Cover, Removing the Power Supply
 |
View all Sony PCV-R553DS manuals
Add to My Manuals
Save this manual to your list of manuals |
Page 49 highlights
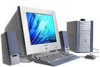
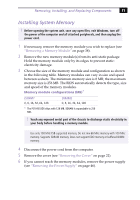
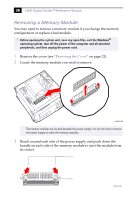
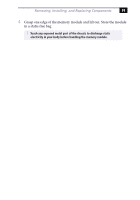
Removing, Installing, and Replacing Components 35 Installing System Memory ! Before opening the system unit, save any open files, exit Windows, turn off the power of the computer and all attached peripherals, and then unplug the power cord. 1 If necessary, remove the memory module you wish to replace (see "Removing a Memory Module" on page 38). 2 Remove the new memory module(s) from its anti-static package. Hold the memory module only by its edges to prevent staticelectricity damage. 3 Choose the size of the memory module and configuration as shown in the following table. Memory modules can vary in size and speed between sockets. The minimum memory size is 8 MB; the maximum memory size is 256 MB. The BIOS automatically detects the type, size and speed of the memory modules. Memory module configurations (MB)* DIMM1 0, 8, 16, 32, 64, 128 DIMM2 0, 8, 16, 32, 64, 128 * The PCV-R553DS ships with 128 MB. SDRAM is expandable to 256 MB. ! Touch any exposed metal part of the chassis to discharge static electricity in your body before handling a memory module. ✍ Use only 100 MHz FSB-supported memory. Do not mix 66 MHz memory with 100 MHz memory. Supports SDRAM memory. Does not support EDO memory or buffered DIMM memory. 4 Disconnect the power cord from the computer. 5 Remove the cover (see "Removing the Cover" on page 22). 6 If you cannot reach the memory modules, remove the power supply (see "Removing the Power Supply" on page 46).
-
 1
1 -
2
-
3
-
4
-
5
-
6
-
7
-
8
-
9
-
10
-
11
-
12
-
13
-
14
-
15
-
16
-
17
-
18
-
19
-
20
-
21
-
22
-
23
-
24
-
25
-
26
-
27
-
28
-
29
-
30
-
31
-
32
-
33
-
34
-
35
-
36
-
37
-
38
-
39
-
40
-
41
-
42
-
43
-
 44
44 -
 45
45 -
 46
46 -
 47
47 -
 48
48 -
 49
49 -
 50
50 -
 51
51 -
 52
52 -
 53
53 -
 54
54 -
55
-
56
-
57
-
58
-
59
-
60
-
61
-
62
-
63
-
64
-
65
-
66
-
67
-
68
-
69
-
70
-
71
-
72
-
73
-
74
-
75
-
76
-
77
-
78
-
79
-
80
-
81
-
82
-
83
-
84
-
85
-
86
-
87
-
88
-
89
-
90
-
91
-
92
-
93
-
94
-
95
-
96
-
97
-
98
-
99
-
100
-
101
-
102
-
103
-
104
-
105
-
106
-
107
-
108
-
109
-
110
-
111
-
112
-
113
-
114
-
115
-
116
-
117
-
118
-
119
-
120
-
121
-
122
 |
 |