Sony PCV-RS315 VAIO User Guide - Page 51
Recording from a CD, Change CD Recording Format
 |
View all Sony PCV-RS315 manuals
Add to My Manuals
Save this manual to your list of manuals |
Page 51 highlights
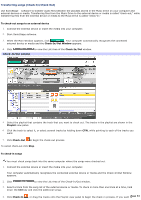
Recording from a CD You can record songs from audio CDs and add them to playlists in SonicStage software. When you record from an audio CD from your optical drive for the first time, the CD Drive Optimization dialog box appears. Click Start to verify your optical drive. After the verification is performed, recording begins. To record music from a CD 1. Insert an audio CD into your computer's optical drive. The Microsoft® Windows® system recognizes the CD, and a window may appear asking you to select an action. Click Cancel to close this window. When SonicStage software is running and an audio CD is inserted, an Internet connection to the CDDB® service is automatically launched to retrieve artist and track information. An error message is displayed if there is no Internet connection. Follow these steps to disable this function: 1. Click Menu. 2. Select CD Settings. 3. Clear the Start playing the CD automatically check box. 2. Start SonicStage software. 3. When the Main Window appears, click . The Recording Assistant Window appears. 4. Select the CD icon in the Source box, and then select the Music Drive icon in the Target box. 5. Click the Jump to Record Window button. The Record Window appears. 6. Click to view the List Area of the Record window. To select specific files on your CD, click to check or clear the check marks of the tracks on the CD. A check mark indicates you have selected that track for recording. Record Window 7. Click CD Info in the lower-left corner of the Record Window to launch the CDDB service, which names your CD and its song titles. Not all audio CDs support the CD Info button. 8. Click Change CD Recording Format in the Record Window to select a different recording format and bit rate. Page 51
-
 1
1 -
2
-
3
-
4
-
5
-
6
-
7
-
8
-
9
-
10
-
11
-
12
-
13
-
14
-
15
-
16
-
17
-
18
-
19
-
20
-
21
-
22
-
23
-
24
-
25
-
26
-
27
-
28
-
29
-
30
-
31
-
32
-
33
-
34
-
35
-
36
-
37
-
38
-
39
-
40
-
41
-
42
-
43
-
44
-
45
-
 46
46 -
 47
47 -
 48
48 -
 49
49 -
 50
50 -
 51
51 -
 52
52 -
 53
53 -
 54
54 -
 55
55 -
 56
56 -
57
-
58
-
59
-
60
-
61
-
62
-
63
-
64
-
65
-
66
-
67
-
68
-
69
-
70
-
71
-
72
-
73
-
74
-
75
-
76
-
77
-
78
-
79
-
80
-
81
-
82
-
83
-
84
-
85
-
86
-
87
-
88
-
89
-
90
-
91
-
92
-
93
-
94
-
95
-
96
-
97
-
98
-
99
-
100
-
101
-
102
-
103
-
104
-
105
-
106
-
107
-
108
-
109
-
110
-
111
-
112
-
113
-
114
-
115
-
116
-
117
-
118
-
119
-
120
-
121
-
122
-
123
-
124
-
125
-
126
-
127
-
128
-
129
-
130
-
131
-
132
-
133
-
134
-
135
-
136
-
137
-
138
-
139
-
140
-
141
-
142
-
143
-
144
-
145
-
146
-
147
-
148
-
149
-
150
-
151
-
152
-
153
-
154
-
155
-
156
-
157
-
158
-
159
-
160
-
161
 |
 |
