Sony PCV-RS315 VAIO User Guide - Page 85
Starting DVgate software, IN/OUT list
 |
View all Sony PCV-RS315 manuals
Add to My Manuals
Save this manual to your list of manuals |
Page 85 highlights
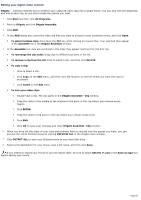
Starting DVgate software 1. Click Start on the Windows® taskbar and point to All Programs. 2. Point to DVgate and click DVgate. To capture digital video 1. Select IMPORT - Auto from the MODE list in the DVgate window, and click SCAN. The DVgate software scans your tape and creates a list of video clips for capture. You can manually select video clips to be captured, while viewing playback of your tape in the Monitor window. For details, refer to DVgate Plus software Help. 2. If necessary, edit the list of video clips. To delete a clip: Select it and then click DELETE. To change the clip capture order: Drag the individual clips to different locations on the list. 3. To capture all the video clips on the IN/OUT list, click CAPTURE ALL. To capture an individual clip, click to select it in the IN/OUT list window and click CAPTURE. 4. In the Save as a file window, type a name for the file and choose a location to save your video clips. The default save location is on drive D. 5. Click Save. Page 85
-
 1
1 -
2
-
3
-
4
-
5
-
6
-
7
-
8
-
9
-
10
-
11
-
12
-
13
-
14
-
15
-
16
-
17
-
18
-
19
-
20
-
21
-
22
-
23
-
24
-
25
-
26
-
27
-
28
-
29
-
30
-
31
-
32
-
33
-
34
-
35
-
36
-
37
-
38
-
39
-
40
-
41
-
42
-
43
-
44
-
45
-
46
-
47
-
48
-
49
-
50
-
51
-
52
-
53
-
54
-
55
-
56
-
57
-
58
-
59
-
60
-
61
-
62
-
63
-
64
-
65
-
66
-
67
-
68
-
69
-
70
-
71
-
72
-
73
-
74
-
75
-
76
-
77
-
78
-
79
-
 80
80 -
 81
81 -
 82
82 -
 83
83 -
 84
84 -
 85
85 -
 86
86 -
 87
87 -
 88
88 -
 89
89 -
 90
90 -
91
-
92
-
93
-
94
-
95
-
96
-
97
-
98
-
99
-
100
-
101
-
102
-
103
-
104
-
105
-
106
-
107
-
108
-
109
-
110
-
111
-
112
-
113
-
114
-
115
-
116
-
117
-
118
-
119
-
120
-
121
-
122
-
123
-
124
-
125
-
126
-
127
-
128
-
129
-
130
-
131
-
132
-
133
-
134
-
135
-
136
-
137
-
138
-
139
-
140
-
141
-
142
-
143
-
144
-
145
-
146
-
147
-
148
-
149
-
150
-
151
-
152
-
153
-
154
-
155
-
156
-
157
-
158
-
159
-
160
-
161
 |
 |
