Sony PMW-EX3 Operating Instructions - Page 33
Adjusting the Lens, Adjusting the Flange Focal Length - lenses
 |
View all Sony PMW-EX3 manuals
Add to My Manuals
Save this manual to your list of manuals |
Page 33 highlights
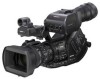
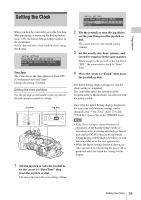
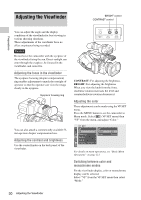
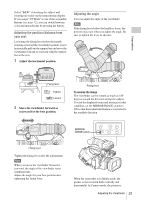
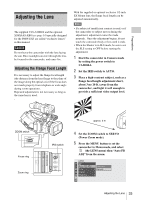
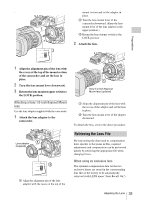
Preparations VIDEO S MONOITUOTR IN DC Adjusting the Lens The supplied VCL-614B2X and the optional XS8X4AS-XB8 (see page 34) specially designed for the PMW-EX3 are called "exclusive lenses" in this manual. Caution Do not leave the camcorder with the lens facing the sun. Direct sunlight can enter through the lens, be focused in the camcorder, and cause fire. Adjusting the Flange Focal Length It is necessary to adjust the flange focal length (the distance from the lens flange to the plane of the image along the optical axis) if the focus does not match properly from telephoto to wide angle during zoom operations. Repeated adjustment is not necessary as long as the same lens is used. With the supplied or optional exclusive 1/2-inch EX Mount lens, the flange focal length can be adjusted automatically. Notes • If a subject of insufficient contrast is used, or if the camcorder or subject moves during the adjustment, adjustment cannot be made properly. Once the adjustment begins, do not touch the camcorder body or lens until it ends. • When the Shutter is in SLS mode, be sure to set the SLS setting to OFF before starting the adjustment. 1 Start the camcorder in Camera mode by setting the power switch to CAMERA. 2 Set the IRIS switch to AUTO. 3 Place a high-contrast subject, such as a flange focal length adjustment chart, about 3 m (10 ft.) away from the camcorder, and light it well enough to provide a sufficient video output level. CH-1 AUDIO OCUHT-2 COMOPUOTNENT ZOOM switch ZOOM MANU SERVO BARTETLEERAYSE B TC/U-BIT/DURATION A TRANSSIHTIOTON RREECVIEW RELEASE STARSTT/OP EXPAFNODCEUDS CONTRAST PEAKING MIRROR IMAGE ON DISPLAY/BATT INFO OFF BRIGHT ZEBRA H L OFF L MONITOR VOL THUMNAIL SEL/SET F REV j PREV l s PLAY/PAUSEG/S J F FWD CANCEL R CH-1 AUDIO IN CH-2 LINE MIC MIC+48V LINE MIC MIC+48V IRIS switch C 16 8 5.6 4 2.8 1.9 Focus ring Zoom ring FULL AF MF 10 15 30 ft 35 10 mm 5.8 10 15 25 40 81.2 STEADY SHOT IRIS MANU AUTO MACRO OFF ON FOCUS MANU AUTO PUSH AF approx. 3 m 4 Set the ZOOM switch to SERVO (Power Zoom mode). 5 Press the MENU button to set the camcorder to Menu mode, and select (the LENS menu) then "Auto FB ADJ" from the menu. LENS Auto FB ADJ File Flare 00:00 Shad i n g Execute B Cancel B B Adjusting the Lens 33
-
 1
1 -
2
-
3
-
4
-
5
-
6
-
7
-
8
-
9
-
10
-
11
-
12
-
13
-
14
-
15
-
16
-
17
-
18
-
19
-
20
-
21
-
22
-
23
-
24
-
25
-
26
-
27
-
 28
28 -
 29
29 -
 30
30 -
 31
31 -
 32
32 -
 33
33 -
 34
34 -
 35
35 -
 36
36 -
 37
37 -
 38
38 -
39
-
40
-
41
-
42
-
43
-
44
-
45
-
46
-
47
-
48
-
49
-
50
-
51
-
52
-
53
-
54
-
55
-
56
-
57
-
58
-
59
-
60
-
61
-
62
-
63
-
64
-
65
-
66
-
67
-
68
-
69
-
70
-
71
-
72
-
73
-
74
-
75
-
76
-
77
-
78
-
79
-
80
-
81
-
82
-
83
-
84
-
85
-
86
-
87
-
88
-
89
-
90
-
91
-
92
-
93
-
94
-
95
-
96
-
97
-
98
-
99
-
100
-
101
-
102
-
103
-
104
-
105
-
106
-
107
-
108
-
109
-
110
-
111
-
112
-
113
-
114
-
115
-
116
-
117
-
118
-
119
-
120
-
121
-
122
-
123
-
124
-
125
-
126
-
127
-
128
-
129
-
130
-
131
-
132
-
133
-
134
-
135
-
136
-
137
-
138
-
139
-
140
-
141
-
142
-
143
-
144
-
145
-
146
-
147
-
148
-
149
-
150
-
151
-
152
-
153
-
154
-
155
-
156
-
157
-
158
-
159
-
160
-
161
 |
 |