Sony PMWF3K Operating Instructions - Page 109
Lcd/vf Set Menu, Video Set, Lcd/vf Set
 |
View all Sony PMWF3K manuals
Add to My Manuals
Save this manual to your list of manuals |
Page 109 highlights
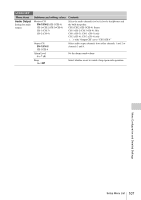
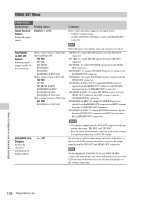
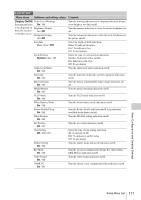
VIDEO SET Menu items Setting values Video Out Display Setting the character information for the composite output On / Off Down Converter Selecting the operation mode of the down converter Squeeze / Letterbox / Edge Crop 23.98P Output Selecting Output mode Dual-Link & Gamma Select Setting the duallink output 59.94i (2-3PullDown)/ 23.98PsF Off / 1.5G YPbPr422 & Video Contents Set whether to add the same menus and status indications as those on the LCD monitor/viewfinder screen to the output signal from the VIDEO OUT connector. Note On the thumbnail, EXPAND CLIP and SHOT MARK screens, the same menus and status indications as those on the LCD monitor/viewfinder screen are displayed regardless of the setting of this item. Set the output mode (aspect) for SD signals Squeeze: To horizontally reduce a 16:9 picture to output a 4:3 picture Letterbox: To mask the upper and lower areas of a 4:3 picture to display a 16:9 picture in the center of the screen Edge Crop: To cut the both sides of a 16:9 picture to output a 4:3 picture Select the video output format when the video format is HQ 1920/23.98P or HQ 1440/23.98P (invalid with video formats other than HQ 1920/23.98P and HQ 1440/23.98P). Set the output from the HD SDI A/B connectors. Off: No signal output 1.5G YPbPr422 & Video: To output 1.5G Dual-Link HD-SDI signal using both the A and B connectors. Note SDI Rec Control Setting the synchronized recording Off / HD SDI Remote I/F The following choices become available when the corresponding options are added. 1.5G RGB444 & Video 1.5G RGB444 & S-Log 3G YPbPr422 & Video 3G RGB444 & Video 3G RGB444 & S-Log To turn the function to enabling recording synchronized with this camcorder. HD SDI Remote I/F: To feed a REC trigger signal to a recorder connected to the SDI OUT and HD SDI A/B connectors. LCD/VF SET Menu LCD/VF SET Menu items Subitems and setting values Contents LCD Color Adjusting the LCD -99 to +99 (±0) monitor Contrast -99 to +99 (±0) Adjust the color of pictures on the LCD monitor. Adjust the contrast of pictures on the LCD monitor. Brightness -99 to +99 (±0) Adjust the brightness of pictures on the LCD monitor. Menu Configuration and Detailed Settings Setup Menu List 109
-
 1
1 -
2
-
3
-
4
-
5
-
6
-
7
-
8
-
9
-
10
-
11
-
12
-
13
-
14
-
15
-
16
-
17
-
18
-
19
-
20
-
21
-
22
-
23
-
24
-
25
-
26
-
27
-
28
-
29
-
30
-
31
-
32
-
33
-
34
-
35
-
36
-
37
-
38
-
39
-
40
-
41
-
42
-
43
-
44
-
45
-
46
-
47
-
48
-
49
-
50
-
51
-
52
-
53
-
54
-
55
-
56
-
57
-
58
-
59
-
60
-
61
-
62
-
63
-
64
-
65
-
66
-
67
-
68
-
69
-
70
-
71
-
72
-
73
-
74
-
75
-
76
-
77
-
78
-
79
-
80
-
81
-
82
-
83
-
84
-
85
-
86
-
87
-
88
-
89
-
90
-
91
-
92
-
93
-
94
-
95
-
96
-
97
-
98
-
99
-
100
-
101
-
102
-
103
-
 104
104 -
 105
105 -
 106
106 -
 107
107 -
 108
108 -
 109
109 -
 110
110 -
 111
111 -
 112
112 -
 113
113 -
 114
114 -
115
-
116
-
117
-
118
-
119
-
120
-
121
-
122
-
123
-
124
-
125
-
126
-
127
-
128
-
129
-
130
-
131
-
132
-
133
-
134
-
135
-
136
-
137
-
138
-
139
-
140
-
141
-
142
-
143
-
144
-
145
-
146
-
147
-
148
-
149
-
150
 |
 |