Sony PMWF3K Operating Instructions - Page 60
Interval Recording, Preparatory Settings, Performing Interval Recording
 |
View all Sony PMWF3K manuals
Add to My Manuals
Save this manual to your list of manuals |
Page 60 highlights
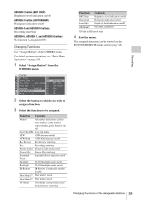
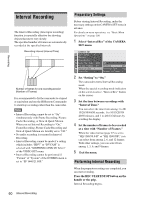
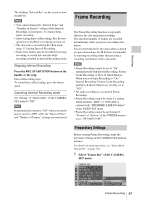
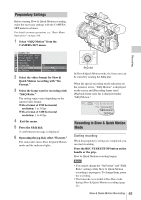
Recording Interval Recording The Interval Recording (time-lapse recording) function is especially effective for shooting objects that move very slowly. The specified number of frames are automatically recorded at the specified intervals. Recording interval (Interval Time) Number of frames for one recording session (Number of Frames) It is recommended to fix the camcorder to a tripod or equivalent and use the IR Remote Commander to start/stop recording rather than the camcorder. Notes • Interval Recording cannot be set to "On" simultaneously with Frame Recording, Picture Cache Recording, or Slow & Quick Motion. When you set Interval Recording to "On," Frame Recording, Picture Cache Recording and Slow & Quick Motion are forcibly set to "Off." • No audio recording is executed in Interval Recording. • Interval Recording cannot be made if a setting which includes "HDV" or "DVCAM" is selected with "SDI/HDMI/i.LINK I/O Select" of the VIDEO SET menu. • Interval Recording cannot be performed if "Format" of "System" of the OTHERS menu is set to "SP 1440/23.98P." Preparatory Settings Before starting Interval Recording, make the necessary settings on the CAMERA SET menu in advance. For details on menu operations, see "Basic Menu Operations" on page 100. 1 Select "Interval Rec" of the CAMERA SET menu. CAMERA SET Gain Setup B Shu t t e r B Slow Shut t e r B Color Bar Type : Mul t i 00:00 F l i c ker Reduce : O f f I n t e r val Rec B Frame Rec B Set ting : Off I n t e r v a l Time : 1sec Number of Frames : 1 2 Set "Setting" to "On." The camcorder enters Interval Recording mode. When the special recording mode indication on the screen is active, "Interval Rec" flashes on the screen. 3 Set the time between recordings with "Interval Time." You can select the time from among 1 to10/ 15/20/30/40/50 seconds, 1 to 10/15/20/30/ 40/50 minutes, and 1 to 4/6/12/24 hours by scrolling the display. 4 Set the number of frames to be recorded at a time with "Number of Frames." When the video format (page 37) is set to "HQ 1280/59.94P" or "HQ 1280/50P," you can select from among 2, 6, and 12 frames. With other settings, you can select from among 1, 3, 6, and 9 frames. 5 Exit the menu. Performing Interval Recording When the preparatory settings are completed, you can start recording. Press the REC START/STOP button on the handle or the grip. Interval Recording begins. 60 Interval Recording
-
 1
1 -
2
-
3
-
4
-
5
-
6
-
7
-
8
-
9
-
10
-
11
-
12
-
13
-
14
-
15
-
16
-
17
-
18
-
19
-
20
-
21
-
22
-
23
-
24
-
25
-
26
-
27
-
28
-
29
-
30
-
31
-
32
-
33
-
34
-
35
-
36
-
37
-
38
-
39
-
40
-
41
-
42
-
43
-
44
-
45
-
46
-
47
-
48
-
49
-
50
-
51
-
52
-
53
-
54
-
 55
55 -
 56
56 -
 57
57 -
 58
58 -
 59
59 -
 60
60 -
 61
61 -
 62
62 -
 63
63 -
 64
64 -
 65
65 -
66
-
67
-
68
-
69
-
70
-
71
-
72
-
73
-
74
-
75
-
76
-
77
-
78
-
79
-
80
-
81
-
82
-
83
-
84
-
85
-
86
-
87
-
88
-
89
-
90
-
91
-
92
-
93
-
94
-
95
-
96
-
97
-
98
-
99
-
100
-
101
-
102
-
103
-
104
-
105
-
106
-
107
-
108
-
109
-
110
-
111
-
112
-
113
-
114
-
115
-
116
-
117
-
118
-
119
-
120
-
121
-
122
-
123
-
124
-
125
-
126
-
127
-
128
-
129
-
130
-
131
-
132
-
133
-
134
-
135
-
136
-
137
-
138
-
139
-
140
-
141
-
142
-
143
-
144
-
145
-
146
-
147
-
148
-
149
-
150
 |
 |
