Sony RCP-1500 Operation Guide - Page 30
Setting the LAN Connection, Setting LEGACY Mode, Network], LAN°I/F]
 |
View all Sony RCP-1500 manuals
Add to My Manuals
Save this manual to your list of manuals |
Page 30 highlights
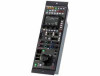
Setting the LAN Connection When connecting using a LAN cable, set the LAN I/F as follows: 1 Enter engineer mode. (page 51) 2 Press the MENU button. The menu closes and the control panel remains in engineer mode. 3 Display the RCP Config screen. (page 50) RCP Config Engineer Mode Exit Customize Date /Time Display /Sound Network Mode Information VR Setting Security Option Key Backup 4 Press [Network]. The Network screen appears. Network Engineer Mode Exit Network Info CNS LAN I/F TCP/IP LAN I/F: Sets LAN I/F to OFF. Negotiation AUTO: The connection settings for the target equipment are configured automatically. Use AUTO only when the target equipment also supports the Auto Negotiation function. Speed 10M/100M: Sets the connection speed. Duplex Half/Full: Sets the communication method: Half (half duplex) or Full (full duplex). Setting LEGACY Mode Set the control panel to LEGACY mode when connecting without using a LAN cable. When the control panel is connected, for example, to a multi-camera system with a CNU-700 or to a LAN system and a LAN cable is not directly connected to the control panel, always set the control panel to LEGACY mode. The TCP/IP and RCP number do not need to be set. 1 Enter engineer mode. (page 51) 2 Press the MENU button. The menu closes and the control panel remains in engineer mode. 3 Display the RCP Config screen. (page 50) RCP Config Engineer Mode Exit Customize Date /Time Display /Sound Network Mode Information VR Setting Security 5 Press [LAN I/F]. The LAN I/F screen appears. The Speed and Duplex buttons are not displayed when Negotiation is set to AUTO, as the Speed/Duplex setting is made automatically. LAN I/F Engineer Mode Exit LAN I/F OFF Negotiation AUTO Speed 10M 100M Duplex Half Full Option Key 4 Press [Network]. The Network screen appears. Network Engineer Mode Backup Exit Network Info CNS LAN I/F TCP/IP Set Cancel This screen allows settings for the equipment for LAN connection. Perform the setting according to the connection requirements for the target. 30
-
 1
1 -
2
-
3
-
4
-
5
-
6
-
7
-
8
-
9
-
10
-
11
-
12
-
13
-
14
-
15
-
16
-
17
-
18
-
19
-
20
-
21
-
22
-
23
-
24
-
 25
25 -
 26
26 -
 27
27 -
 28
28 -
 29
29 -
 30
30 -
 31
31 -
 32
32 -
 33
33 -
 34
34 -
 35
35 -
36
-
37
-
38
-
39
-
40
-
41
-
42
-
43
-
44
-
45
-
46
-
47
-
48
-
49
-
50
-
51
-
52
-
53
-
54
-
55
-
56
-
57
-
58
-
59
-
60
-
61
-
62
-
63
-
64
-
65
-
66
-
67
-
68
-
69
-
70
-
71
-
72
-
73
-
74
-
75
-
76
-
77
-
78
-
79
-
80
-
81
-
82
-
83
-
84
-
85
-
86
-
87
-
88
 |
 |
