Sony RDR VX530 Operating Instructions - Page 100

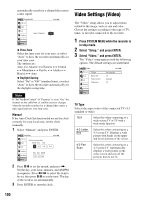
Video Settings (Video), Manual, Press SYSTEM MENU while the recorder is, in stop mode., Select Setup

Page 100 highlights

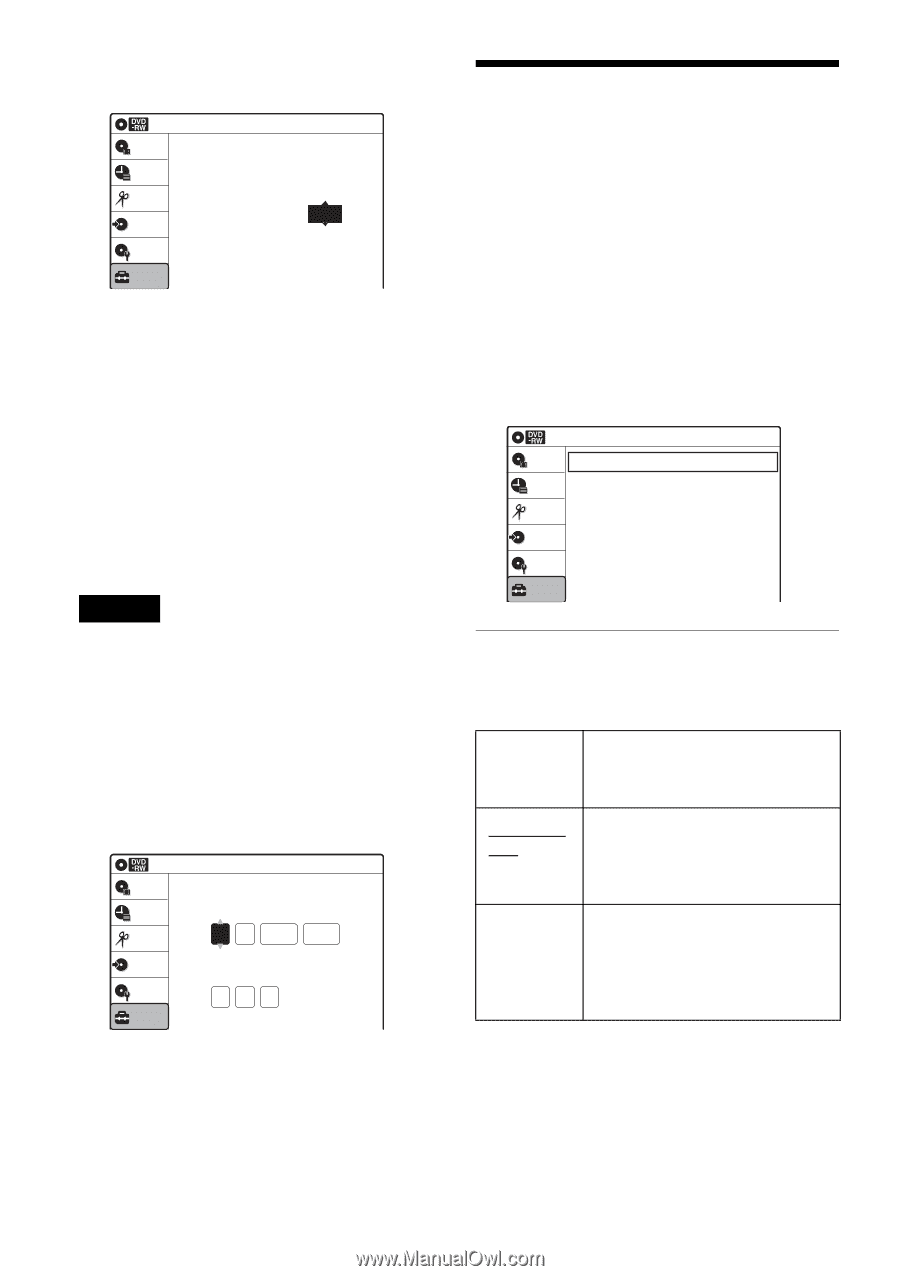
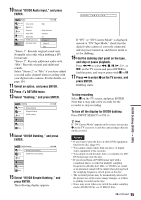
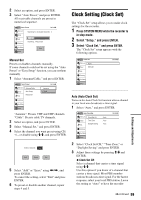
automatically search for a channel that carries a time signal. Clock Set CH Title List Timer Edit Dubbing Select a Channel: Disc Setting Setup 10:10 AM Auto ◆ Time Zone Select the time zone for your area, or select "Auto" to have the recorder automatically set your time zone. The options are: Auto y Atlantic y Eastern y Central y Mountain y Pacific y Alaska y Hawaii y Auto ◆ Daylight Saving Select "On" or "Off" (standard time), or select "Auto" to have the recorder automatically set the daylight saving time. Note If "Set Top Box Control" of "Features" is set to "On," the channel on the cable box or satellite receiver changes when the recorder searches for a channel that carries a time signal and sets your time zone. Manual If the Auto Clock Set function did not set the clock correctly for your local area, set the clock manually. 1 Select "Manual," and press ENTER. Clock Set Title List Timer Set the time and date. Month Day Year Edit 01 01 2006 Dubbing Disc Setting Setup Hour Min AM/PM 10 : 10 AM 10:10 AM Sun 2 Press M/m to set the month, and press ,. Set the day, year, hour, minutes, and AM/PM in sequence. Press

  • 1
  • 2
  • 3
  • 4
  • 5
  • 6
  • 7
  • 8
  • 9
  • 10
  • 11
  • 12
  • 13
  • 14
  • 15
  • 16
  • 17
  • 18
  • 19
  • 20
  • 21
  • 22
  • 23
  • 24
  • 25
  • 26
  • 27
  • 28
  • 29
  • 30
  • 31
  • 32
  • 33
  • 34
  • 35
  • 36
  • 37
  • 38
  • 39
  • 40
  • 41
  • 42
  • 43
  • 44
  • 45
  • 46
  • 47
  • 48
  • 49
  • 50
  • 51
  • 52
  • 53
  • 54
  • 55
  • 56
  • 57
  • 58
  • 59
  • 60
  • 61
  • 62
  • 63
  • 64
  • 65
  • 66
  • 67
  • 68
  • 69
  • 70
  • 71
  • 72
  • 73
  • 74
  • 75
  • 76
  • 77
  • 78
  • 79
  • 80
  • 81
  • 82
  • 83
  • 84
  • 85
  • 86
  • 87
  • 88
  • 89
  • 90
  • 91
  • 92
  • 93
  • 94
  • 95
  • 96
  • 97
  • 98
  • 99
  • 100
  • 101
  • 102
  • 103
  • 104
  • 105
  • 106
  • 107
  • 108
  • 109
  • 110
  • 111
  • 112
  • 113
  • 114
  • 115
  • 116
  • 117
  • 118
  • 119
  • 120
  • 121
  • 122
  • 123
  • 124
  • 125
  • 126
  • 127
  • 128
  • 129
  • 130
  • 131
  • 132

100
automatically search for a channel that carries
a time signal.
Time Zone
Select the time zone for your area, or select
“Auto” to have the recorder automatically set
your time zone.
The options are:
Auto
y
Atlantic
y
Eastern
y
Central
y
Mountain
y
Pacific
y
Alaska
y
Hawaii
y
Auto
Daylight Saving
Select “On” or “Off” (standard time), or select
“Auto” to have the recorder automatically set
the daylight saving time.
Note
If “Set Top Box Control” of “Features” is set to “On,” the
channel on the cable box or satellite receiver changes
when the recorder searches for a channel that carries a
time signal and sets your time zone.
Manual
If the Auto Clock Set function did not set the clock
correctly for your local area, set the clock
manually.
1
Select “Manual,” and press ENTER.
2
Press
M
/
m
to set the month, and press
,
.
Set the day, year, hour, minutes, and AM/PM
in sequence. Press
<
/
,
to select the item to
be set, then press
M
/
m
to set the item. The day
of the week is set automatically.
3
Press ENTER to start the clock.
Video Settings (Video)
The “Video” setup allows you to adjust items
related to the image, such as size and color.
Choose the settings according to the type of TV,
tuner, or decoder connected to the recorder.
1
Press SYSTEM MENU while the recorder is
in stop mode.
2
Select “Setup,” and press ENTER.
3
Select “Video,” and press ENTER.
The “Video” setup appears with the following
options. The default settings are underlined.
TV Type
Selects the aspect ratio of the connected TV (4:3
standard or wide).
Clock Set CH
10:10 AM
Select a Channel:
Auto
Setup
Disc Setting
Edit
Title List
Timer
Dubbing
2006
Sun
01
01
10 :
10
AM
10:10 AM
Clock Set
Set the time and date.
Hour Min
AM/PM
Month Day
Year
Setup
Disc Setting
Edit
Title List
Timer
Dubbing
16:9
Select this when connecting to a
wide-screen TV or TV with a
wide mode function.
4:3 Letter
Box
Select this when connecting to a
4:3 screen TV. Displays a wide
picture with bands on the upper
and lower portions of the screen.
4:3 Pan
Scan
Select this when connecting to a
4:3 screen TV. Automatically
displays a wide picture on the
entire screen and cuts off the
portions that do not fit.
Video
10:10 AM
TV Type
Black Level
Picture Control
Progressive
:
Standard
:
Off
:
4:3 Letter Box
:
On
Setup
Disc Setting
Edit
Title List
Timer
Dubbing